# Vue3 的优势
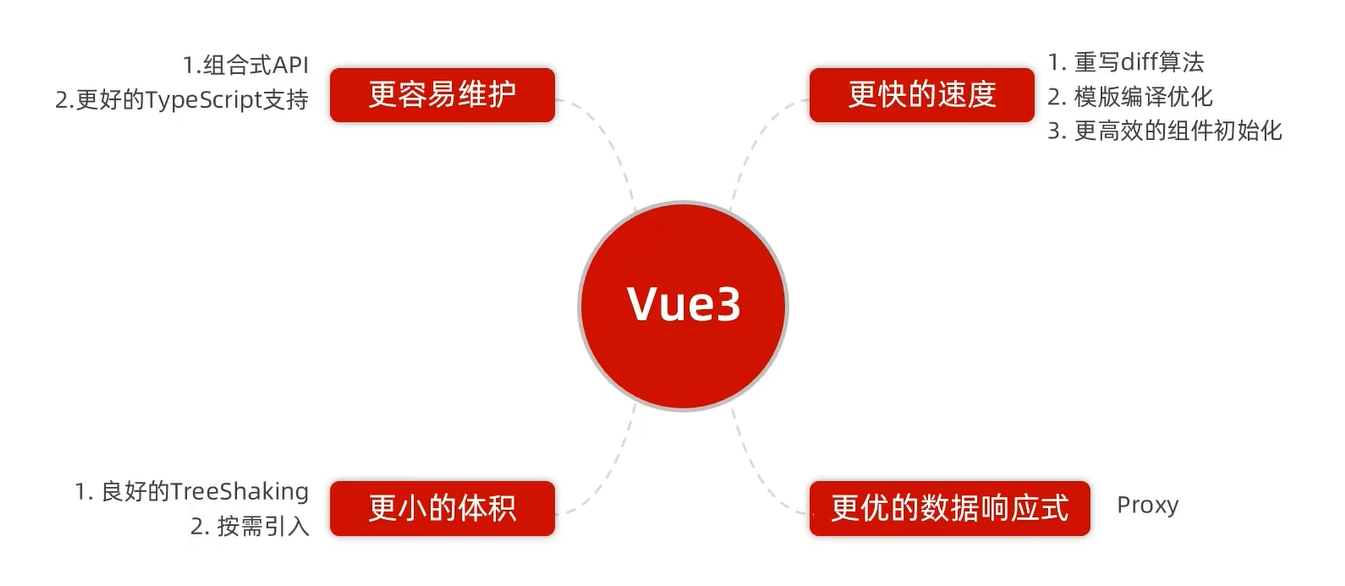
组合式 API
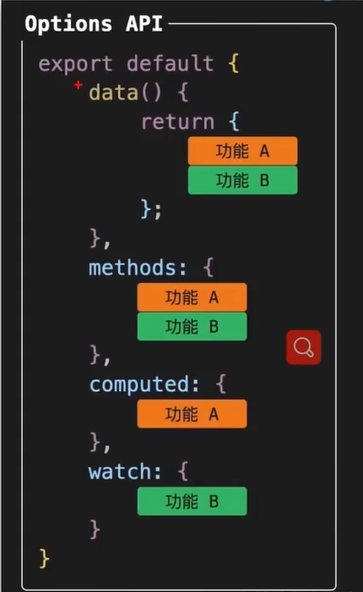
- 之前写的 vue2 是选项是 API 那什么是选项是 API 呢,如下:
![image-20230830085720920]()
就是在整个配置项当中有一个一个选项 data (数据),methods (函数),computed (计算属性),wattch (侦听器)。
特征:如果要实现一个功能,实际上我们需要分散式的将代码散落到各个配置项当中。
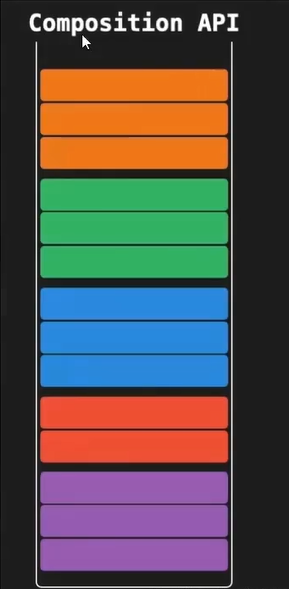
- vue3 当中改成了 Composition API
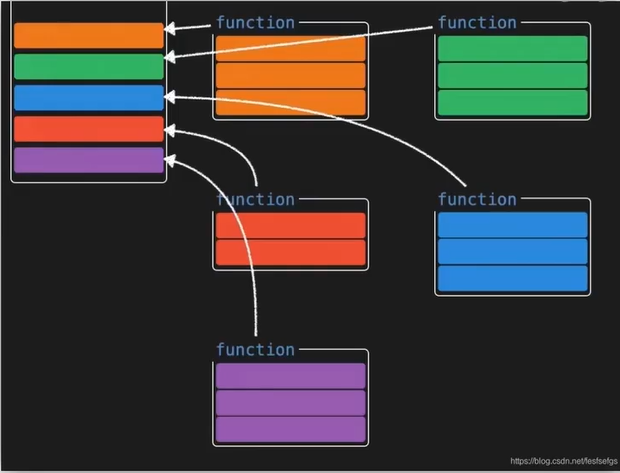
- Composition API 提供数据再也不用到 data 当中 提供了,而是可以调用方法的时候提供。直接将我们同功能相关的内容进行 集合式的管理
- 好处:如果要改造某一块的功能假设有 8 百行代码,那么我们不需要关注其它 750 行代码在干嘛,只需要关注与该功能模块里面代码
![image-20230830090144717]()
![image-20230830090745930]()
# 认识 create-vue
create-vue 是 Vue<font title='red'> 官方新的脚手架工具 </font>,底层切换到了 < font title='red'>vite (下一代构架工具) </font>,为开发提供极速响应
# 使用 create-vue 创建项目
# 1 前提环境条件
已安装 <span alt='solid'>16.0 或更高版本 </span > 的 Node.js
node -v
# 2 创建一个 Vue 应用
npm ini vue@latest
这一指令将会安装并执行 create-vue
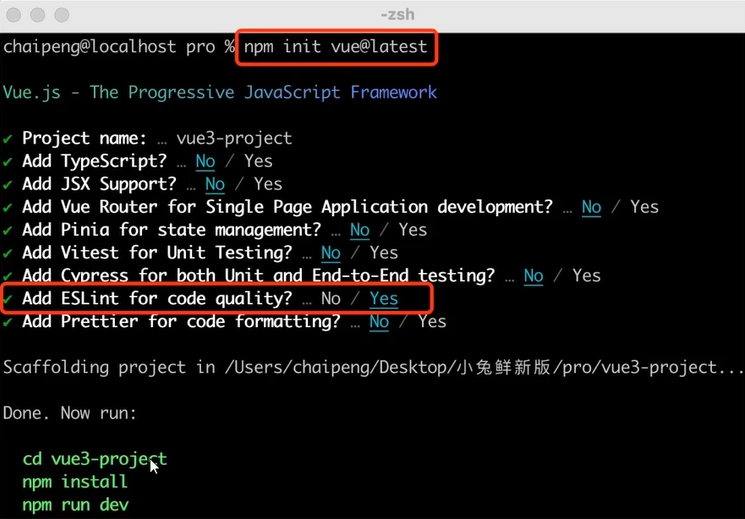
# 3 启动 vue 应用
cd 到 项目根目录下 执行命令: npm install 安装一下依赖
执行命令启动项目: npm run dev
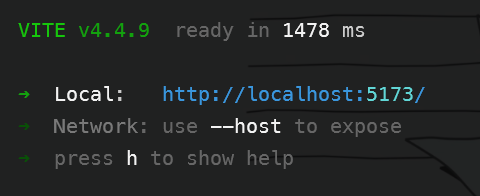
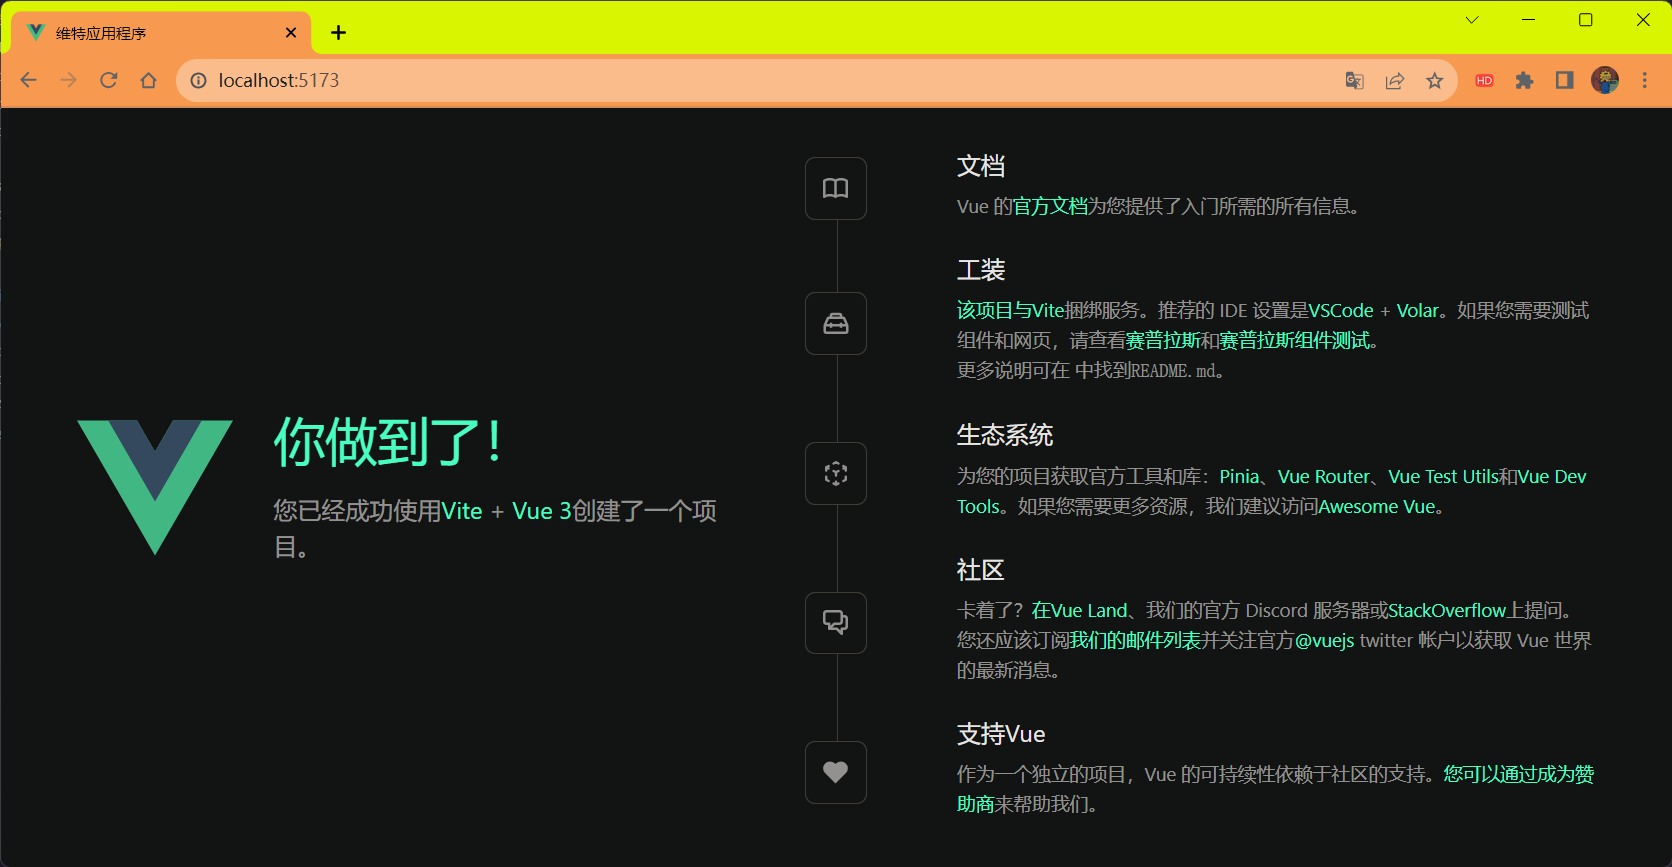
访问地址查看是否成功的启动了。
# 熟悉项目目录和关键文件
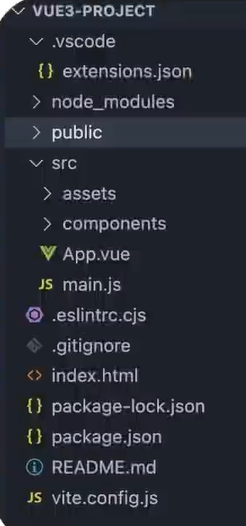
关键文件:
vite.config.js - 项目的配置文件 <font title='red'> 基于 vite 的配置 </font>.
package.json - 项目包文件 <font title='red'> 核心依赖项变成了 vue3.x 和 vite</font>.
main.js - 入口文件 <font title='red'>createApp 函数创建应用实例 </font>.
app.vue - 根组件 <font title='red'>SFC 单文件组件 script - template -style</font>.
变化一:脚本 script 和模版 template 顺序调整
变化二:模版 template 不再要求唯一根元素
变化三:脚本 script 添加 setup 标识支持组合式 API
index.html - 单页入口 <font title='red'> 提供 id 为 app 的挂载点 </font>.
vscode 中两个不同的插件启用其中一个禁用其中一个。
在 vscode 中 vue2 的插件是:Vetur

在 vscode 中 vue3 的插件是:Vue Language Features

# 组合式 API
# 组合式 API - setup 选项
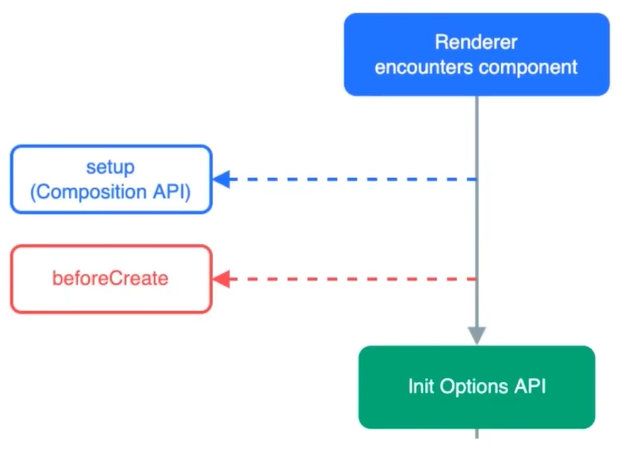
# setup 选项的写法和执行时机
<script> | |
export default { | |
//setup | |
//1. 执行时机,比 beforeCreate 还要早 | |
//2.setup 函数中,获取不到 this (this 是 undefined) | |
setup() { | |
console.log('setup函数', this) | |
}, | |
beforeCreate() { | |
console.log('beforeCreate函数') | |
} | |
} | |
</script> |
# setup 选项中写代码的特点
数据 和 函数,需要在 setup 最后 return,才能在模版中应用
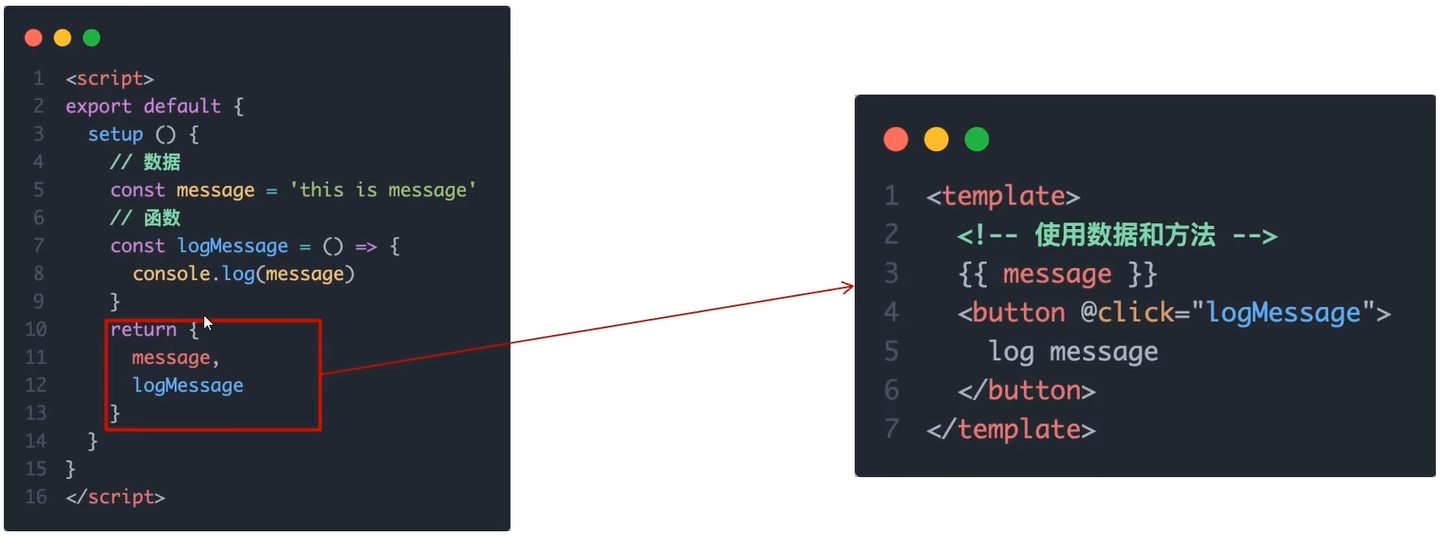
明确了,在 setup 中写代码的特点需要 return 每次需要 return 太麻烦了。所以不得不提到 script setup 语法糖
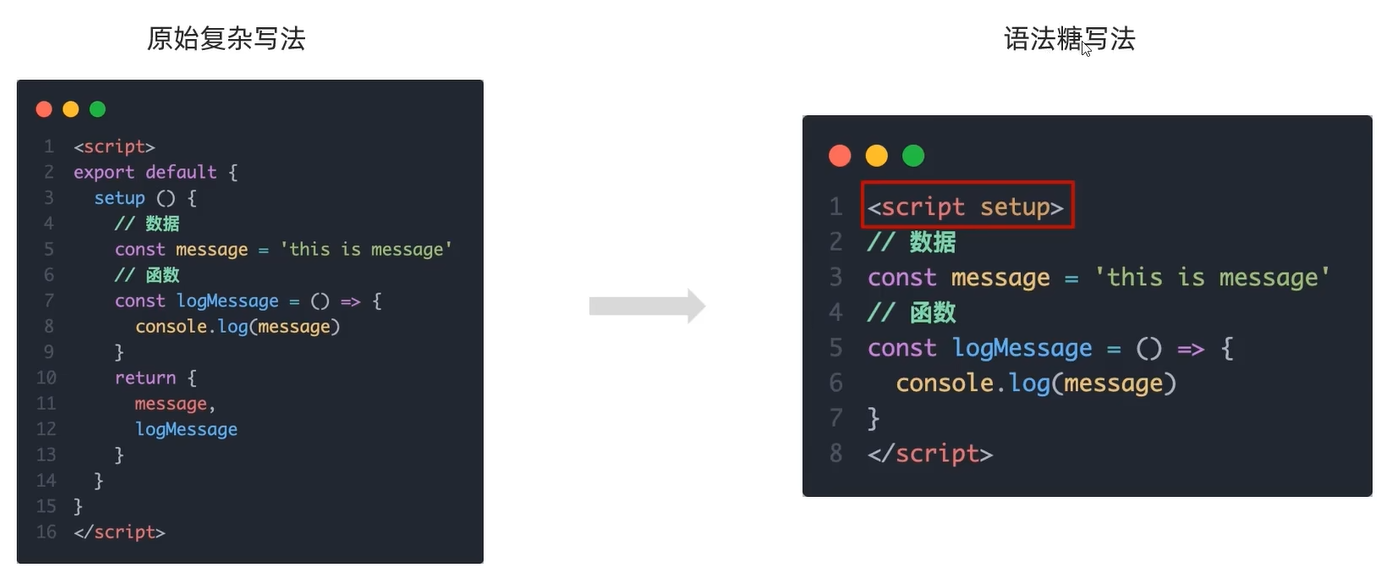
# script setup 语法糖原理
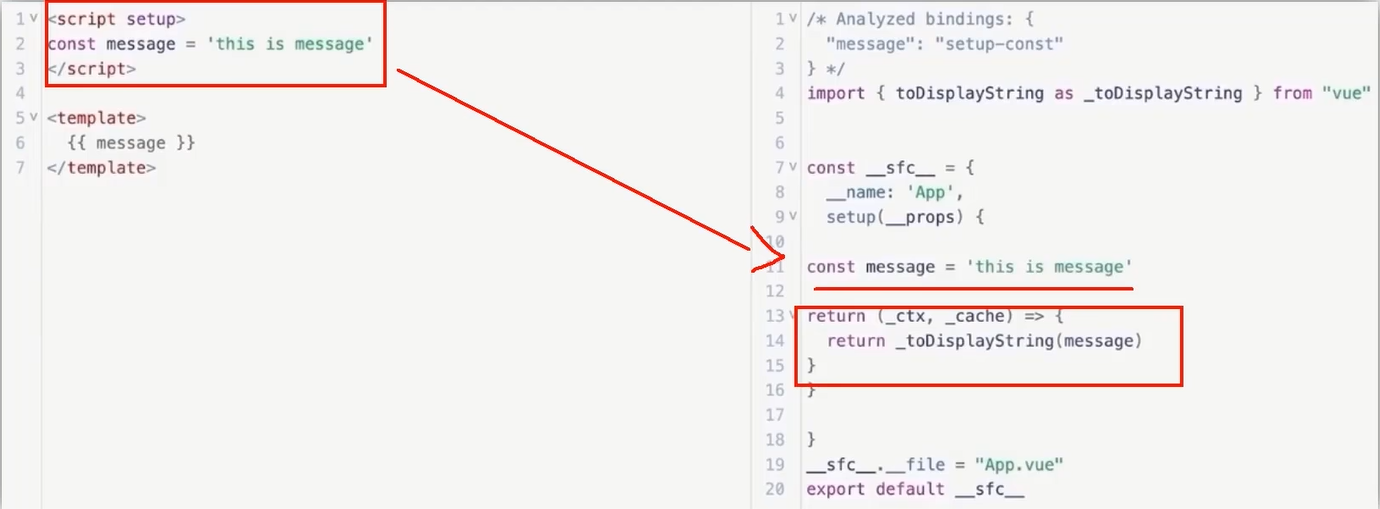
<span alt='solid'> 总结 </span>:
setup 选项的执行时机?
beforeCreate 钩子之前,自动执行
setup 写代码的特点是什么?
定义数据 + 函数 然后以对象方式 return
script setup 解决了什么问题?
经过语法糖的封装更简单的使用组合式 API
setup 中的 this 还指向组件实例吗?
指向 undefined
# 组合式 API-reactive 和 ref 函数
# reactive()
作用:接收 <font title='red'> 对象类型数据的参数传入 </font > 并返回一个 < font title='red'> 响应式的对象 </font>。
核心步骤:
<script setup> | |
// 导入 | |
import { reactive } from 'vue' | |
// 执行函数 传入参数 变量接收 | |
const state = reactive(对象类型数据) | |
</script> |
- 从 vue 包中 <font title='red'> 导入 reactive 函数 </font>
- 在 script setup 中 <font title='red'> 执行 reactive 函数 </font > 并传入 < font title='red'> 类型为对象 </font > 的初始值,并使用变量接收返回值
代码演示:App.vue
<script setup> | |
//reactive: 接收一个对象类型的数据,返回一个响应式的对象 | |
// 问题:如果是简单类型,怎么办呢? | |
import { reactive } from 'vue' | |
const state = reactive ({ | |
count: 100 | |
}) | |
const setCount = () => { | |
state.count++ | |
} | |
</script> | |
<template> | |
<div> | |
<div></div> | |
<button @click="setCount">+1</button> | |
</div> | |
</template> |
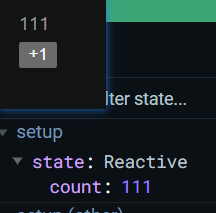
效果:
# ref()
作用:接收 <font title='red'> 简单类型或者对象类型的数据 </font > 传入并返回一个 < font title='red'> 响应式的对象 </font>。
核心步骤:
<script setup> | |
// 导入 | |
import { ref } from 'vue' | |
// 执行函数 传入参数 变量接收 | |
const count = ref(简单类型或者复杂类型数据) | |
</script> |
- 从 vue 包中 <font title='red'> 导入 ref 函数 </font>。
- 在 script setup 中 <font title='red'> 执行 ref 函数 </font > 并传入初始值,使用 < font title='red'> 变量接收 </font> ref 函数的返回值
<span alt='solid'> 推荐 </span>:以后声明数据,统一使用 ref
代码演示:App.vue
<script setup> | |
// 2. ref: 接收简单类型 或 复杂类型,返回一个响应式的对象 | |
// 本质:是在原有传入数据的基础上,外层包了一层对象,包成了复杂类型 | |
// 底层,包成复杂类型之后,再借助 reactive 实现的响应式 | |
// 注意点:因为包了一层对象,所以访问数据时需要通过.value | |
import { ref } from 'vue' | |
const count = ref(0) | |
console.log(count) | |
const setCount = () => { | |
count.value++ | |
} | |
</script> | |
<template> | |
<div> | |
<!-- | |
在 script 中因为包了一层对象而访问数据需要.value | |
在 template 中.value 不需要加 (帮我们扒了一层) | |
推荐:以后声明数据,统一使用 ref | |
--> | |
<div></div> | |
<br><br> | |
<button @click="count++">[template]+1</button> | |
<br><br> | |
<button @click="setCount">[script setup]+1</button> | |
</div> | |
</template> |
ref 对象的打印结果:

总结:
reactive 和 ref 函数的共同作用是什么?
用函数调用的方式生成响应式数据
reactive <font title='red'>vs</font> ref ?
- reactive 不能处理简单类型的数据
- ref 参数类型支持更好但是必须通过 ==.value== 访问修改
- ref 函数的内部实现依赖于 reactive 函数
在实际工作中推荐使用哪个?
推荐使用 ref 函数,更加灵活统一
# 组合式 API - computed 计算属性函数
计算属性基本思想和 Vue2 的完全一致,组合式 API 下的计算属性 <font title='red'> 只是修改了写法 </font>。
核心步骤:
- <font title='red'> 导入 </font>computed 函数
- <font title='red'> 执行函数 </font > 在回调参数中 < font title='red'>retrun 基于响应式数据做计算的值 </font>,用 < font title='red'> 变量接收 </font>。
<script setup> | |
// 导入 | |
import { computed } from 'vue' | |
// 执行函数 变量接收 在回调参数中 return 计算值 | |
const computedState = computed(() => { | |
return 基于响应式数据做计算之后的值 | |
}) | |
</script> |
代码演示:App.vue
<script setup> | |
//const 计算属性 = computed (() => { | |
// return 计算返回的结果 | |
// }) | |
import { computed, ref } from 'vue' | |
// 声明数据 | |
const list = ref([1, 2, 3, 4, 5, 6, 7, 8, 9]) | |
// 基于 list 派生一个计算属性,从 list 中过滤出 > 2 | |
const computedList = computed (() => { | |
return list.value.filter(item => item > 2) | |
}) | |
// 定义一个修改数组的方法 | |
const addFn = () => { | |
list.value.push(666) | |
} | |
</script> | |
<template> | |
<div> | |
<div>原始数组:</div> | |
<div>计算后的数组:</div> | |
<button @click="addFn">修改</button> | |
</div> | |
</template> |
效果:

<span alt='solid'> 最佳实践 </span>.
计算属性中不应该有 “副作用”
比如异步请求 / 修改 dom
避免直接修改计算属性的值
计算属性应该是只读的,特殊情况可以配置 get set
# 组合式 API - watch
# watch 函数
作用:侦听 <font title='red'> 一个或者多个数据 </font > 的变化,数据变化时执行回调函数
两个额外参数:
- immediate (立即执行)
- deep (深度侦听)
# 基础使用 - 侦听单个数据
- <font title='red'> 导入 watch</font > 函数
- <font title='red'> 执行 watch 函数 </font > 传入要侦听的响应式数据 (<font title='red'>res 对象 </font>) 和回调函数
<script setup> | |
//1. 导入 watch | |
import { ref, watch } from 'vue' | |
const count = ref(0) | |
//2. 调用 watch 侦听变化 | |
watch(count, (newValue, oldValue) => { | |
console.log(`count发生了变化,老值为${oldValue},新值为${newValue}`) | |
}) | |
</script> |
# 基础使用 - 侦听多个数据
说明:同时侦听多个响应式数据的变化,不管哪个数据变化都需要
<script setup> | |
import { ref, watch } from 'vue' | |
const count = ref(0) | |
const name = ref('cp') | |
// 侦听多个数据源 | |
watch( | |
[count, name], | |
([newCount, newName], [oldCount, oldName]) => { | |
console.log('count或者name变化了', [newCount, newName], [oldCount, oldName]) | |
} | |
) | |
</script> |
# immediate
说明:在侦听器创建时 <font title='red'> 立即触发回调 </font>,响应式数据变化之后继续执行 回调
const count = ref(0) | |
watch(count, (newValue, oldValue) => { | |
console.log(newValue, oldValue) | |
}, { | |
immediate: true | |
}) |
# deep
作用:侦听复杂数据类型的改变
// 声明一个复杂数据类型 | |
const obj = ref({ | |
name: '张三', | |
age: 18 | |
}) | |
watch(obj, (newValue, oldValue) => { | |
console.log(newValue, oldValue) | |
}, { | |
deep: true | |
}) |
代码演示:App.vue
<script setup> | |
import { ref, watch } from 'vue' | |
const count = ref(0) | |
const nickname = ref('张三') | |
const chanageCount = () => { | |
count.value++ | |
} | |
const chanageNickName =() => { | |
nickname.value = '李四' | |
} | |
// 1. 监视单个数据的变化 监视 count 的变化 | |
// watch (ref 对象,(newValue, oldValue) => { ... }) | |
// watch(count, (newValue, oldValue) => { | |
// console.log (newValue, oldValue) // 开启 immediate 后 0 undefined | |
// }, { | |
// immediate: true | |
// }) | |
// 2. 监视多个数据的变化 | |
//watch ([ref 对象 1, ref 对象 2], (newArr, oldArr) => { ... }) | |
// watch([count, nickname], (newArr, oldArr) => { | |
// console.log (newArr, oldArr) // 开启 immediate 后 (2) [0, ' 张三 '] [] | |
// }, { | |
// // 立刻执行 | |
// immediate: true, | |
// }) | |
// 声明一个复杂数据类型 | |
const userInfo = ref({ | |
name: '小张', | |
age: 18 | |
}) | |
const setUserInfo = () => { | |
// 如果修改的只是对象内部的属性值那么这个对象并没有发生变化因而不会触发 watch 侦听函数 | |
//userInfo.value.name = ' 大张' | |
// 如果修改的是一整个对象那么 watch 侦听函数就会触发 | |
//userInfo.value = {name: ' 大大大大张 ', age: 20} | |
userInfo.value.age++ | |
} | |
watch(userInfo, (newValue, oldValue) => { | |
console.log(newValue, oldValue) | |
}, { | |
//deep 深度监视,默认 watch 进行的是,浅层监视 | |
// const ref1 = ref (简单类型) 可以直接监视 | |
// const ref2 = ref (复杂类型) 监视不到复杂类型内部数据的变化 | |
deep: true | |
}) | |
</script> | |
<template> | |
<div> | |
<button @click="chanageCount">修改数字</button> | |
<button @click="chanageNickName">修改名字</button> | |
<div></div> | |
<button @click="setUserInfo">修改userInfo</button> | |
</div> | |
</template> |
# 精确侦听对象的某个属性
需求:在不开启 deep 的前提下,侦听 age 的变化,只有 age 变化时才执行回调
const info = ref({ | |
name: 'cp', | |
age: 18 | |
}) | |
watch( | |
() => info.value.age, (newValue, oldValue) => console.log('age发生变化了') | |
) |
<span alt='solid'> 总结 </span>:
作为 watch 函数的第一个参数,ref 对象需要添加 .value 吗?
不需要,第一个参数就是传 ref 对象
watch 只能侦听单个数据吗?
单个 或者 多个
不开启 deep,直接监视 复杂类型,修改属性,能触发回调吗?
不能,默认是浅层侦听
不开启 deep,精确侦听对象的某个属性?
可以把第一个参数写成函数的写法,返回要监听的具体属性
# 组合式 API - 生命周期函数
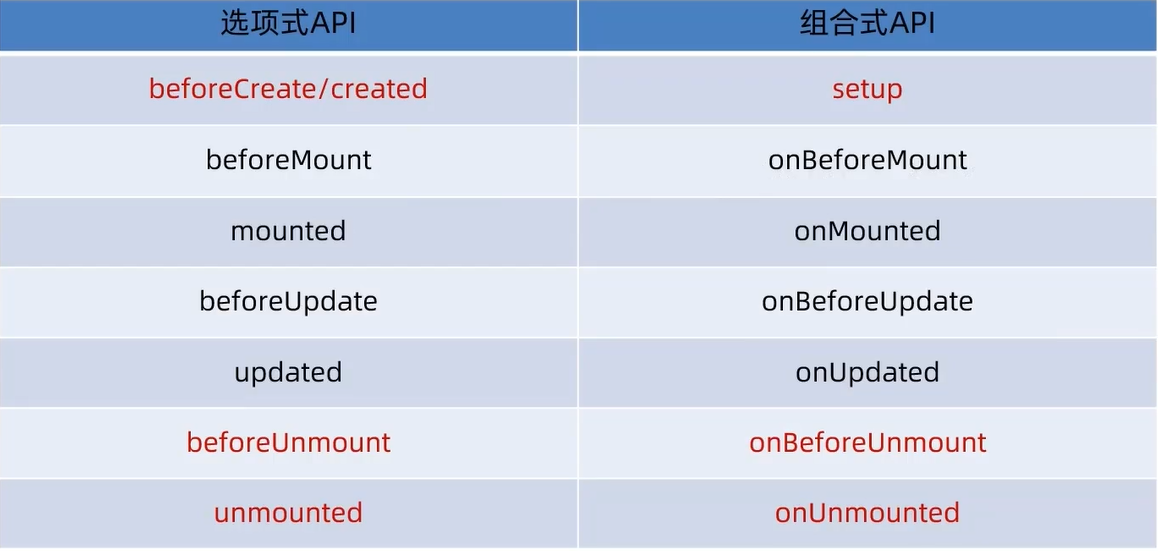
<span alt='solid'>Vue3 的生命周期 API (选项式 <font title='red'>VS</font> 组合式)</span>.
<center> 对比图 </center>
代码演示:App.vue
<script setup> | |
import { onMounted } from 'vue' | |
//beforeCreate 和 created 的相关代码 | |
// 一律放在 setup 中执行 | |
const getList = () => { | |
setTimeout(() => { | |
console.log('请求发送,获取数据') | |
}, 2000) | |
} | |
// 一进入页面的请求 | |
getList() | |
// 如果有些代码需要在 mounted 生命周期中执行 | |
onMounted(() => { | |
console.log('mounted声明周期函数 - 逻辑1') | |
}) | |
// 写成函数的调用方式,可以调用多次 | |
// 调用一次提供一个钩子 | |
// 并不会冲突,而是按照顺序依次执行 | |
onMounted(() => { | |
console.log('mounted声明周期函数 - 逻辑2') | |
}) | |
</script> |
效果:

# 组合式 API - 父子通信
# 组合式 API 下的 父传子
# 基本思想
- 父组件中给子组件绑定属性
- 子组件内部通过 props 选项接收

代码演示:
子组件
<script setup> | |
// 子组件 | |
// 注意:由于写了 setup 所以无法直接配置 props 选项 | |
// 所以:此处需要借助于 "编译器宏" 函数接收子组件传递的数据 | |
const props = defineProps({ | |
car: String, | |
money: Number | |
}) | |
console.log(props.car) | |
</script> | |
<template> | |
<!-- 对于 props 传递过来的数据模版中可以直接使用 --> | |
<div> | |
<div class="son">我是子组件 - - </div> | |
</div> | |
</template> | |
<style> | |
.son { | |
border: 1px solid #000; | |
padding: 30px; | |
} | |
</style> |
父组件
<script setup> | |
// 父传子 | |
// 1. 给子组件,添加属性的方式传值 | |
// 2. 在子组件,通过 props 接收 | |
// 局部组件 (导入进来就能用) | |
import SonCom from '@/components/son-com.vue' | |
import { ref } from 'vue' | |
const money = ref(100) | |
const getMoney = () => { | |
money.value += 10 | |
} | |
</script> | |
<template> | |
<div> | |
<h3>父组件 - <button @click="getMoney">搬砖</button></h3> | |
</div> | |
<br> | |
<!-- 给子组件,添加属性的方式传值 --> | |
<SonCom car="宝马车" :money="money"></SonCom> | |
</template> |
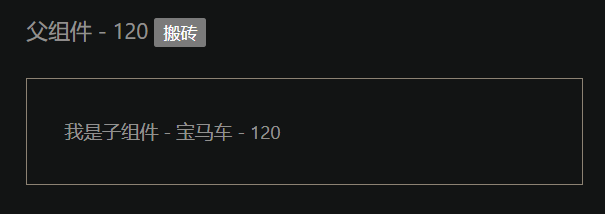
效果:
# defineProps 原理
<span alt='solid'>defineProps 原理 </span>:就是 < font title='red'> 编译阶段的一个标识 </font>,实际编译器解析时,遇到后会进行编译转换
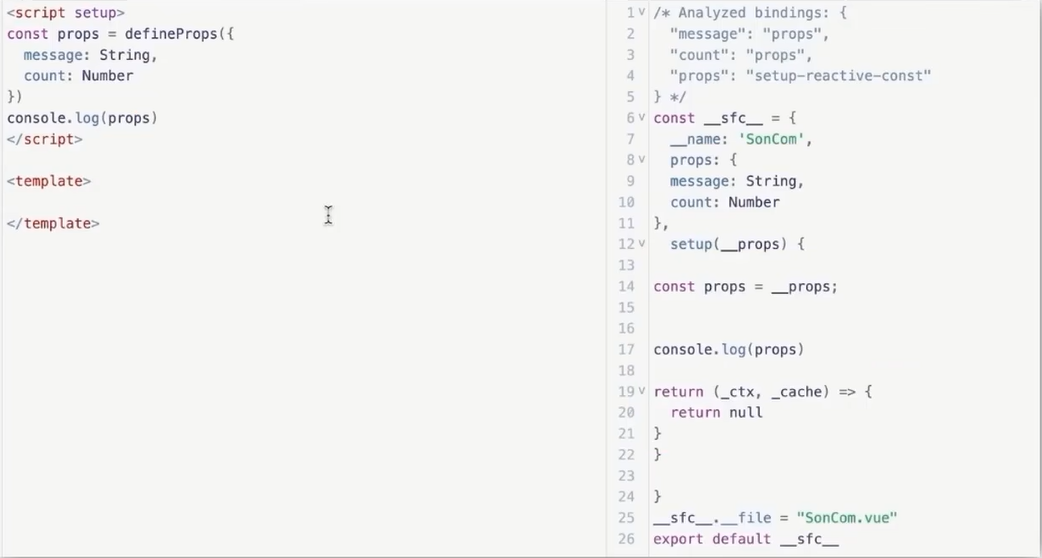
里面编写 defineProps 里面接收 message,count 等等,实际上 它在真正编译器解析之后,解析成完整的对象配置的时候,它相当于有 set up,也有组件的 name 也有组件的 props,实际上你看起来写了 defineProps 是在 setup 里面的,但是到了编译阶段会把 defineProps 函数的内容转换成 props 配置项。本质上配置的 还是 props 选项。只不过可以在 setup 里面可以去接收使用而已。
所以我们就懂了 defineProps 就是编译阶段的一个标识,它会帮你去编译转换
# 组合式 API 下的 子传父
# 基本思想
- 父组件中给 <font title='red'> 子组件标签通过 @绑定事件 </font>.
- 子组件内部通过 <font title='red'>emit 方法触发事件 </font>.
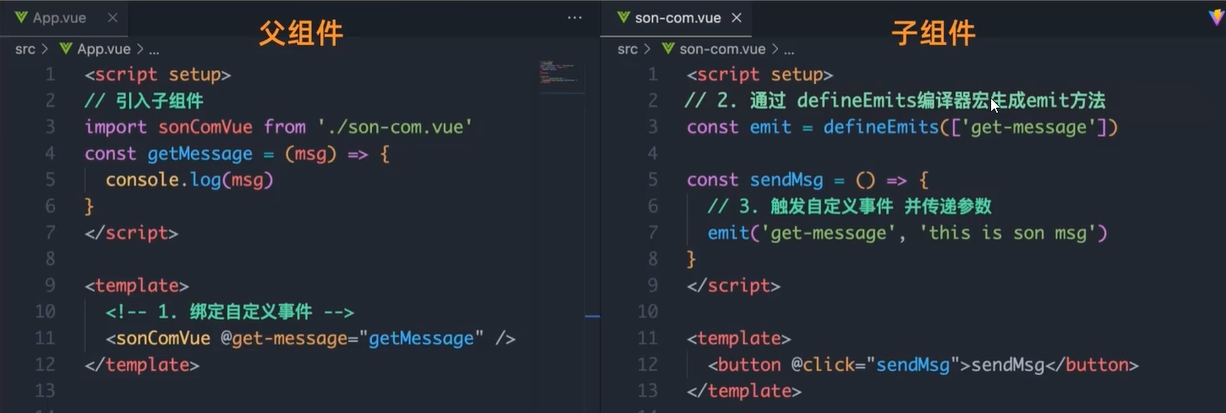
代码演示:
子组件
<script setup> | |
const emit = defineEmits(['changeMoney']) | |
const buy = () => { | |
// 此处报错,不能直接修改老爹传过来的值 | |
// props.money-- | |
// 需要 emit 触发事件 | |
emit('changeMoney', 5) | |
} | |
</script> | |
<template> | |
<!-- 对于 props 传递过来的数据模版中可以直接使用 --> | |
<div> | |
我是子组件我爱: <button @click="buy">花钱</button> | |
</div> | |
</template> | |
<style> | |
.son { | |
border: 1px solid #000; | |
padding: 30px; | |
} | |
</style> |
父组件
<script setup> | |
// 局部组件 (导入进来就能用) | |
import SonCom from '@/components/son-com.vue' | |
import { ref } from 'vue' | |
const money = ref(100) | |
const getMoney = () => { | |
money.value += 10 | |
} | |
// 子传父 | |
// 1. 在子组件内部,emit 触发事件 (编译器宏获取) | |
// 2. 在父组件通过 @就可以监听了 | |
const changeFn = (newMoney) => { | |
money.value = newMoney | |
} | |
</script> | |
<template> | |
<div> | |
<h3>父组件 - <button @click="getMoney">搬砖</button></h3> | |
</div> | |
<br> | |
<!-- 给子组件,添加属性的方式传值 --> | |
<SonCom @changeMoney="changeFn"></SonCom> | |
</template> |
效果:

总结:
父传子
父传子的过程中通过什么方式接收 props?
defineProps ({属性名:类型})
setup 语法糖中如何使用父组件传递过来的数据?
const props = defineProps ({属性名:类型})
props.xxx
子传父
子传父的过程中通过什么方式得到 emit 方法?
defineEmits(['事件名称'])怎么触发事件
emit('自定义事件名', 参数)
# 组合式 API - 模版引用
# 模版引用的概念
通过 <font title='red'>ref 标识 </font > 获取真实的 < font title='red'>dom 对象或者组件实例对象 </font>.

<span alt='solid'> 比如说 </span>:做一个登陆功能,这个时候在官网文档就会告诉你,我们需要通过
this.$refs.form.validate()拿到组件,然后调用组件里面的方法或者找到某个输入框原生 dom.focus 让它聚焦,将来我们都会有很多的场景可以通过 ref 表示去获取真实的 dom 或者组件实例
Vue3 中也同样包含这样的一个语法,但是不是通过 this 去获取了,也是通过 ref 去创建
# 如何使用 (以获取 dom 为例 组件同理)
<script setup> | |
import { ref } from 'vue' | |
//1. 调用 ref 函数得到 ref 对象 | |
const h1Ref = ref(null) | |
</script> | |
<template> | |
<!--2.通过ref标识绑定ref对象--> | |
<h1 ref="h1Ref">我是dom标签h1</h1> | |
</template> |
- 调用 ref 函数生成一个 ref 对象
- 通过 ref 标识绑定 ref 对象到标签
# defineExpose()
默认情况下载 script setup 语法糖下 <font title='red'> 组件内部的属性和方法是不开放 </font > 给父组件访问的,可以通过 defineExpose 编译宏 < font title='red'> 指定哪些属性和方法允许访问 </font>.

比如说:定义好了一个数据叫做 test message 它是不会往外暴漏的。如果你想要往外暴漏就需要 defineExpose 宏函数
代码演示:
子组件
<script setup> | |
const count = 999 | |
const sayHi = () => { | |
console.log('打招呼') | |
} | |
defineExpose({ | |
count, | |
sayHi | |
}) | |
</script> | |
<template> | |
<div>我是用于测试的组件 - </div> | |
</template> |
父组件
<script setup> | |
import TestCom from '@/components/son-test.vue' | |
import { onMounted, ref } from 'vue' | |
// 模版引用可以获取 dom 也可以获取组件 | |
// 1. 调用 ref 函数,生成一个 ref 对象 | |
// 2. 通过 ref 标识,进行绑定 | |
// 3. 通过 ref 对象.value 即可访问到绑定的元素 (必须渲染完成后,才能拿到) | |
const inp = ref (null) | |
console.log(inp.value) | |
// 声明周期钩子 | |
onMounted (() => { | |
console.log(inp.value) | |
inp.value.focus() | |
}) | |
const focusFn = () => { | |
inp.value.focus() | |
} | |
// -------------------------------------------- | |
const testRef = ref(null) | |
const getCom = () => { | |
console.log(testRef.value) | |
} | |
</script> | |
<template> | |
<div> | |
<input ref="inp" type="text"/> | |
<button @click="focusFn">点击我让输入框聚焦</button> | |
</div> | |
<br> | |
<TestCom ref="testRef"></TestCom> | |
<button @click="getCom">获取组件</button> | |
</template> |
效果:
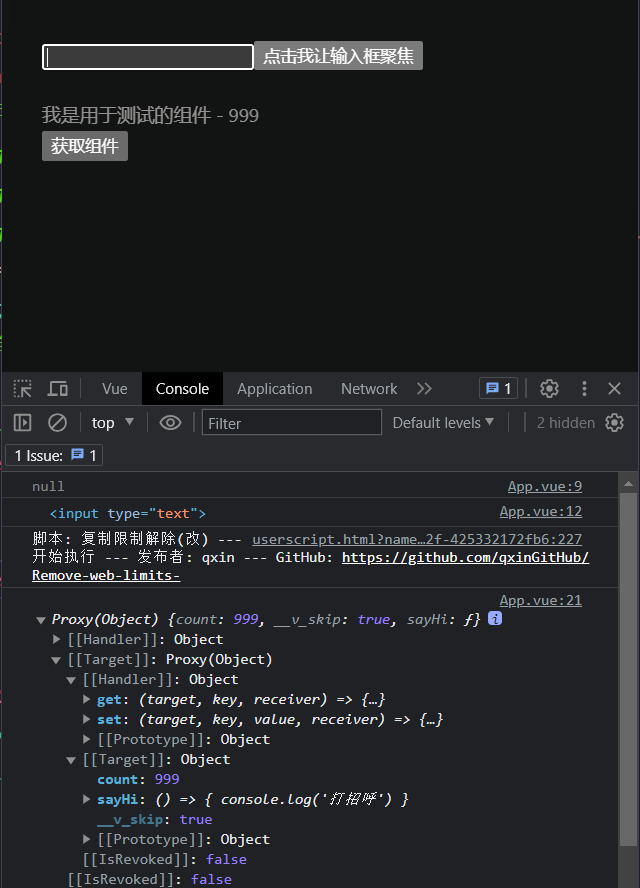
<span alt='solid'> 总结 </span>:
获取模版引用的时机是什么?
组件挂载完毕
defineExpose 编译宏的作用是什么?
显式暴漏组件内部的属性和方法
# 组合式 API - provide 和 inject
作用和场景
顶层组件向任意的底层组件 <font title='red'> 传递数据和方法 </font>,实现 < font title='red'> 跨层组件通信 </font>.
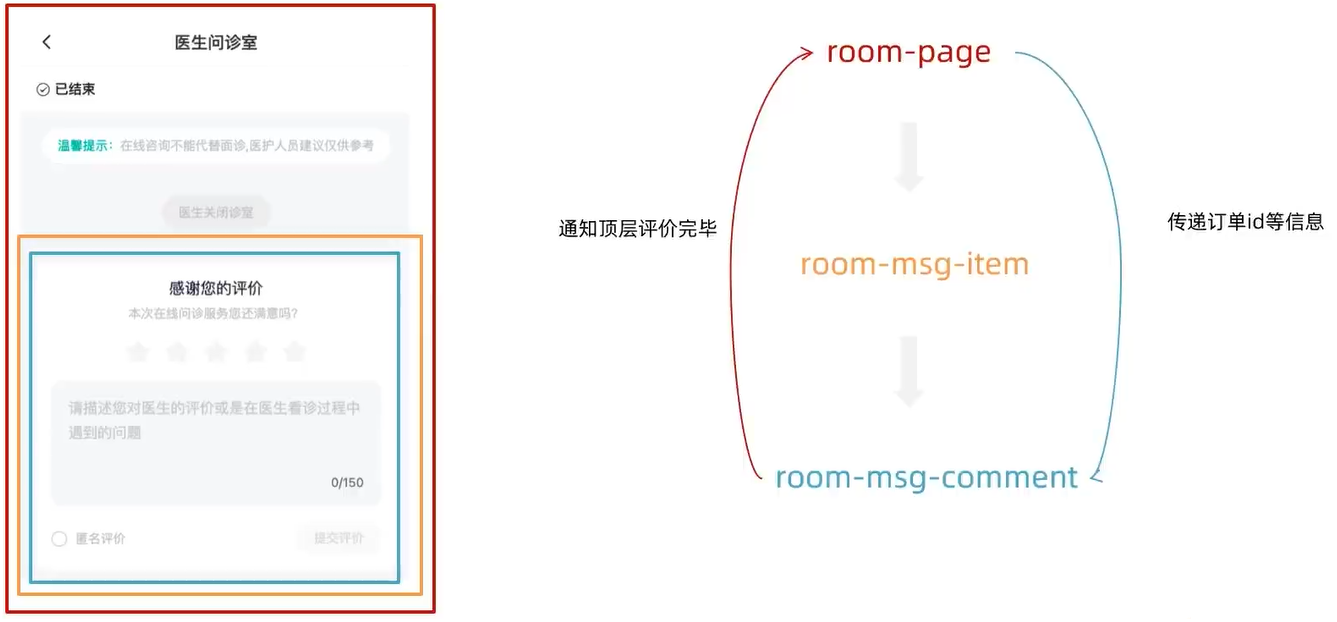
比如说:整个医生问诊是一个大组件 room-page 它可以将数据往下传递传递给 room-msg-item 中间一层组件,再往下有一个 room-msg-comment 评价组件,从上到下有一个包裹关系。需求是从顶层组件需要往底层组件传递订单消息。一旦订单消息传递过去了,将来底层组件如果评价完成了,要能通知大组件 room-page 呢
# 跨层传递普通数据
- 顶层组件通过 <font title='red'>provide 函数提供 </font > 数据
- 底层组件通过 <font title='red'>inject 函数获取 </font > 数据
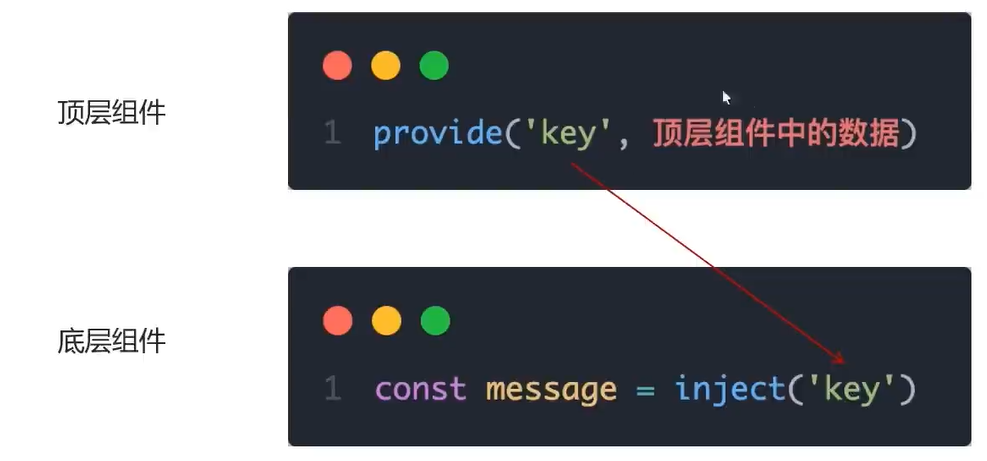
代码演示:
父组件
<script setup> | |
import CenterSon from '@/components/son-center.vue' | |
import { provide } from 'vue' | |
// 1. 跨层传递普通数据 | |
// 使用 provide 向子组件传递数据 | |
provide('theme-color', 'pink') | |
</script> | |
<template> | |
<div> | |
<h1>我是顶层组件</h1> | |
<CenterSon></CenterSon> | |
</div> | |
</template> |
底部组件
<script setup> | |
import { inject } from 'vue' | |
// 使用 inject 获取父组件传递过来的数据 | |
const themeColor = inject('theme-color') | |
</script> | |
<template> | |
<div> | |
<h5>我是底层组件 - </h5> | |
<button>更新count</button> | |
</div> | |
</template> |
中间组件
<script setup> | |
import ButtonSon from '@/components/son-button.vue' | |
</script> | |
<template> | |
<div> | |
<h3>我是中间层组件</h3> | |
<ButtonSon></ButtonSon> | |
</div> | |
</template> |
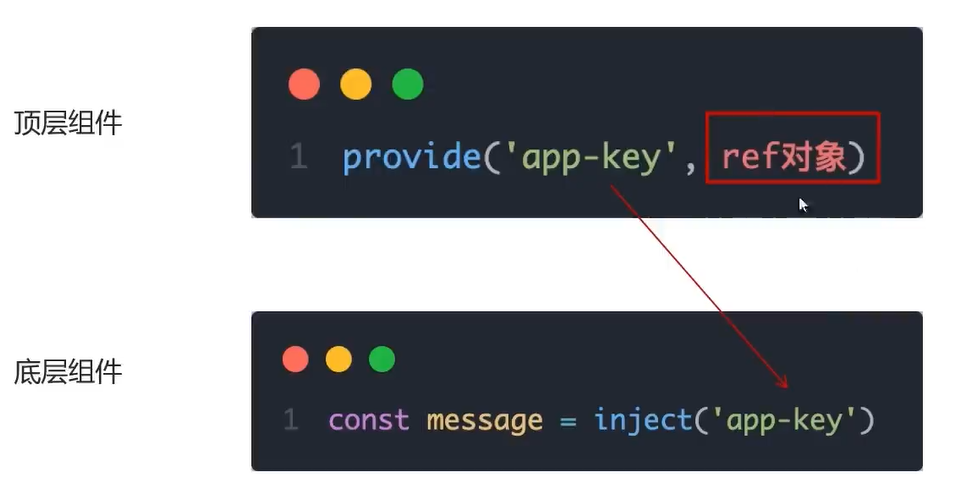
# 跨层传递响应式数据
在调用 provide 函数时,第二个参数设置为 <font title='red'>ref 对象 </font>.
代码演示:
父组件
<script setup> | |
import CenterSon from '@/components/son-center.vue' | |
import { provide, ref } from 'vue' | |
// 跨层传递响应式数据 | |
const count = ref(100) | |
provide('count', count) | |
// 2 秒后改变数据 | |
setTimeout(() => { | |
count.value = 500 | |
}, 2000) | |
</script> | |
<template> | |
<div> | |
<h1>我是顶层组件</h1> | |
<CenterSon></CenterSon> | |
</div> | |
</template> |
底部组件
<script setup> | |
import { inject } from 'vue' | |
// 使用 inject 获取父组件传递过来的数据 | |
const count = inject('count') | |
</script> | |
<template> | |
<div> | |
<h5>我是底层组件 - </h5> | |
<button>更新count</button> | |
</div> | |
</template> |
中间组件
<script setup> | |
import ButtonSon from '@/components/son-button.vue' | |
</script> | |
<template> | |
<div> | |
<h3>我是中间层组件</h3> | |
<ButtonSon></ButtonSon> | |
</div> | |
</template> |
# 跨层传递方法
顶层组件可以向底层组件传递方法,<font title='red'> 底层组件调用方法修改顶层组件中的数据 </font>.

代码演示:
父组件
<script setup> | |
import CenterSon from '@/components/son-center.vue' | |
import { provide, ref } from 'vue' | |
const count = ref(100) | |
provide('count', count) | |
// 跨层级函数 => 给子孙后代传递可以修改数据的方法 | |
provide('changeCount', (newCount) => { | |
count.value = newCount | |
}) | |
</script> | |
<template> | |
<div> | |
<h1>我是顶层组件</h1> | |
<CenterSon></CenterSon> | |
</div> | |
</template> |
底部组件
<script setup> | |
import { inject } from 'vue' | |
// 使用 inject 获取父组件传递过来的数据 | |
const count = inject('count') | |
// 获取父组件传递过来的方法 | |
const chanage = inject('changeCount') | |
const clickFn = () => { | |
// 使用方法传入参数 | |
chanage(1000) | |
} | |
</script> | |
<template> | |
<div> | |
<h5>我是底层组件 - </h5> | |
<button @click="clickFn">更新count</button> | |
</div> | |
</template> |
中间组件
<script setup> | |
import ButtonSon from '@/components/son-button.vue' | |
</script> | |
<template> | |
<div> | |
<h3>我是中间层组件</h3> | |
<ButtonSon></ButtonSon> | |
</div> | |
</template> |
