# 日期对象
- 日期对象:用来表示时间的对象
- 作用:可以得到当前系统时间
学习路径:
- 实例化
- 日期对象方法
- 时间戳
# 1 实例化
在代码中发现了 new 关键字时,一般将这个操作称为 <font color=red> 实例化 </font>.
创建一个时间对象并获取时间
- 获得当前时间
const date = new Date()
- 获取指定时间
const date = new Date('2008-8-8')
console.log(date)
# 2 日期对象方法
使用场景:因为日期对象返回的数据我们不能直接使用,所以需要转换为实际开发中常用的格式
| 方法 | 作用 | 说明 |
|---|---|---|
| getFullYear() | 获得年份 | 获取四位年份 |
| getMonth() | 获得月份 | 取值为 0 ~ 11 |
| getDate() | 获取月份中的每一天 | 不同月份取值也不相同 |
| getDay() | 获取星期 | 取值为 0 ~ 6 |
| getHours() | 获取小时 | 取值为 0 ~ 23 |
| getMinutes() | 获取分钟 | 取值为 0 ~ 59 |
| getSeconds() | 获取秒 | 取值为 0 ~ 59 |
代码:
html
<body> | |
<script src="./js/实例化日期对象.js"></script> | |
</body> |
js
// 实例化日期对象 | |
let date = new Date() | |
let year = date.getFullYear() | |
let month = date.getMonth() + 1 | |
let date_date = date.getDate() | |
let day = date.getDay() | |
let hours = date.getHours() | |
let minutes = date.getMinutes() | |
let seconds = date.getSeconds() | |
console.log(`获得年份${date.getFullYear()}`) | |
console.log(`获得月份${date.getMonth() + 1}`) | |
console.log(`获得月份中的每一天${date.getDate()}`) | |
console.log(`获得星期${date.getDay()}`) | |
console.log(`获得小时${date.getHours()}`) | |
console.log(`获得分钟${date.getMinutes()}`) | |
console.log(`获得秒${date.getSeconds()}`) | |
const html = document.documentElement | |
html.addEventListener('click',function () { | |
month = month < 10 ? '0' + month : month | |
date_date = date_date < 10 ? '0' + date_date : date_date | |
hours = hours < 10 ? '0' + hours : hours | |
minutes = minutes < 10 ? '0' + minutes : minutes | |
document.body.innerText += document.write(`date对象方法拼接: ${year}-${month}-${date_date} ${hours}:${minutes}</br>`) | |
document.write(`使用date.toLocaleString(): ${date.toLocaleString()}`) | |
}) | |
// 或者使用 | |
console.log(`toLocaleString${date.toLocaleString()}`) |
效果:
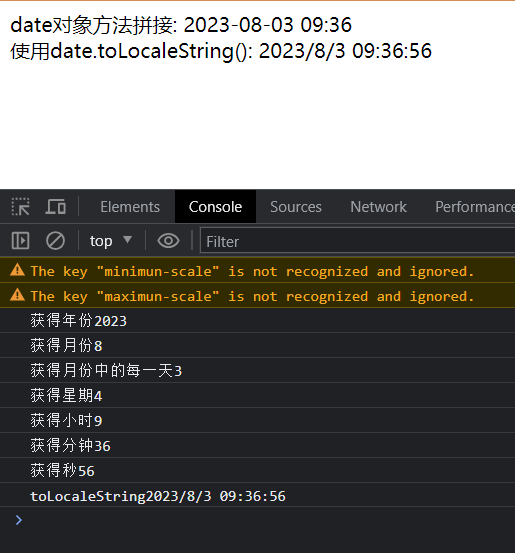
# 3 时间戳
使用场景:如果计算倒计时效果,前面方法无法直接计算,需要借助于时间戳完成
什么是时间戳
- 是指 1970 年 01 月 01 日 00 时 00 分 00 秒起至现在的毫秒数,它是一种特殊的计量时间的方式
算法:
- 将来的时间戳 - 现在的时间戳 = 剩余时间毫秒数
- 剩余时间毫秒数 转换为 剩余时间的 年月日时分秒 就是 倒计时时间
- 比如 将来时间戳 2000ms - 现在时间戳 1000ms = 1000ms
- 1000ms 转换为就是 0 小时 0 分 1 秒
# 三种方式获取时间戳
使用 getTIme () 方法
- 需要实例化 date 对象
const date = new Date()
console.log(date.getTime())
简写 +new Date () + 将字符串类型转换为数字类型
- 无需实例化
console.log(+new Date())
使用 Date.now ()
- 无需实例化
- <font color=red> 但是只能得到当前的时间戳,而前面两种可以返回指定时间的时间戳 </font>.
console.log(Date.now())
# 节点操作
# DOM 节点
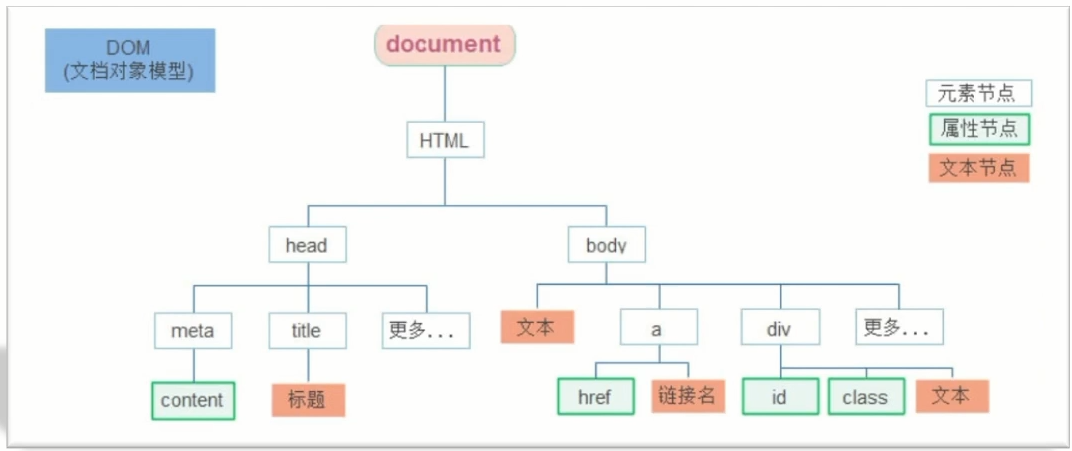
DOM 数里每一个内容都称之为节点
节点类型
- 元素节点 (重点学习)
- 所有的标签 比如 body,div
- html 是根节点
- 属性节点
- 所有的属性 比如 href
- 文本节点
- 所有的文本呢
- 其它
![image-20230803095729600]()
- 元素节点 (重点学习)
# 总结
- 什么是 DOM 节点?
- DOM 树里每一个内容都称之为节点
- DOM 节点的分类?
- 元素节点,比如 div 标签
- 属性节点,比如 class 属性
- 文本节点,比如标签里面的文字
- 我们重点记住哪个节点?
- 元素节点
- 可以更好的让我们理清标签元素之间的关系
# 查找结点
** 通过案例引入问题 **
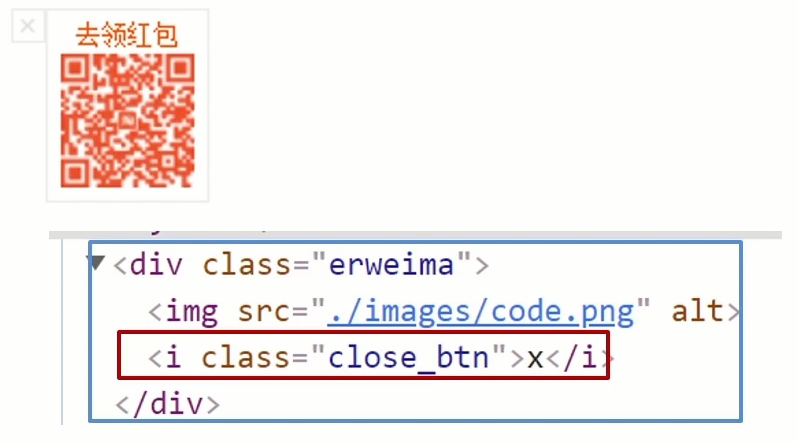
关闭二维码案例:
点击关闭按钮,关闭的是二维码的盒子,还要获取 erweima 盒子
![image-20230803100617978]()
思考:
- 关闭按钮和 erweima 是什么关系呢?
- 父子关系
- 所以,我们完全可以这样做:
- 点击关闭按钮,直接关闭它的父级,就无需获取 erweima 元素了
节点关系:针对的找亲戚返回的都是对象
- 父节点
- 子节点
- 兄弟节点
# 父节点查找
- parentNode 属性
- 返回最近一级的父节点,找不到返回为 null
子元素.parentNode |
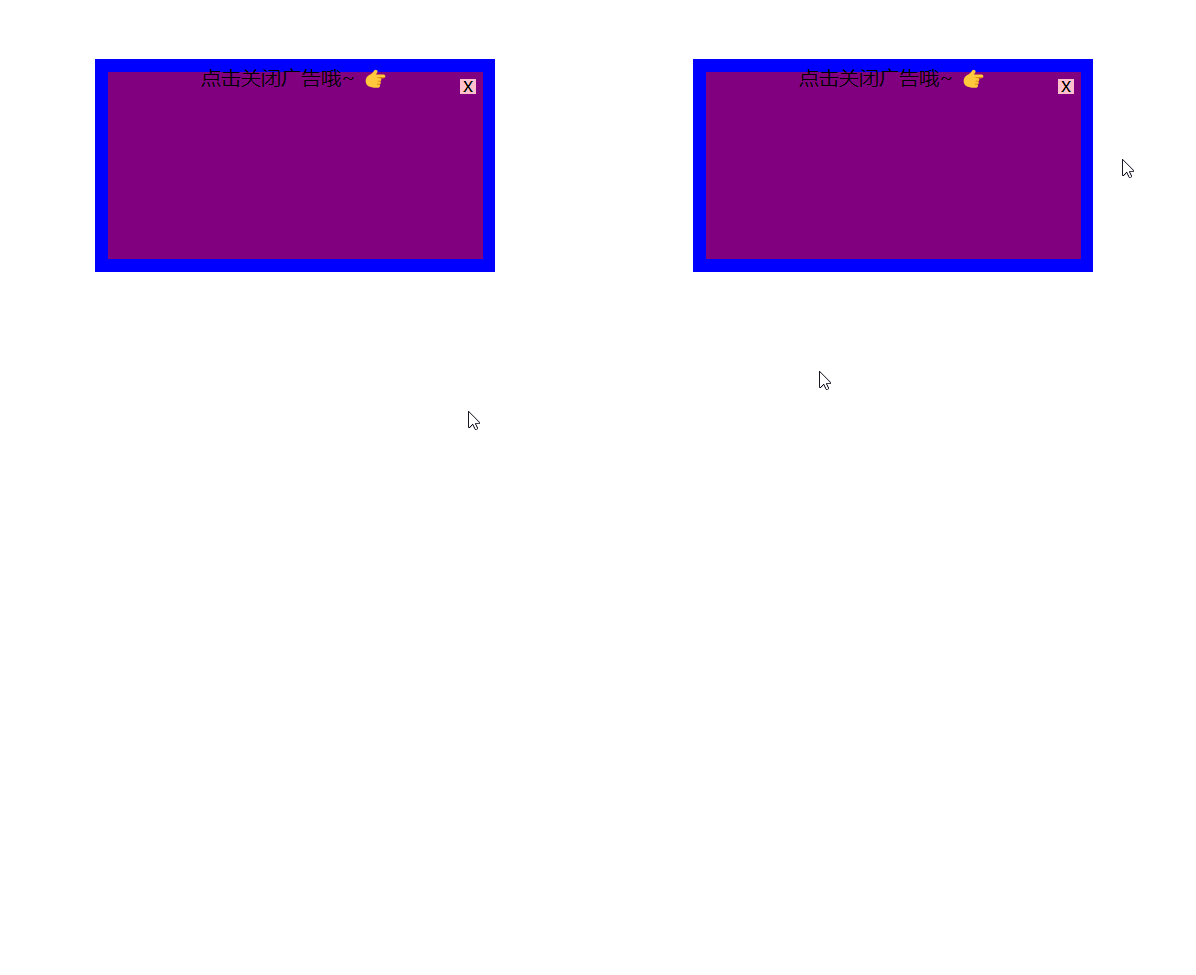
# 关闭广告案例
代码:
html
<link rel="stylesheet" href="./css/广告.css"/> | |
</head> | |
<body> | |
<div class="yeye"> | |
<div class="father"> | |
点击关闭广告哦~ 👉 | |
<div class="son">x</div> | |
</div> | |
</div> | |
<script src="./js/父节点.js"></script> | |
</body> |
less
@baseSize: 200px; | |
@baseSizeH: 50px; | |
body { | |
.yeye { | |
width: (@baseSize + 120px); | |
height: (@baseSizeH + 120px); | |
background-color: blue; | |
margin: 100px auto; | |
overflow: hidden; | |
.father { | |
position: relative; | |
width: (@baseSize + 100px); | |
height: (@baseSizeH + 100px); | |
background-color: purple; | |
margin: 10px auto; | |
text-align: center; | |
line-height: .5; | |
.son { | |
position: absolute; | |
top: 6px; | |
right: 5px; | |
width: (@baseSize - 187px); | |
height: (@baseSizeH - 38px); | |
background-color: pink; | |
} | |
} | |
} | |
} |
js
const son = document.querySelector('.son') | |
console.log(son)// 返回 dom 对象 son 标签 | |
console.log(son.parentNode)// 返回 dom 对象 father 标签 | |
console.log(son.parentNode.parentNode)// 返回 dom 对象 yeye 标签 | |
son.addEventListener('click',function () { | |
this.parentNode.parentNode.style.display = 'none' | |
}) |
效果:

# 子节点查找
childNodes
- 获得所有子节点,包括文本节点 (空格,换行),注释节点等
<font color=red>children 属性 (重点)</font>.
- 仅获得所有子元素节点
- 返回的还是一个伪数组.
父元素.children
# 兄弟关系查找
html
<body> | |
<div class="ge">哥哥</div> | |
<div class="di">弟弟</div> | |
<script src="./js/获取兄弟节点.js"></script> | |
</body> |
下一个兄弟节点
- nextElementSibling 属性
// 获取哥哥 div 对象const ge = document.querySelector('.ge')
// 获取下一个兄弟标签就是弟弟了const didi = ge.nextElementSibling
console.log(didi)
结果:
![image-20230804193904285]()
上一个兄弟节点
- previousElementSibling 属性
// 获取弟弟 div 对象const di = document.querySelector('.di')
// 获取上一个兄弟标签 就是 哥哥了const gege = di.previousElementSibling
console.log(gege)
效果:
![image-20230804193915994]()
# 总结
- 查找父节点用哪个属性?
- parentNode
- 查找所有子节点用哪个属性?
- children
- 查找兄弟节点用哪个属性?
- nextElementSibling
- previousElementSibling
# 增加节点
很多情况下,我们需要在页面中增加元素
- 比如,点击发布按钮,可以新增一条信息
一般情况下,我们新增节点,按照如下操作:
- 创建一个新的节点
- 把创建的新的节点加入到指定的元素内部
学习路径
- 创建节点
- 追加节点
# 1 创建节点
- 即创造出一个新的网页元素,再添加到网页内,一般先创建节点,然后插入节点
- 创建元素节点方法:
语法:
// 创造一个新的元素节点 | |
document.createElement('标签名') |
代码:
html
<!DOCTYPE html> | |
<html lang="en"> | |
<head> | |
<meta charset="UTF-8"> | |
<meta name="viewport" content="width=device-width, initial-scale=1.0, | |
minimun-scale=1.0,maximun-scale=1.0,user-scalable=no"> | |
<title>Document</title> | |
</head> | |
<body> | |
<script src="./js/增加节点.js"></script> | |
</body> | |
</html> |
js
// 创建一个节点 | |
const div = document.createElement('div') | |
console.log(div) |
效果:
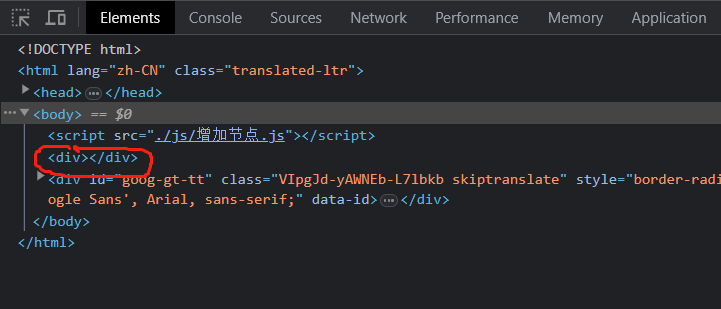
可以看到虽然在 js 中已经创建了一个 div 标签,<font color=red> 但是 html 结构中并不存在 div 这样的标签 </font>,我们需要将创建好的标签插入到某个 html 存在的标签的位置中。

# 2 追加节点
- 要想在界面看到,还得插入到某个父元素中.
- 插入到父元素的最后一个子元素:
语法:
// 插入到这个父元素的最后 | |
父元素.appendChild(要插入的元素) |
代码:
js
// 创建一个节点 | |
const div = document.createElement('div') | |
console.log(div) | |
// 将创建好的 div 标签 插入到 body 的后面 | |
document.body.appendChild(div) |
效果:
- 插入到父元素中某个子元素的前面:
语法:
// 插入到某个子元素的前面 | |
父元素.inertBefore(要插入的元素,在哪个元素前面) |
代码:
html
<body> | |
<ul> | |
<li>我是老大</li> | |
</ul> | |
<script src="./js/增加节点.js"></script> | |
</body> |
js
// 获取 html 存在的标签对象 | |
const ul = document.querySelector('ul') | |
// 打印 ul 元素中的所有子元素 | |
console.log(ul.children) | |
//children 获取的是一个伪数组通过下标获取哪个子元素 | |
console.log(ul.children[0]) | |
// 创建一个节点 | |
const li = document.createElement('li') | |
// 修改标签文本内容 | |
li.innerText = '我是小li' | |
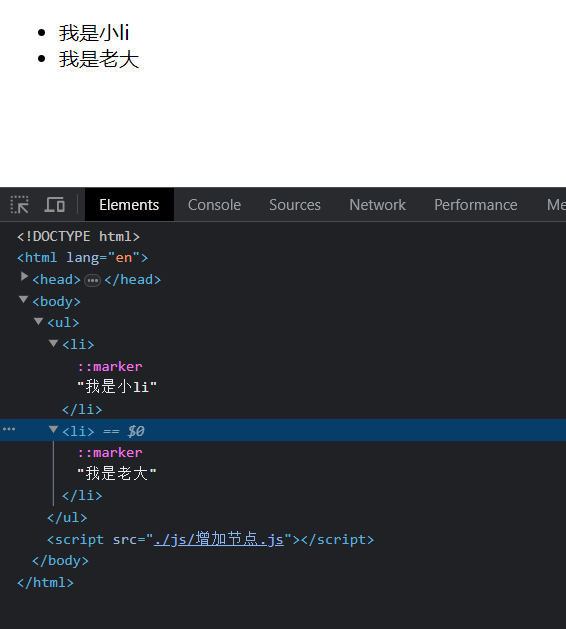
// 将创建的 li 标签插入到 ul 中的第 1 个 li (子元素) 的前面 | |
ul.insertBefore(li,ul.children[0]) |
效果:
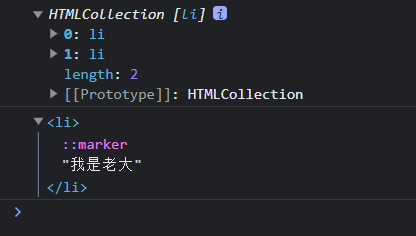
# 3 克隆节点
cloneNode 会克隆出一个跟原标签一样的元素,括号内传入布尔值.
- 若为 true,则代表克隆时会包含后代节点一起克隆,深克隆.
- 若为 false,则代表克隆时不包含后代节点,浅克隆.
- 默认为 flase.
语法:
// 克隆一个已有的元素节点 | |
元素.cloneNode(布尔值) |
代码:
html
<body> | |
<ul> | |
<li>1</li> | |
<li>2</li> | |
<li>3</li> | |
</ul> | |
<script src="./js/克隆节点.js"></script> | |
</body> |
js
// 获取 ul 元素对象 | |
const ul = document.querySelector('ul') | |
//1. 克隆节点 元素.cloneNode (true) 深克隆将标签和内容都克隆 | |
const li1 = ul.children[0].cloneNode(true) | |
console.log(li1) | |
// 追加元素 | |
ul.appendChild(li1) |
效果:
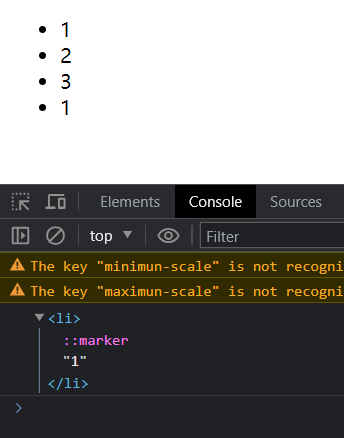
# 删除节点
- 若一个节点在页面中已不需要时,可以删除它
- 在 JavaScript 原生 DOM 操作中 ,要删除元素必须通过 <font color=red> 父元素删除 </font>.
- Element.remove () 方法,把对象从它所属的 DOM 树中删除。
语法:
父元素.removeChild(要删除的元素) | |
要删除的元素.remove() |
注:
- 如果不存在父子关系则删除不成功.
- 删除节点和隐藏节点 (display:none) 有区别的:
- 隐藏:节点还是存在的
- 删除:从 HTML 中删除节点,不存在了
- 如果使用 remove 则必须是一个 div 而不是 ul 里面的 li 否则会报错,删除 ul 中某个 li 建议使用 removeChild (ul.children [0])
代码:
html
<link rel="stylesheet" href="./css/隐藏节点.css"/> | |
</head> | |
<body> | |
<div class="box"> | |
123 | |
</div> | |
<ul> | |
<li>没用了</li> | |
</ul> | |
<script src="./js/删除节点.js"></script> | |
</body> |
less
.box { | |
// 隐藏元素 不占有原来位置 | |
display: none; | |
} |
js
// 获取 ul 元素对象 | |
const ul = document.querySelector('ul') | |
// 删除节点 父元素.removeChild (子元素) | |
ul.removeChild(ul.children[0]) |
效果:
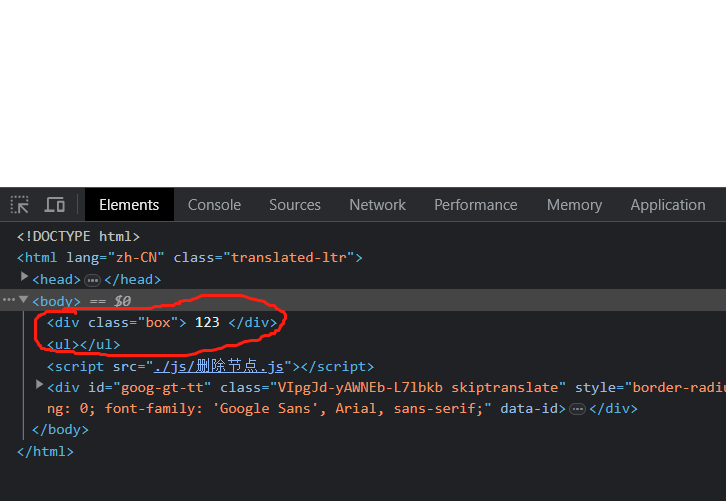
# M 端事件
移动端也有自己独特的地方。比如 触屏事件 touch (也称触摸事件),Android 和 IOS 都有。
- 触屏事件 touch (也称触摸事件) ,Android 和 IOS 都有。
- touch 对象代表一个触摸点。触摸点可能是一根手指,也可能是一根触摸笔。触屏事件可响应用户手指 (或触控笔) 对屏幕或者触控板操作。
- 常见的触屏事件如下:
| 触屏 touch 事件 | 说明 |
|---|---|
| touchstart | 手指触摸到一个 DOM 元素时触发 |
| touchmove | 手指在一个 DOM 元素上滑动时触发 |
| touchend | 手指从一个 DOM 元素怒上移开时触发 |
代码:
html
<link rel="stylesheet" href="./css/摸摸摸.css"/> | |
</head> | |
<body> | |
<div></div> | |
<script src="./js/m端事件.js"></script> | |
</body> |
less
div { | |
width: 200px; | |
height: 200px; | |
background-color: pink; | |
} |
js
// 获取元素对象 | |
const div = document.querySelector('div') | |
// 1. 开始 | |
div.addEventListener('touchstart',function () { | |
console.log('开始摸了') | |
}) | |
// 2. 离开 | |
div.addEventListener('touchend',function () { | |
console.log('离开了') | |
}) | |
// 3. 移动 | |
div.addEventListener('touchmove',function () { | |
console.log('移动摸') | |
}) |
效果:
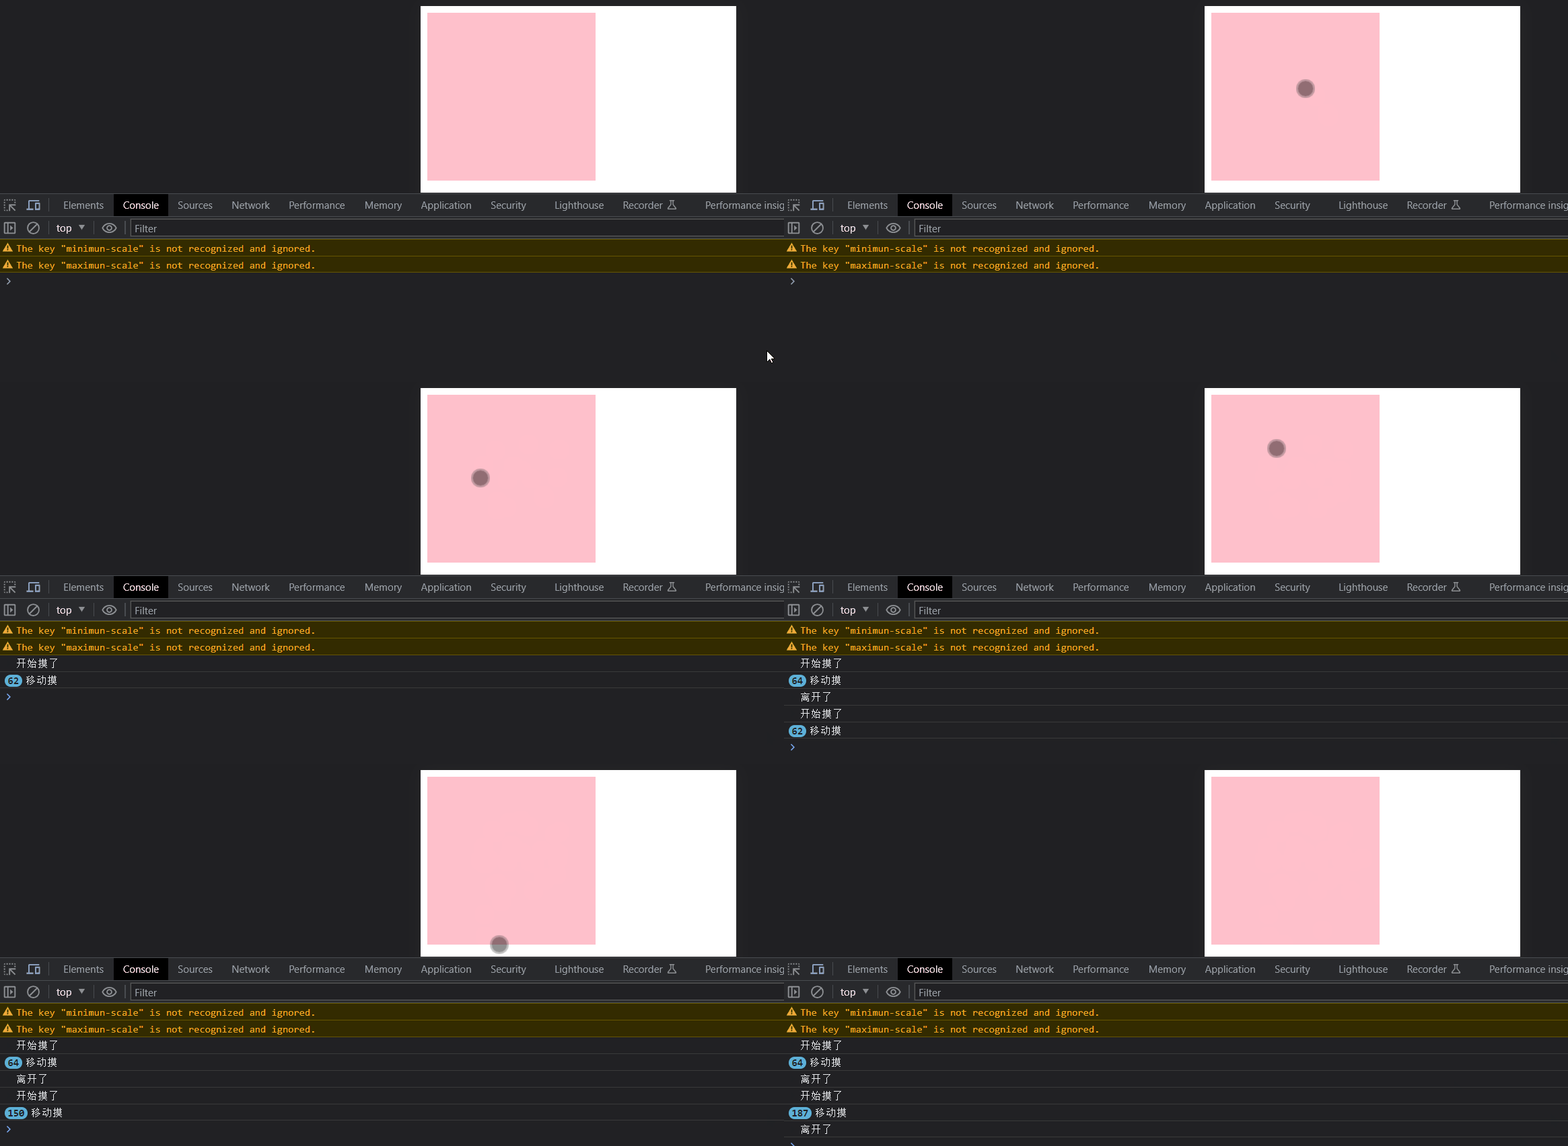
# JS 插件
- 学习插件的基本过程
- 熟悉官网,了解这个插件可以完成什么需求:https://www.swiper.com.cn/
- 看在线演示,找到符合自己需求的 demo:https://www.swiper.com.cn/demo/index.html
- 查看基本使用流程:https://www.swiper.com.cn/usage/index.html
- 查看 API 文档,去配置自己的插件:https://www.swiper.com.cn/api/index.html
- 注意:多个 swiper 同时使用的时候,类名需要注意区分
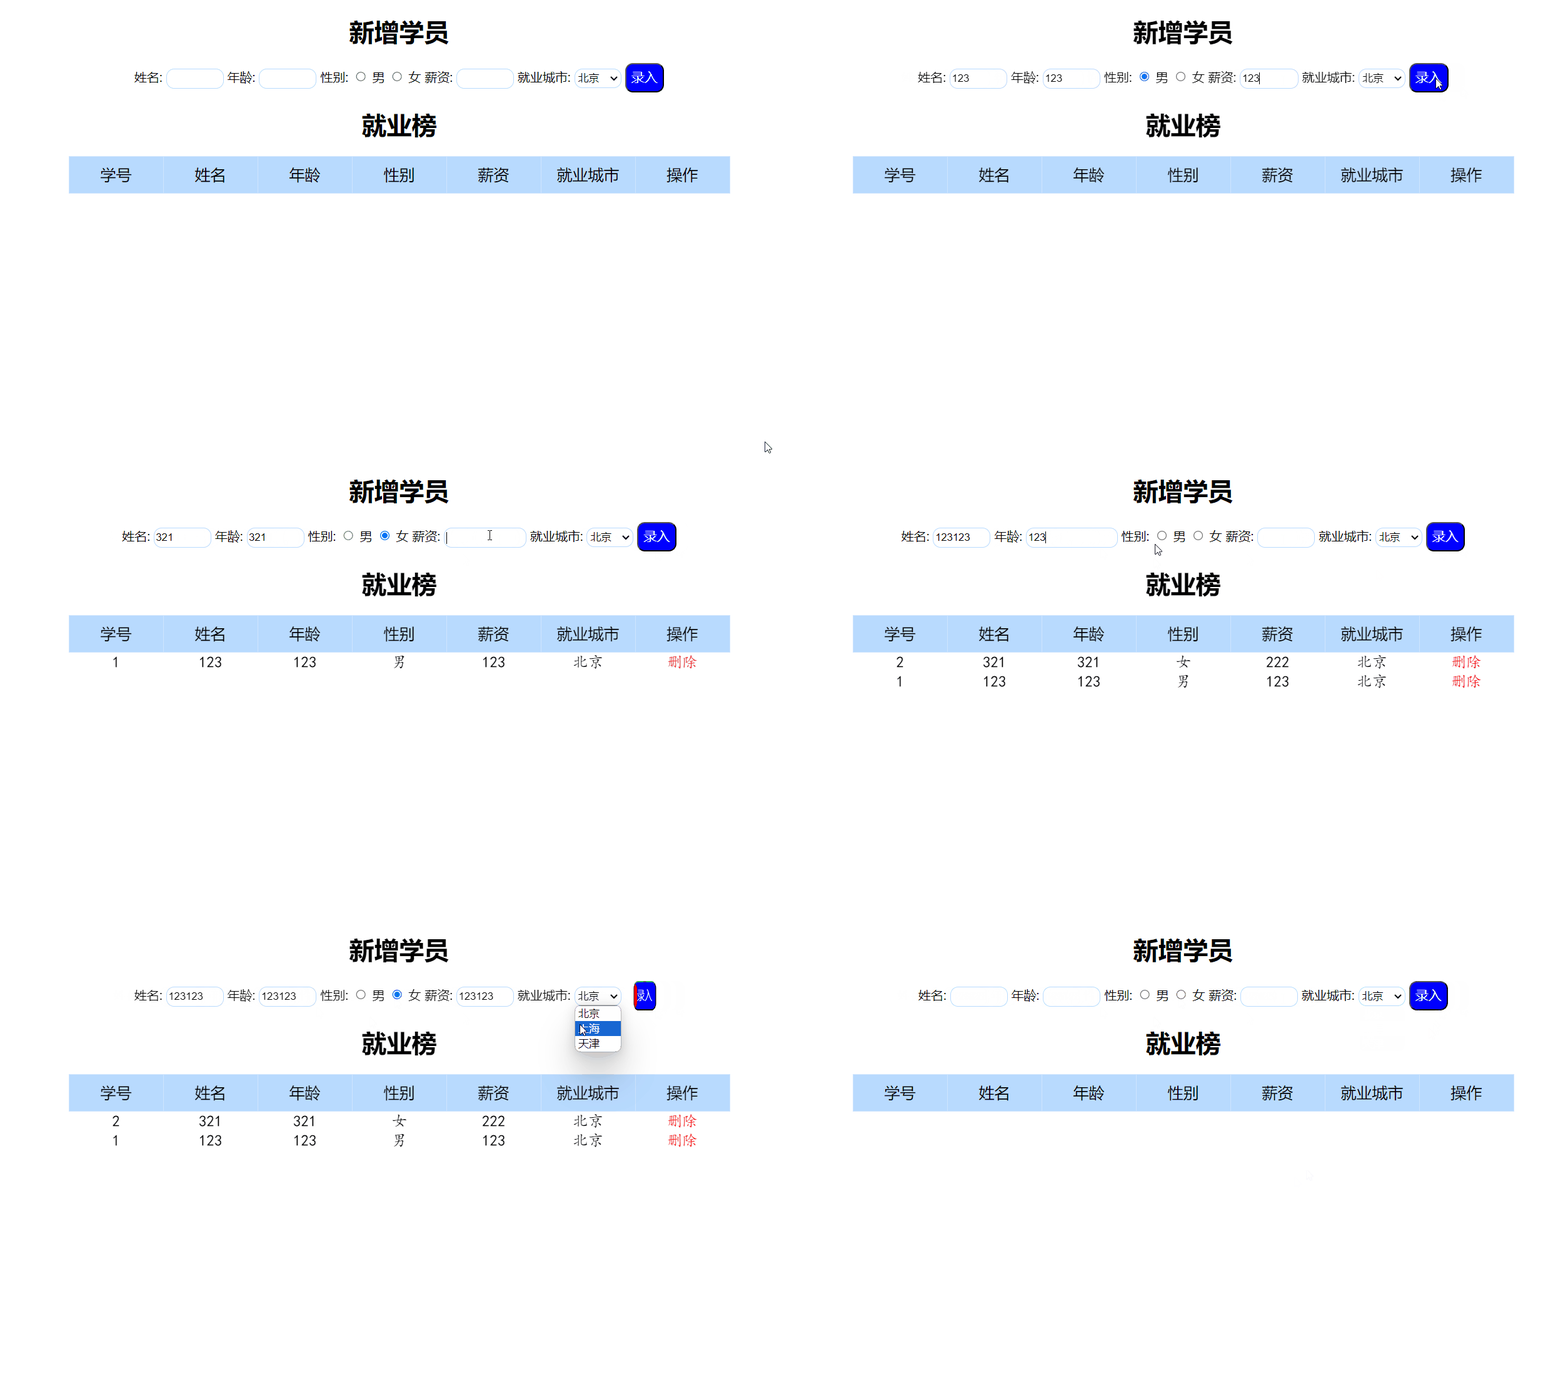
# 学生信息表案例
说明:
本次案例,我们尽量减少 dom 操作,采取操作数据的形式
增加和删除都是针对于数组的操作,然后根据数组数据渲染页面
代码:
html
<link rel="stylesheet" href="./css/index.css" /> | |
</head> | |
<body> | |
<h1 class="one">新增学员</h1> | |
<form class="info" autocomplete="off" action="#" method="GET"> | |
姓名: <input type="text" id="name" name="name" /> | |
年龄: <input type="text" id="gender" name="gender" /> | |
性别: <input type="radio" class="sex" name="sex" value="男" checked="checked"/> 男 | |
<input type="radio" class="sex" name="sex" value="女"/> 女 | |
薪资: <input type="text" id="salary" name="salary"/> | |
就业城市: <select id="city" name="city"> | |
<option value="北京">北京</option> | |
<option value="上海">上海</option> | |
<option value="天津">天津</option> | |
</select> | |
<button class="add">录入 | |
<div class="add_add">点击</div> | |
</button> | |
</form> | |
<h1>就业榜</h1> | |
<table class="tab"> | |
<thead> | |
<tr> | |
<th>学号</th> | |
<th>姓名</th> | |
<th>年龄</th> | |
<th>性别</th> | |
<th>薪资</th> | |
<th>就业城市</th> | |
<th>操作</th> | |
</tr> | |
</thead> | |
<tbody class="tbody"> | |
</tbody> | |
</table> | |
<script src="./js/index.js"></script> | |
</body> |
less
body { | |
margin: 0; | |
padding: 0; | |
-webkit-tab-heiglight-color: transparent; | |
perspective: 300px; | |
} | |
a { | |
text-decoration: none; | |
color: red; | |
} | |
h1 { | |
text-align: center; | |
margin: 20px 0; | |
} | |
.info { | |
text-align: center; | |
transform-style: perserver-3d; | |
input[type="text"] { | |
width: 68px; | |
height: 22px; | |
border: 1px #b8daff solid; | |
border-radius: 10px; | |
outline: none; | |
transition: all .5s; | |
&:hover { | |
width: 130px; | |
} | |
} | |
input[type="radio"]:checked { | |
animation: move linear 1s; | |
} | |
select[name="city"] { | |
width: 60px; | |
height: 25px; | |
border-radius: 10px; | |
border: 1px #b8daff solid; | |
} | |
.add { | |
position: relative; | |
border-radius: 10px; | |
background-color: blue; | |
font-size: 17px; | |
width: 50px; | |
line-height: 2; | |
padding: 0; | |
color: #fff; | |
transform: preserver-3d; | |
transition: all 1s; | |
overflow: hidden; | |
&:hover { | |
.add_add | |
{ | |
transform: translateX(48px); | |
} | |
transform: rotateY(360deg); | |
} | |
} | |
.add_add | |
{ | |
position: absolute; | |
width: 0; | |
height: 100%; | |
width: 100%; | |
border-radius: 10px; | |
top: 0; | |
left: -48px; | |
background-color: red; | |
transition: all 1s; | |
} | |
} | |
.tab { | |
margin: 0 auto; | |
border-collapse: collapse; | |
border-spacing: 2px; | |
thead { | |
tr { | |
display: table-row; | |
vertical-align: inherit; | |
th { | |
display: table-cell; | |
width: 100px; | |
padding: 10px; | |
background-color: #b8daff; | |
font-size: 20px; | |
font-weight: 400; | |
} | |
th, | |
td { | |
border: 1px #cfe5ff solid; | |
} | |
} | |
} | |
tbody { | |
tr { | |
text-align: center; | |
&:hover:nth-child(2n) { | |
background-color: #ccc; | |
} | |
&:hover:nth-child(2n + 1) { | |
background-color: rgb(219, 116, 219); | |
} | |
td { | |
font: 20px 楷体; | |
color: #000; | |
} | |
} | |
} | |
} | |
@keyframes move { | |
0% { | |
transform: rotate(0); | |
} | |
55% { | |
transform: rotateY(180deg); | |
} | |
66% { | |
transform: rotate(-180deg); | |
} | |
88% { | |
transform: rotateX(180deg); | |
} | |
100% { | |
transform: rotate(-180deg); | |
} | |
} |
js
// 获取元素对象 | |
const uname = document.querySelector('#name') | |
const gender = document.querySelector('#gender') | |
const salary = document.querySelector('#salary') | |
const city = document.querySelector('#city') | |
const tbody = document.querySelector('.tbody') | |
const nameisNull = document.querySelectorAll('[name]') | |
// 声明一个空数组,增加和删除都是对这个数组进行操作 | |
const arr = [] | |
// 录入模块 | |
// 表单提交事件 | |
const info = document.querySelector('.info') | |
info.addEventListener('submit', function (e) { | |
// 当性别选择后用户才会点击提交否则进行安全判断,所以写在提交中获取 sex 的值 | |
const sex = document.querySelector('.sex:checked') | |
// 阻止表单的默认提交事件 | |
e.preventDefault() | |
// 创建对象 | |
const obj = { | |
// 获取提交表单输入的值,数组长度作为学生号 | |
stuId: arr.length + 1, | |
uname: uname.value, | |
gender: gender.value, | |
sex: sex.value, | |
salary: salary.value, | |
city: city.value | |
} | |
// 将创建好的对象 push 到数组中 | |
arr.push(obj) | |
// 提交表单重置表单清空输入框内的内容 | |
this.reset() | |
render() | |
}) | |
// 渲染函数 因为增加和删除都需要渲染 | |
function render() { | |
// 清除 tbody 之前的数据 | |
tbody.innerHTML = '' | |
// 循环遍历数组 | |
for (let i = 0; i < arr.length; i++) { | |
// 创建 tr 标签元素 | |
const tr = document.createElement('tr') | |
// 添加内容 | |
tr.innerHTML = `<td>${arr[i].stuId}</td> | |
<td>${arr[i].uname}</td> | |
<td>${arr[i].gender}</td> | |
<td>${arr[i].sex}</td> | |
<td>${arr[i].salary}</td> | |
<td>${arr[i].city}</td> | |
<td><a href="javascript:" data-id=${i}>删除</a></td>` | |
console.log(tbody.children.length) | |
if (tbody.children.length <= 0) { | |
tbody.appendChild(tr) | |
} else { | |
tbody.insertBefore(tr, tbody.children[0]) | |
} | |
} | |
} | |
// 删除操作 | |
// 事件委托 click 事件 | |
tbody.addEventListener('click', function (e) { | |
if (e.target.tagName === 'A') { | |
// 得到当前元素自定义属性 data-id | |
// 删除 arr 数组里面对应的数据 | |
arr.splice(e.target.dataset.id, 1) | |
render() | |
} | |
}) |
效果:
# 做安全校验
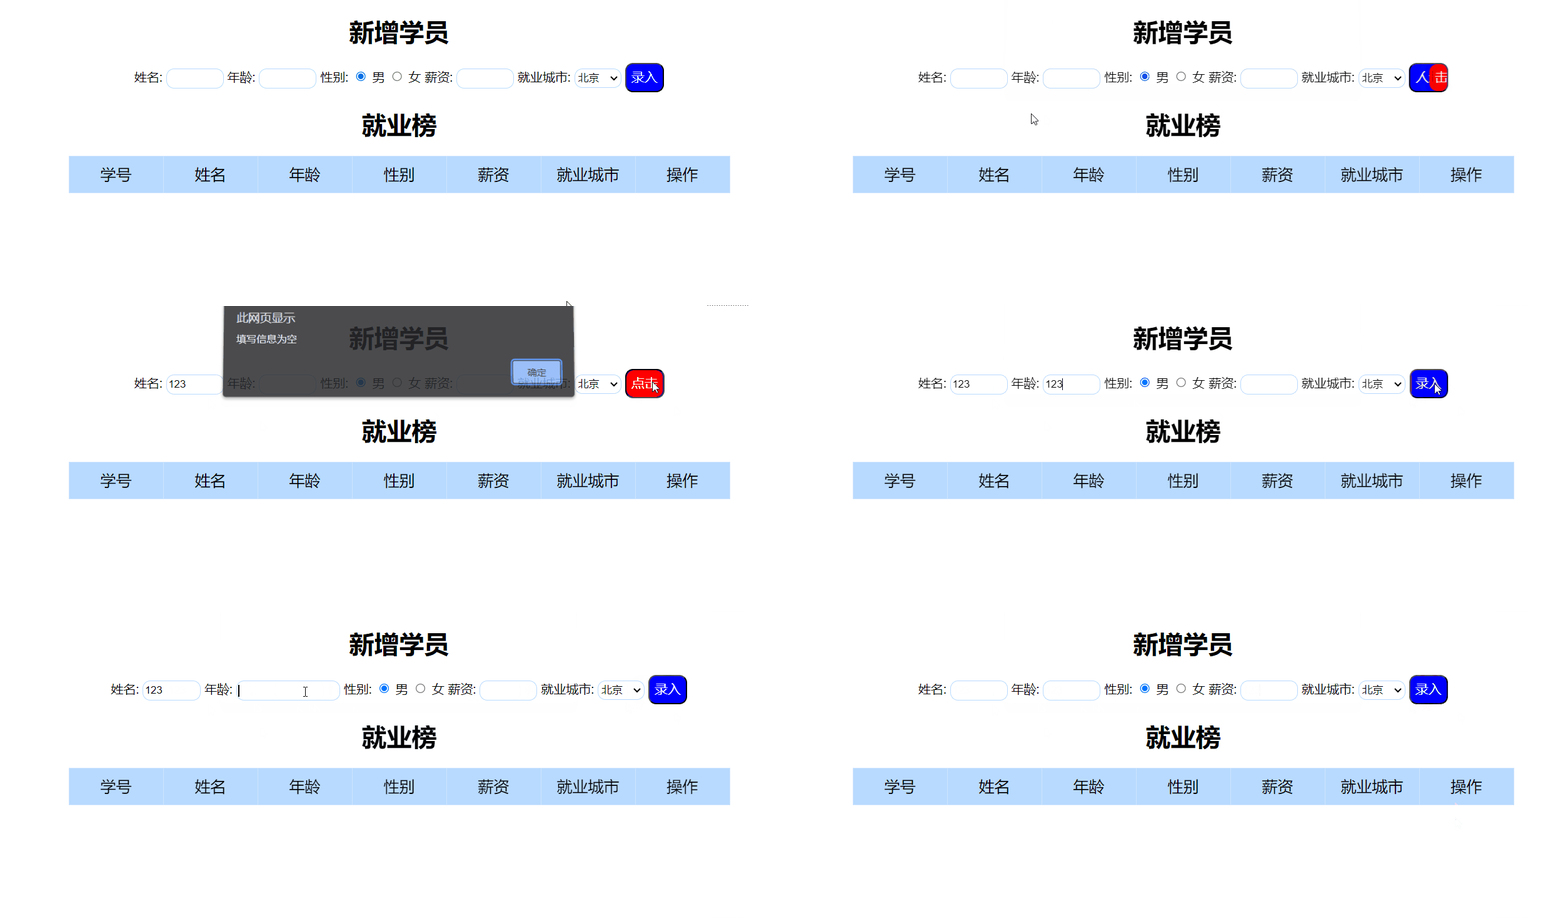
技巧:
不用一个一个的进行校验 ,通过查看表单中都有一个共同的特点,就是都加了 name 属性,因为表单中不写 name 属性拿不到值我们可以使用一个选择器将这些带有 name 的表单元素全部获取然后循环判断
<form class="info" autocomplete="off" action="#" method="GET"> | |
姓名: <input type="text" id="name" name="name" /> | |
年龄: <input type="text" id="gender" name="gender" /> | |
性别: <input type="radio" class="sex" name="sex" value="男" /> 男 | |
<input type="radio" class="sex" name="sex" value="女"/> 女 | |
薪资: <input type="text" id="salary" name="salary"/> | |
就业城市: <select id="city" name="city"> | |
<option value="北京">北京</option> | |
<option value="上海">上海</option> | |
<option value="天津">天津</option> | |
</select> | |
<button class="add">录入 | |
<div class="add_add">点击</div> | |
</button> | |
</form> |
js
for (let i = 0; i < nameisNull.length; i++) { | |
if (nameisNull[i].value === '') { | |
alert('填写信息为空') | |
return | |
} | |
} |
- 将 js 代码写到 提交事件中 因为提交才做出相应的判断
效果:
# Window 对象
- BOM (浏览器对象模型)
- 定时器 — 延时函数
- JS 执行机制
- location 对象
- navigator 对象
- histroy 对象
# 1 BOM
- BOM (Browser Object Model) 是浏览器对象模型.
- BOM 中包含了 DOM——BOM 是最大的也是顶级的

- window 对象是一个全局对象,也可以说是 JavaScript 中的顶级对象.
- 像 document,alert (),console.log () 这些都是 window 的属性,基本 BOM 的属性和方法都是 window 的。
- 所有通过 var 定义在全局作用域中的变量,函数都会变成 window 对象的属性和方法.
- window 对象下的属性和方法调用的时候可以省略 window.
# 2 定时器 — 延时函数
- JavaScript 内置的一个用来让代码延迟执行的函数,叫 setTimeout.
语法:
setTimeout(回调函数,等待的毫秒数) |
- setTimeout 仅仅只执行一次,所以可以理解为就是把一段代码延迟执行,平时省略 window。
清除延时函数:
let timer = setTimeout(回调函数,等待的毫秒数) | |
clearTimeout(timer) |
注意点:
- 延时器需要等待,所以后面的代码先执行 .
- 每一次调用延时器都会产生一个新的延时器.
# 定时器于延时器的区别
- 两种定时器对比:执行的次数
- 延时函数:到时间执行一次。
- 间歇函数:每隔一段时间就执行一次,除非手动清除。
# 3 JS 执行机制
# 经典面试题

结果:
结果都是 111 333 222
JavaScript 语言的一大特点就是 <font color=red> 单线程 </font>,也就是说,<font color=red > 同一个时间只能做一件事 </font>.
这是因为 JavaScript 这门脚本语言诞生的使命所致 ——JavaScript 是为处理页面中用户的交互,以及操作 DOM 而诞生的。比如我们对某个 DOM 元素进行添加和删除操作,不能同时进行。应该先进行添加,之后 DOM 再删除。
单线程就意味着,所有任务需要排队,前一个任务结束,才会执行后一个任务。这样所导致的问题是:如果 JS 执行的时间过长,这样就会造成页面的渲染不连贯,导致页面渲染加载阻塞的感觉。
- 为了解决这个问题,利用多核 CPU 的计算能力,HTML5 提出 Web Worker 标准, 允许 JavaScript 脚本创建多个线程。于是,JS 中出现了 <font color=red> 同步 </font> 和 < font color=red> 异步 </font>.
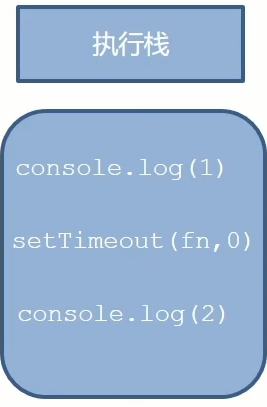
# 同步任务
同步任务都在主线程上执行,形成一个 <font color=red> 执行栈 </font>。
# 异步任务
JS 的异步是通过回调函数实现的。
一般而言,异步任务有以下三种类型:
- 普通事件,如 click,resize 等
- 资源加载,如 load,error 等
- 定时器,包括 setInterval,setTimeout 等
异步任务相关添加到 <font color=red> 任务队列 </font> 中 (任务队列也称为消息队列)。
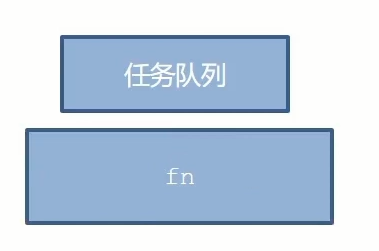
JS 中没有堆和栈 这些说法都是建立思想上的。
# JS 执行机制
1 先执行 <font color=red> 执行栈中的同步任务 </font>。
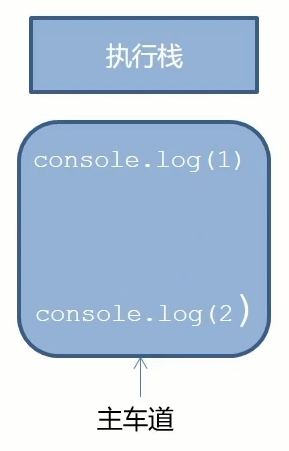
2 异步任务放入任务队列中。
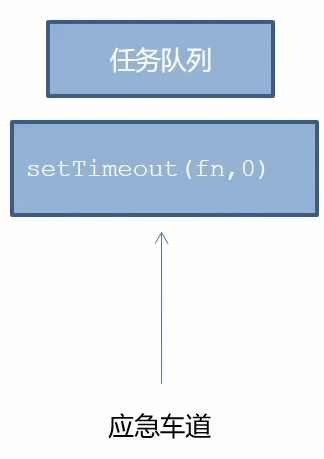
3 一旦执行栈中的所有同步任务执行完毕,系统就会按次序读取 <font color=red> 任务队列 </font> 中的异步任务,于是被读取的异步任务结束等待状态,进入执行栈,开始执行。
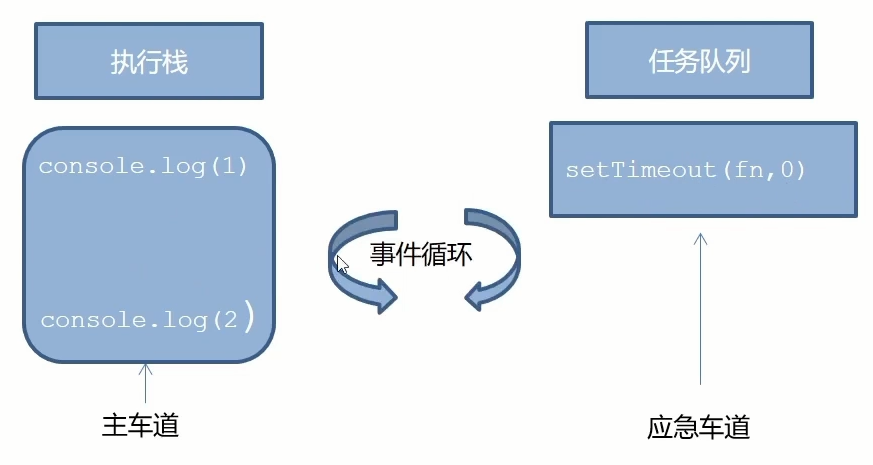
事件循环整个执行过程,流程图
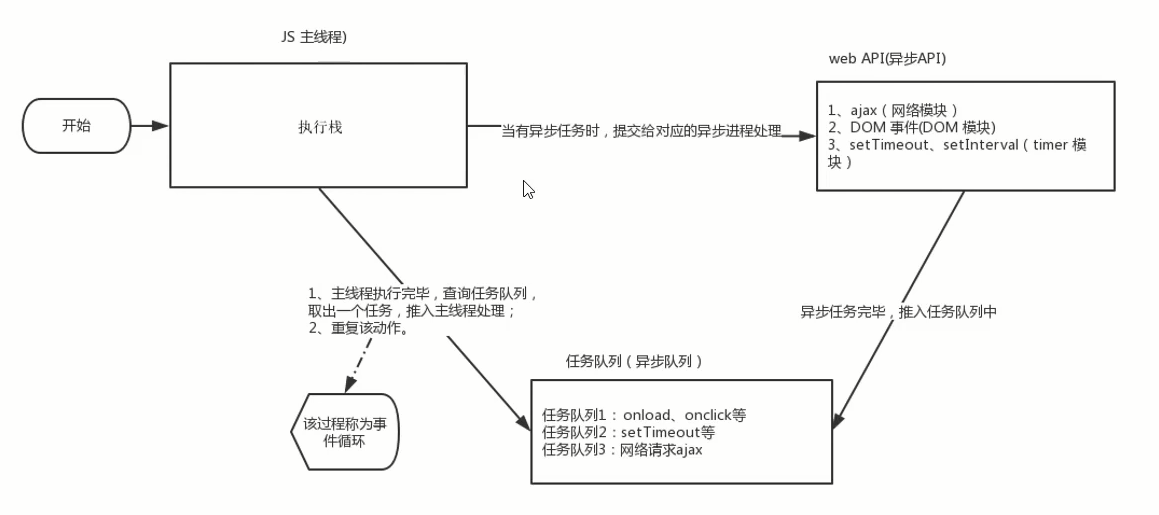
由于主线程不断的重复获得任务,执行任务,再获取任务,再执行,所以这种机制被称为 <font color=red> 事件循环 </font>(event loop)
# 4 location 对象
location 的数据类型是对象,它拆分并保存了 URL 地址的各个组成部分
常用属性和方法:
href 属性获取完整的 URL 地址,对其赋值时用于地址的跳转
// 可以得到当前文件 URL 地址 | |
console.log(location.href) | |
// 可以通过哦 js 方式跳转到目标地址 | |
location.href = 'https://www.baidu.com' |
- search 属性获取地址中 携带的参数,符号 ?后面部分
html
<form action="#" method="GET"> | |
<input type="text" name="name" /> | |
<input type="password" name="password" /> | |
<button>提交</button> | |
</form> |
js
console.log(location.search) | |
//'?name=123&password=123' |
- hash 属性获取地址中的哈希值,符号 # 后面部分
html
<a href="#/my">下载</a> |
js
console.log(location.hash) | |
//'#/my' |
后期 vue 路由的铺垫,经常用于不刷新页面,显示不同页面,比如 网易云音乐
reload 方法用来刷新当前页面,传入参数 true 时表示强制刷新
<button>点击刷新</button> | |
<script> | |
let btn = document.querySelector('button') | |
btn.addEventListener('click',function() { | |
location.reload(true) | |
// 强制刷新 类似 ctrl + f5 | |
}) | |
</script> |
# 5 navigator 对象
- navigator 的数据类型是对象,该对象下记录了浏览器自身的相关信息
- 常用属性和方法
- 通过 userAgent 检测浏览器的版本及平台
// 检测 userAgent (浏览器信息) | |
!(function(){ | |
const userAgent = navigator.userAgent | |
// 验证是否为 Android 或 iphone | |
const android = userAgent.match(/(Android);?[¥s¥/]+([¥d.]+)?/) | |
const iphone = userAgent.match(/(iPhone¥sOS)¥s([¥d_]+)/) | |
// 如果是 Android 或 iPhone,则跳转至移动站点 | |
if(android || iphone){ | |
location.href = 'http://m.doukai.cn' | |
} | |
}) |
# 6 history 对象
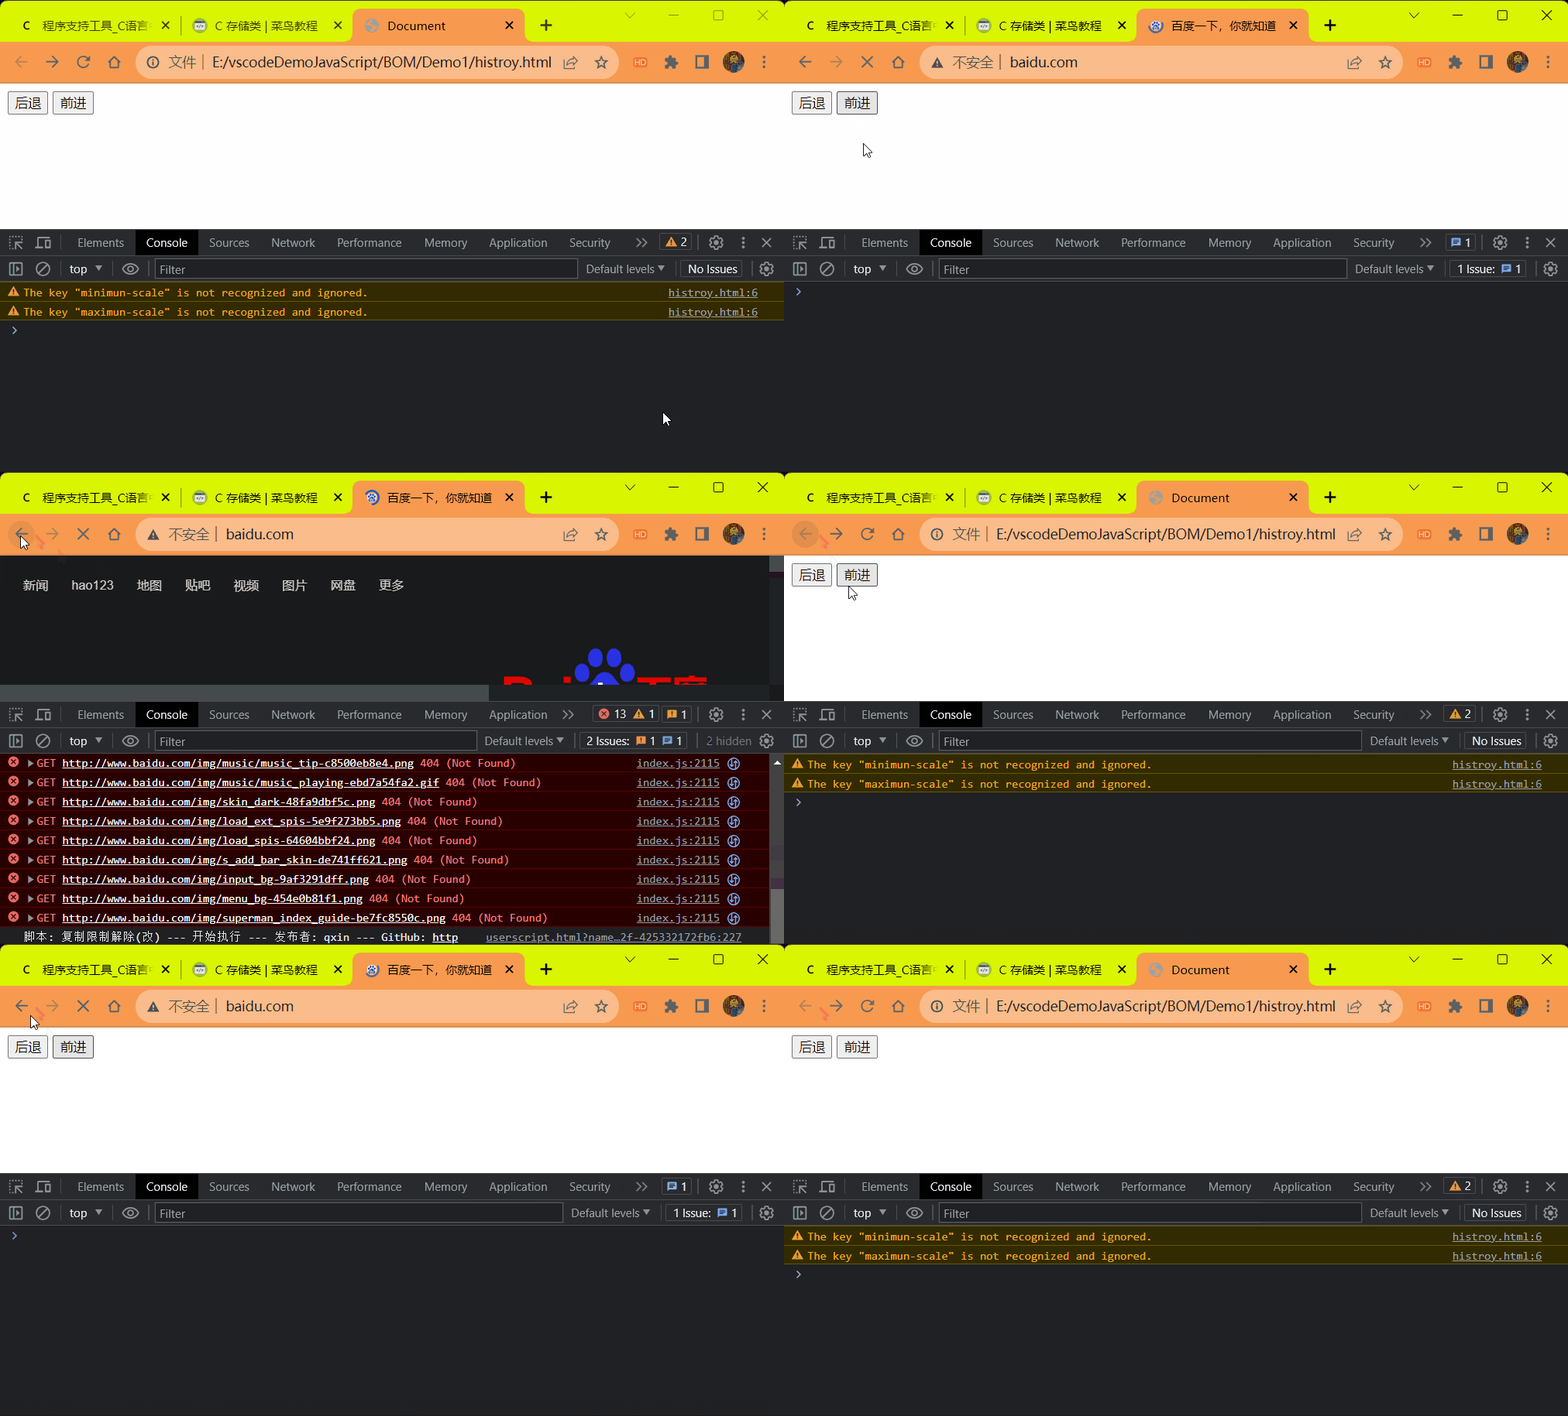
history 的数据类型是对象,主要管理历史记录,该对象与浏览器地址栏的操作相对应,如前进,后退,历史记录等。
常用属性和方法:
| histroy 对象方法 | 作用 |
|---|---|
| back() | 可以后退功能 |
| forward() | 前进功能 |
| go (参数) | 前进后退功能,参数如果是 1 前进 1 个页面,如果是 - 1 后退 1 个页面 |
history 对象一般在实际开发中比较少用,但是会在一些 OA 办公系统中见到。

代码:
html
<body> | |
<button>后退</button> | |
<button>前进</button> | |
<script src="./js/histroy.js"></script> | |
</body> |
js
const button1 = document.querySelector('button:nth-child(1)') | |
const button2 = document.querySelector('button:nth-child(2)') | |
button1.addEventListener('click',function() { | |
// 后退一步 | |
// history.back() | |
history.go(-1) | |
}) | |
button2.addEventListener('click',function() { | |
// 前进一步 | |
// history.forward() | |
history.go(1) | |
}) |
效果:
# 7 本地存储
# 1 本地存储介绍 —localStorage
- 以前我们页面写的数据一刷新页面就没有了
- 随着互联网的快速发展,基于网页的应用越来越普遍,同时也变得越来越复杂,为了满足各种各样的需求,会经常性在本地存储大量的数据,HTML5 规范提出了相关解决方案。
- 数据存储在 <font color=red> 用户浏览器 </font> 中
- 设置,读取方便,甚至页面刷新不丢失数据
- 容量较大,sessionStorage 和 localStorage 约 5M 左右
- 常见的使用场景
- https://todomvc.com/examples/vanilla-es6/ 页面刷新数据不丢失,通过 TODO 代办事项网页来体验本地存储
- 作用:可以将数据永久存储在本地 (用户的电脑),除非手动删除,否则关闭页面也会存在
- 特性:
- 可以多个窗口 (页面) 共享 (同一浏览器可以共享)
- 以键值对的形式存储使用
- 存储数据时先将数据转换为字符串再存入,取出时也是字符串类型的
语法:
存储数据:
localStorage.setitem(key,value) |
操作:
console.log(localStorage) | |
// 重复的 key 会覆盖 | |
localStorage.setItem('name','张三') | |
localStorage.setItem('name1','李四') | |
localStorage.getItem('name') | |
localStorage.removeItem('name1') | |
localStorage.clear() | |
localStorage.setItem('age',18) | |
localStorage.getItem('age') // 获取的是字符串类型数值 |
# 总结
- localStorage 作用是什么?
- 可以将数据永久存储在本地 (用户电脑) ,除非手动删除,否则关闭页面也会存在.
- localStorage 存储,获取,删除的语法是什么?
- 存储:localStorage.setItem (key,value)
- 获取:localStorage.getItem (key)
- 删除:localStorage.removeItem (key)
- 存储数据时先将数据转换为字符串再存入,取出时也是字符串类型的
# 2 本地存储介绍 —sessionStorage
- 特性:
- 生命周期为关闭浏览器窗口
- 在同一个窗口 (页面) 下数据可以共享
- 以键值对的形式存储使用
- 用法 跟 localStorage 基本相同
# 3 存储复杂数据类型
- 本地只能存储字符串,<font color=red> 无法直接存储复杂数据类型 </font>.
const obj = { | |
uname: '张三', | |
age: 18, | |
gender: '女' | |
} | |
// 本地存储,存储复杂数据类型 | |
localStorage.setItem('obj',obj) | |
// 取出复杂数据类型 数据 | |
console.log(localStorage.getItem('obj')) |
存储的结果:

取出的结果:

解决问题的步骤:
- 使用 JSON.stringify (复杂数据类型)
- 将复杂数据类型转换为 JSON 格式
- 使用 JSON.parse (JSON 数据)
- 将复杂数据类型 JSON 格式的数据解析为 一个对象
取出的数据不能使用了,所以直接本地存储复杂数据类型是不对的。
- 解决:需要将复杂数据类型转换为 JSON 字符串,再存储到本地。
- 语法:JSON.stringify (复杂数据类型)
const obj = { | |
uname: '张三', | |
age: 18, | |
gender: '女' | |
} | |
// 本地存储,存储复杂数据类型 直接存储会导致数据取出不能使用 使用 JSON.stringify 转换为 JSON 数据 | |
localStorage.setItem('obj',JSON.stringify(obj)) | |
// 取出复杂数据类型 数据 | |
console.log(localStorage.getItem('obj')) |
存储结果:

取出结果:

如果直接取出结果还是字符串类型的,我们可以使用 JSON.parse 将 JSON 数据解析为对象
- 语法:
JSON.parse(JSON数据对象) |
const obj = { | |
uname: '张三', | |
age: 18, | |
gender: '女' | |
} | |
// 本地存储,存储复杂数据类型 直接存储会导致数据取出不能使用 使用 JSON.stringify 转换为 JSON 数据 | |
localStorage.setItem('obj',JSON.stringify(obj)) | |
// 取出复杂数据类型 数据 使用 JSON.parse 将 JSON 数据解析为对象 | |
console.log(JSON.parse(localStorage.getItem('obj'))) |
取出结果:

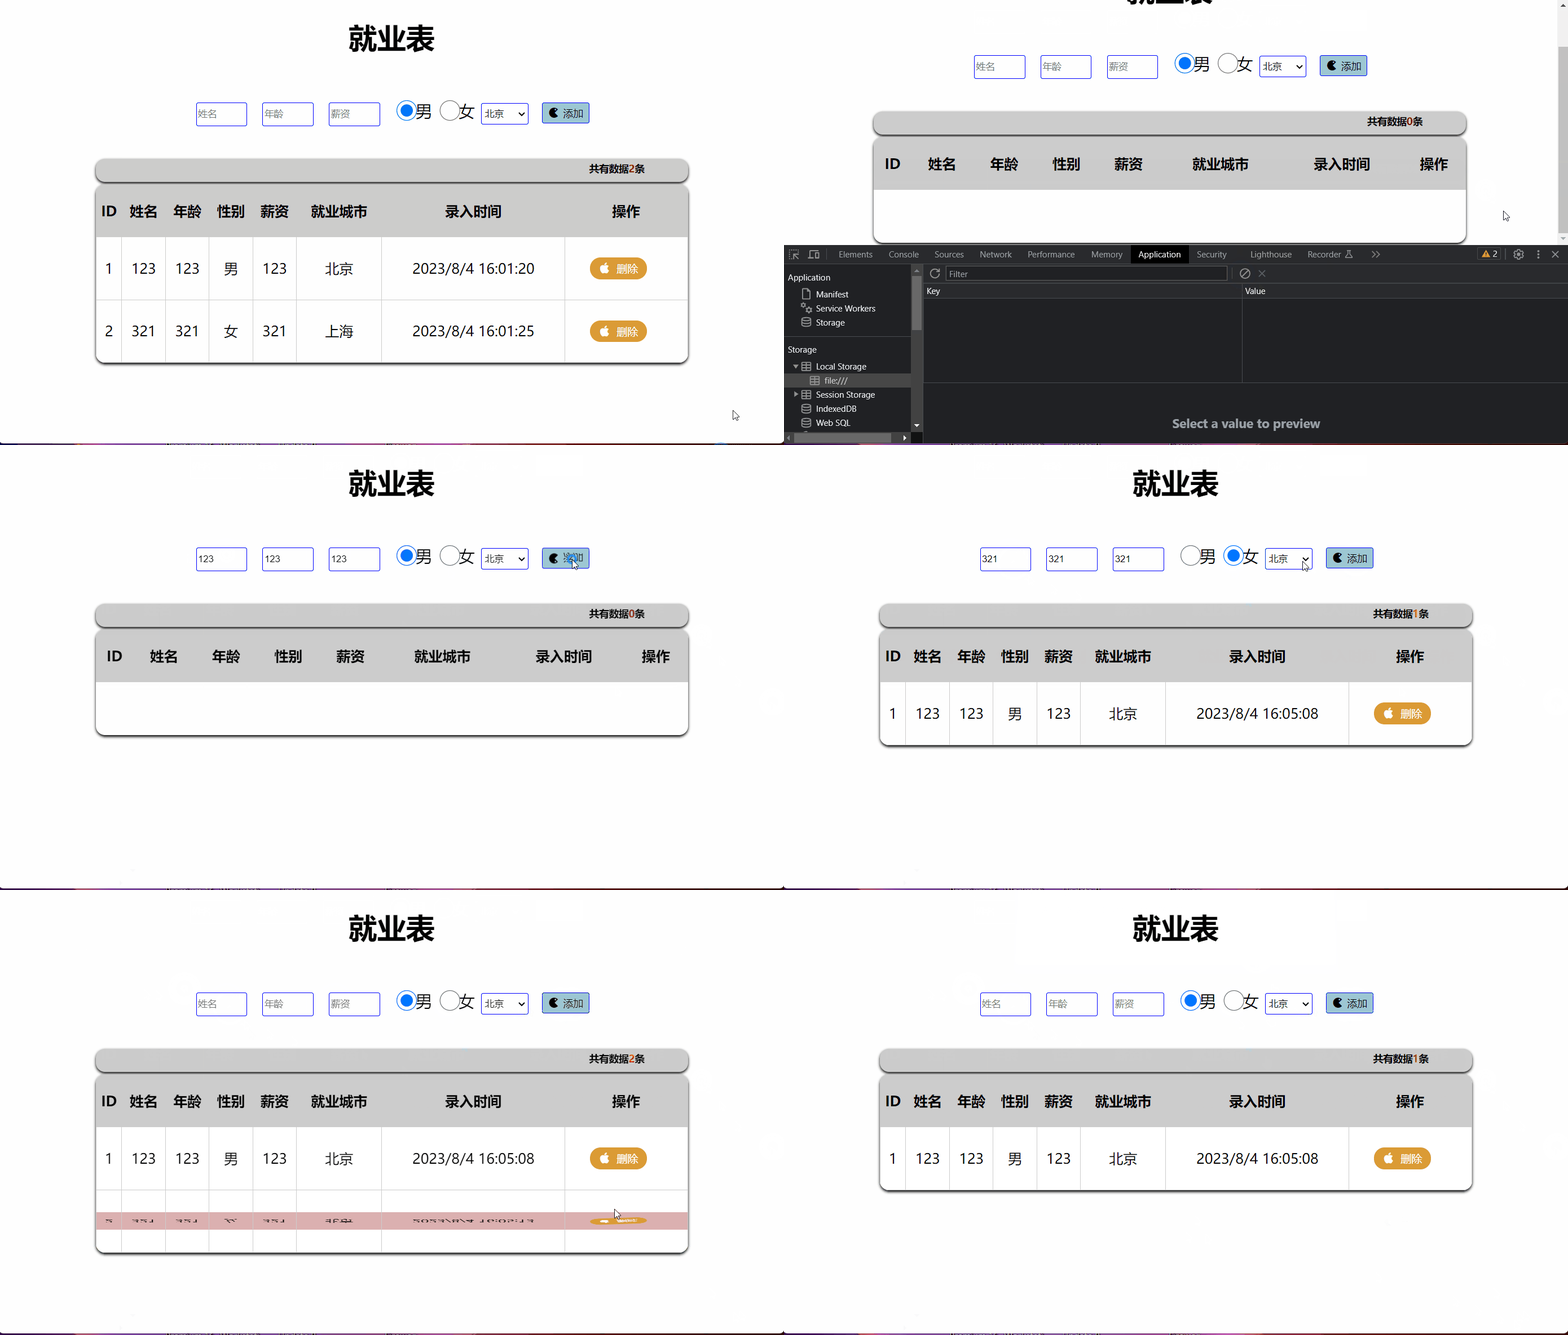
# 综合案例 — 学生就业统计表
# 渲染业务
根据持久化数据 <font color=red> 渲染页面 </font>.
核心步骤:
根据数据渲染页面。遍历数组,根据数据生成 tr,里面填充数据,最后追加给 tbody
- 渲染业务要封装成一个函数
render - 我们使用
map方法遍历数组,里面更换数据,然后会 <font color=red> 返回 </font > 有数据的 tr 数组 - 通过 json 方法把 map 返回的数组转换为字符串.
- 把字符串通过 innerHTML 赋值给 tbody
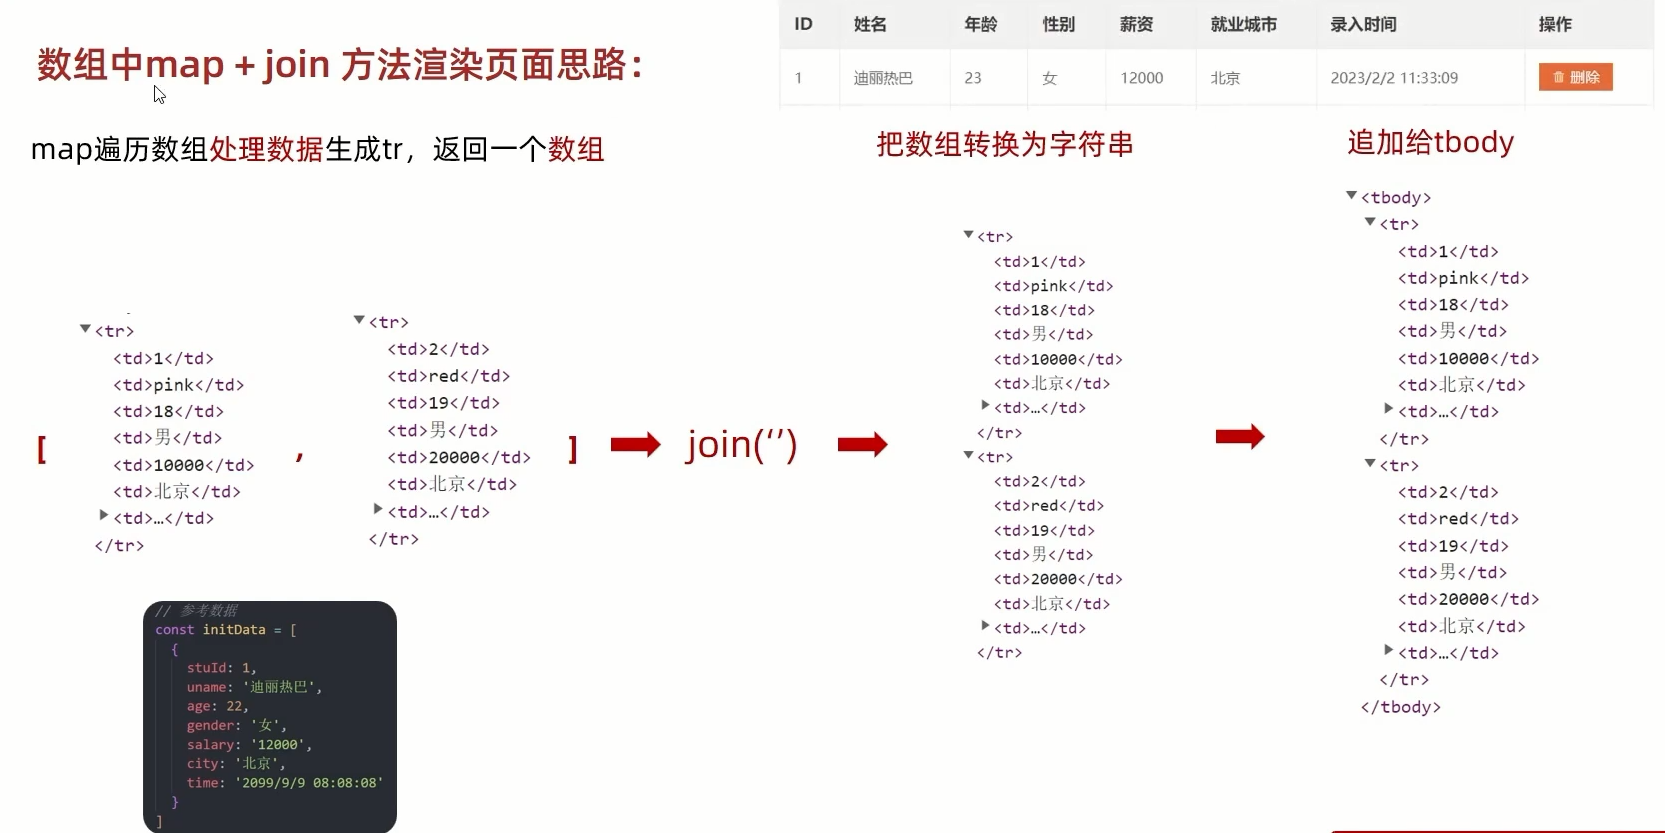
字符串拼接新思路:(效率更高,开发常用的写法)
- 利用 map () 和 join() 数组方法实现字符串拼接
代码:
html
<!DOCTYPE html> | |
<html lang="en"> | |
<head> | |
<meta charset="UTF-8"> | |
<meta name="viewport" content="width=device-width, initial-scale=1.0, | |
minimun-scale=1.0,maximun-scale=1.0,user-scalable=no"> | |
<title>Document</title> | |
<link rel="stylesheet" href="./css/index.css"/> | |
</head> | |
<body> | |
<h1>就业表</h1> | |
<form action="#" class="info" autocomplete="off" method="GET"> | |
<input type="text" class="uname" name="name" placeholder="姓名"/> | |
<input type="text" class="age" name="age" placeholder="年龄"/> | |
<input type="text" class="salary" name="salary" placeholder="薪资"/> | |
<label class="sex_label"> | |
<input type="radio" class="sex" name="sex" value="男" checked/> 男 | |
</label> | |
<label class="sex_label"> | |
<input type="radio" class="sex" name="sex" value="女"/> 女 | |
</label> | |
<select class="city"> | |
<option value="北京">北京</option> | |
<option value="上海">上海</option> | |
<option value="天津">天津</option> | |
</select> | |
<button class="submit"> 添加</button> | |
</form> | |
<div class="title">共有数据<span class="num">0</span>条</div> | |
<table class="tab"> | |
<thead> | |
<tr> | |
<th>ID</th> | |
<th>姓名</th> | |
<th>年龄</th> | |
<th>性别</th> | |
<th>薪资</th> | |
<th>就业城市</th> | |
<th>录入时间</th> | |
<th>操作</th> | |
</tr> | |
</thead> | |
<tbody> | |
</tbody> | |
</table> | |
<script src="./js/index.js"></script> | |
</body> | |
</html> |
less
@import 'iconfont'; | |
@media screen and (min-width: 350px) { | |
html { | |
font-size: 25px; | |
} | |
} | |
@media screen and (min-width: 450px) { | |
html { | |
font-size: 30px; | |
} | |
} | |
@media screen and (min-width: 550px) { | |
html { | |
font-size: 36px; | |
} | |
} | |
@media screen and (min-width: 750px) { | |
html { | |
font-size: 50px; | |
} | |
} | |
@media screen and (min-width: 850px) { | |
html { | |
font-size: 56px; | |
} | |
} | |
body { | |
min-width: 350px; | |
margin: 0; | |
padding: 0; | |
-webkit-tab-heiglight-color: transparent; | |
perspective: 300px; | |
width: 15rem; | |
margin: 0 auto; | |
box-sizing: border-box; | |
-webkit-box-sizing: border-box; | |
background-color: #fff; | |
} | |
h1 { | |
text-align: center; | |
font-size: .7321rem; | |
} | |
.info { | |
text-align: center; | |
input, | |
select { | |
margin: 0 .0472rem; | |
width: 1.1929rem; | |
height: .5357rem; | |
outline: none; | |
border-radius: 3px; | |
border: 1px blue solid; | |
} | |
input { | |
transition: width .5s; | |
&:hover { | |
width: 1.7857rem; | |
} | |
} | |
.sex_label { | |
position: relative; | |
margin-left: 0.5571rem; | |
font-size: .4107rem; | |
.sex { | |
margin: 0; | |
position: absolute; | |
top: 0; | |
left: -0.4821rem; | |
width: .5357rem; | |
&:checked { | |
transition: all .5s; | |
transform: rotateY(360deg); | |
} | |
} | |
} | |
.submit { | |
background-color: rgb(157, 199, 211); | |
font-family: 'icomoon'; | |
width: 1.1964rem; | |
height: .5357rem; | |
border: 1px blue solid; | |
border-radius: 3px; | |
transition: all .5s; | |
font-size: .25rem; | |
overflow: hidden; | |
&:hover { | |
transform: rotateX(180deg); | |
} | |
} | |
} | |
.title { | |
margin: 45px auto 0; | |
width: 15rem; | |
height: .5893rem; | |
background-color: #ccc; | |
font-size: .25rem; | |
font-weight: bold; | |
line-height: 2; | |
text-indent: 50em; | |
color: #000; | |
border-radius: 13px; | |
box-shadow: 0 2px 4px rgba(0, 0, 0, 1); | |
.num { | |
color: red; | |
} | |
} | |
.tab { | |
margin: .0500rem auto; | |
width: 100%; | |
font-size: .3571rem; | |
height: 1rem; | |
border-collapse: collapse; | |
text-align: center; | |
border-radius: 13px; | |
overflow: hidden; | |
box-shadow: 0 2px 4px rgba(0, 0, 0, 1); | |
thead, | |
tbody { | |
height: 1.3393rem; | |
border: 1px #ccc solid; | |
tr { | |
border: 1px #ccc solid; | |
td { | |
border: 1px #ccc solid; | |
.del { | |
&:before { | |
content: ''; | |
font-family: 'icomoon'; | |
margin-right: .1786rem; | |
} | |
border-radius: .2679rem; | |
display: block; | |
text-align: center; | |
text-decoration: none; | |
background-color: rgb(219, 155, 53); | |
width: 1.4464rem; | |
font-size: .2679rem; | |
line-height: 2; | |
color: #fff; | |
margin-left: .6071rem; | |
transition: all .5s; | |
&:hover { | |
transform: rotateZ(360deg); | |
} | |
} | |
} | |
} | |
} | |
thead { | |
background-color: #ccc; | |
} | |
tbody { | |
tr { | |
transition: all .5s; | |
height: 1.5893rem; | |
&:hover:nth-child(2n) { | |
background-color:rgb(206, 144, 144); | |
transform: rotateX(360deg); | |
} | |
&:hover:nth-child(2n+1) { | |
background-color:rgb(33, 80, 31); | |
transform: rotateX(360deg); | |
} | |
} | |
} | |
} |
js
const tbody = document.querySelector('tbody') | |
const num = document.querySelector('.num') | |
// 1. 渲染业务 | |
// 1.1 先读取本地存储的数据 | |
// (1) 本地存储有数据则记得转换为对象然后存储到变量里面,后期用于渲染页面 | |
// localStorage.setItem('user', JSON.stringify(arr)) | |
// (2) 如果没有数据,则用,空数组来代替 使用逻辑中断 | |
const data = JSON.parse(localStorage.getItem('data')) || [] | |
console.log(data) | |
// 1.2 利用 map 和 join 方法来渲染页面 | |
function render() { | |
// (1). 利用 map 遍历数组,返回对应 tr 的数组 | |
const trArr = data.map(function (ele, index) { | |
return ` | |
<tr> | |
<td>${ele.stuId}</td> | |
<td>${ele.uname}</td> | |
<td>${ele.age}</td> | |
<td>${ele.sex}</td> | |
<td>${ele.salary}</td> | |
<td>${ele.city}</td> | |
<td>${ele.time}</td> | |
<td> | |
<a href="javascript:" class="del" data-id=${index}>删除</a> | |
</td> | |
</tr> | |
` | |
}) | |
console.log(trArr) | |
// (2). 把数组转换为字符串 | |
// (3). 把生成的字符串追加给 tbody | |
tbody.innerHTML = trArr.join('') | |
// 显示共有几条数据 | |
num.innerHTML = trArr.length | |
} | |
render() | |
// 新增业务 | |
const uname = document.querySelector('.uname') | |
const age = document.querySelector('.age') | |
const salary = document.querySelector('.salary') | |
const city = document.querySelector('.city') | |
const info = document.querySelector('.info') | |
info.addEventListener('submit', function (e) { | |
const sex = document.querySelector('.sex:checked') | |
// 阻止默认行为 | |
e.preventDefault() | |
if (!uname.value || !age.value || !salary.value) { | |
alert('内容不能为空') | |
} | |
data.push( | |
{ | |
// ID 序号,下次的结果是上次的值相加。 | |
// 避免空数组调用 stuId 报错 使用三目运算符,非 0 即为真 非 0 即后者 + 前者 得到结果 否则直接给 1 | |
stuId: data.length ? data[data.length - 1].stuId + 1 : 1, | |
uname: uname.value, | |
age: age.value, | |
salary: salary.value, | |
sex: sex.value, | |
city: city.value, | |
time: new Date().toLocaleString() | |
} | |
) | |
render() | |
this.reset() | |
localStorage.setItem('data', JSON.stringify(data)) | |
}) | |
tbody.addEventListener('click', function (e) { | |
if (e.target.tagName === 'A') { | |
if (confirm('你确定删除吗?删除数据可是不挽回的')) { | |
data.splice(e.target.dataset.id, 1) | |
render() | |
localStorage.setItem('data', JSON.stringify(data)) | |
} | |
} | |
}) |
效果:
