# webAPIs🎄
# 变量声明♦️
💠
变量声明有三个 var,let 和 const
我们应该用哪个呢?
首先 var 先排除,老派写法,问题很多,可以淘汰掉。。。
<font title="red">let</font> <span alt="blink"><span alt="shake">or</span></span> <font title="green">const</font>?
建议:<font title="red"><span alt="blink">const 优先 </span></font>,尽量使用 const, 原因是:
- const 语义化更好
- 很多变量我们声明的时候就知道它不会被更改了,那为什么不用 const 呢?
- 实际开发中也是,比如 react 框架,基本 const
如果你还在纠结,那么我建议:
- <span style="color:red"> 有了变量先给 const, 如果发现它后面是要被修改的,再改为 let</span>.
const 声明的值不能更改,而且 const 声明变量的时候需要里面进行初始化
但是对于引用数据类型,const 声明的变量,里面存的 <span style="color:red"><font color="green"> 不是值 </font>,<font color="yellow"> 不是值 </font>,<font title="red"> 不是值 </font>,<font color="blue"> 是地址值 </font></span>.
const names = [] | |
names = [1,2,3] |
const obj = {} | |
obj = { | |
uname: '刘桑' | |
} |
<font style="color:red"><span alt="wavy"> 错误,它们的地址值是不一样的 </span></font>
const names = [] | |
names[0] = 1 | |
names[1] = 2 | |
names[2] = 3 |
const obj = {} | |
obj.uname = '刘桑' |
<font title="green"> 这是正确的 </font>.
总结:
- 以后声明变量我们优先使用哪个?
- const
- 有了变量先给 const, 如果发现它后面是要被修改的,再改为 let
- 为什么 const 声明的对象可以修改里面的属性?
- 因为对象是引用类型,里面存储的是地址,只要地址不变,就不会报错
- <font color="red"> 建议数组和对象使用 const 来声明 </font>.
- 什么时候使用 let 声明变量?
- 如果基本数据类型的值或者引用类型的地址发生变化的时候,需要用 let
- 比如 一个变量进行加减运算,比如 for 循环中的 i++ 这个值在循环时一直在改变
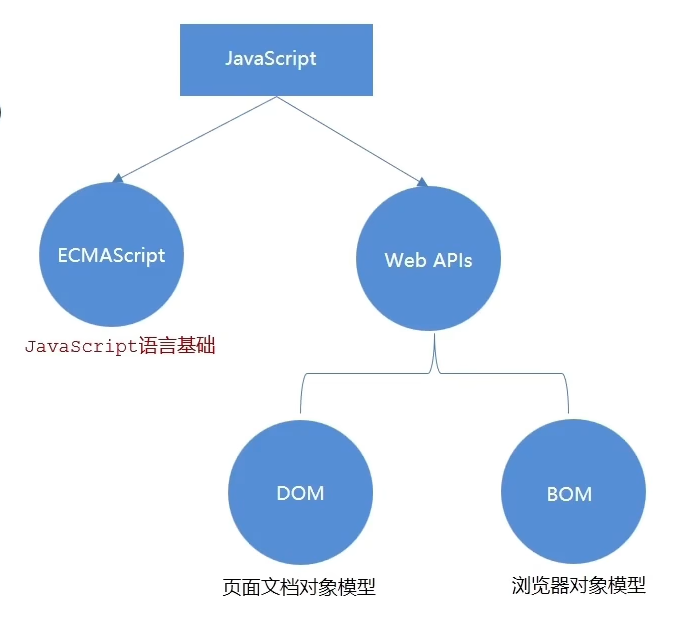
# WebAPI 基本认知🎄
💠
# 作用和分类🍊
作用:就是使用 js 去操作 html 和浏览器
分类:<font title="red">DOM</font>(文档对象模型),<font title="red">BOM</font>(浏览器对象模型)
# 什么是 DOM🗡
💠
DOM (Document Object Model-<font style="color:red"> 文档对象模型 </font>) 是用来呈现以及与任意 HTML 或 XML 文档交互的 API
白话:DOM 是浏览器提供的一套专门用来 <font style="color:red"> 操作网页内容 </font > 的功能
DOM 作用:🎲
- 开发网页内容特效和实现用户交互
- Web API 阶段我们学习哪两部分?
- DOM
- BOM
- DOM 是什么?有什么作用?
- DOM 是 <strong style="color:red"> 文档对象模型 </strong>.
- 操作网页内容,可以开发网页内容特效和实现用户交互
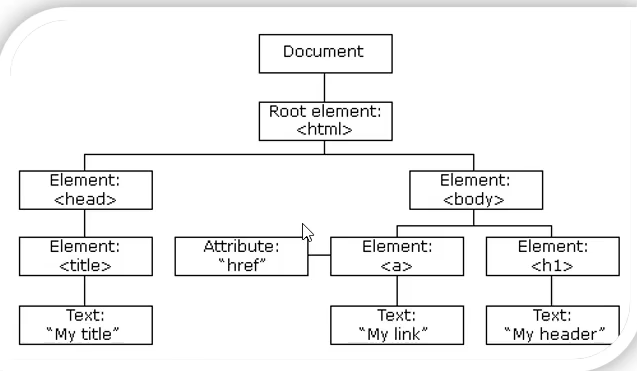
# DOM 树🎄
💠
DOM 树是什么.
- 将 HTML 文档以树状结构直观的表现出来,我们称之为文档树或 DOM 树
- 描述网页内容关系的名词
- 作用:<font color="red"> 文档树直观的体现了标签与标签之间的关系 </font>.
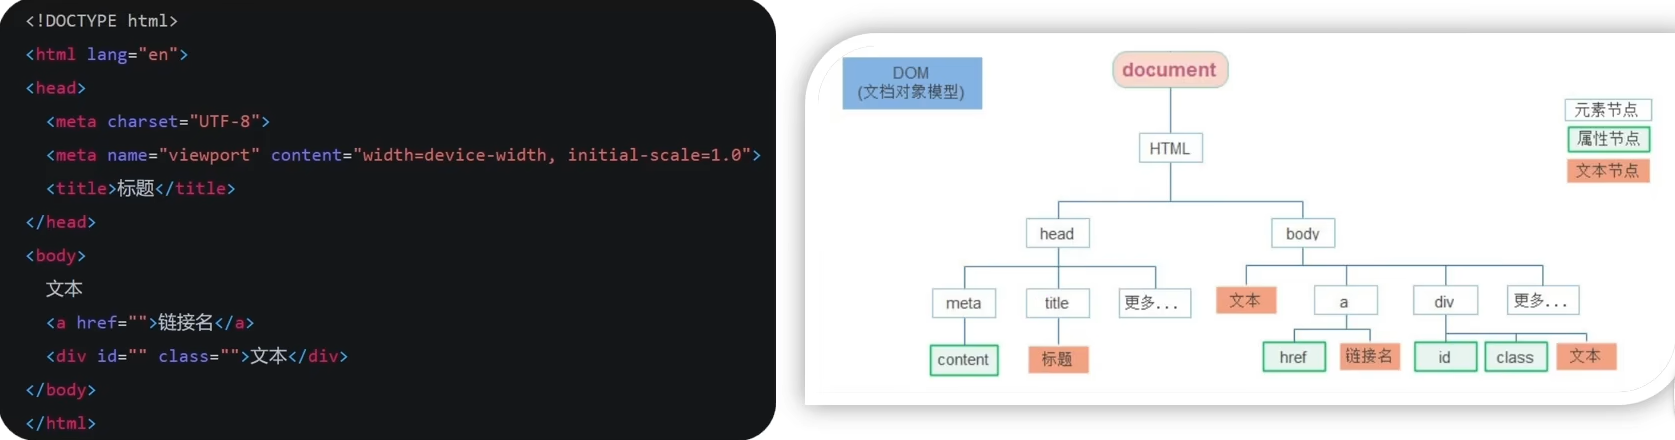
<font title="red"> 最大的是 document 对象然后就是 html,html 下有两个 head 和 body 就这样依次推理 </font>.
# DOM 对象💎 <span alt="shake">(重要)</span>
DOM 对象:浏览器根据 html 标签生成的 <font color="red">JS 对象 </font>, 任何一个标签都是一个 < font color="red"> 对象 </font>, 只要是 < font color="red"> 对象 </font> 就有 属性和方法.
- 所有的标签属性都可以在这个对象上面找到
- 修改这个对象的属性会自动映射到标签上
const div = document.querySelector('div') | |
console.dir(div)//dom 对象 | |
console.log(typeof div)//object |
# dir 专门用于打印对象的
在 DOM 中所有的标签都是一个对象
DOM 的核心思想.
- 把网页内容当作 <font color="red"> 对象 </font > 来处理
document 对象.
是 DOM 里提供的一个 <font color="red"> 对象 </font>.
所以它提供的属性和方法都是 <font color="red"> 用来访问和操作网页内容的 </font>.
- 例:document.write ()
网页所有内容都在 document 里面
总结:
- DOM 树是什么?
- 将 HTML 文档以树状结构直观的表现出来,我们称之为文档树或 DOM 树
- 作用:文档树直观的体现了标签与标签之间的关系。
- DOM 对象怎么创建的?
- 浏览器根据 html 标签生成的 JS 对象 (DOM 对象).
- DOM 的核心就是把 <font color="red"> 内容 </font > 当 < font color="red"> 对象 </font > 来处理
- document 是什么?
- 是 DOM 里提供的一个 <font title="red"> 对象 </font>.
- 网页所有内容都在 document 里面
# 获取 DOM 对象🎄
💠
目标:能查找 / 获取 DOM 对象
# 根据 CSS 选择器来获取 DOM 元素 (重点)🌳
提问:我们想要操作某个标签首先做什么?
- 肯定首先选中这个标签,跟 CSS 选择器类似,选中标签才能操作比如:
<!DOCTYPE html> | |
<html lang="en"> | |
<head> | |
<meta charset="UTF-8"> | |
<title>Title</title> | |
<style> | |
.box{ | |
width: 50px; | |
height: 50px; | |
background: red; | |
} | |
</style> | |
</head> | |
<body> | |
<div class="box"></div> | |
</body> | |
</html> |
- JS 也是同样的
- 查找元素 DOM 元素就是利用 JS 选择页面中标签元素
# 1 选择匹配第一个元素 querySelector
语法:
document.querySelector('css选择器') |
代码:
<body> | |
<div>123</div> | |
<div class="box">456</div> | |
<div class="box">789</div> | |
<span id="u">你好</span> | |
<ul> | |
<li>1</li> | |
<li>2</li> | |
<li>3</li> | |
</ul> | |
<script> | |
//querySelector 获取匹配的第一个元素 | |
const div = document.querySelector('div'); | |
console.dir(div);//123 | |
const box = document.querySelector('.box'); | |
console.dir(box);//456 | |
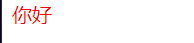
const span = document.querySelector('#u'); | |
console.dir(span);// 你好 | |
const l1 = document.querySelector('ul li:first-child'); | |
console.dir(l1);//1 | |
const l2 = document.querySelector('ul li:nth-child(2)'); | |
console.dir(l2);//2 | |
const l3 = document.querySelector('ul li:last-child'); | |
console.dir(l3);//3 | |
</script> | |
</body> |
结果:
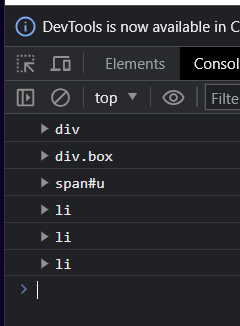
div:innerText: "123"

div.box:innerText: "456"

span#u:innerText: "你好"

li:innerText: "1"

li:innerText: "2"

li:innerText: "3"
修改样式:
const span = document.querySelector('#u'); | |
span.style.color = 'red'; |
结果:
querySelector 默认匹配指定元素的第一个被匹配到的元素,但是想要指定第 2 个或者其它则需要使用其它的选择器来完成,比如 结构伪类选择器。
参数:
包含一个或多个有效的 CSS 选择器 <font color="red"> 字符串 </font>.
返回值:
CSS 选择器匹配的 <font color="red"> 第一个元素 </font>,一个 HTMLElement 对象。
如果没有匹配到,则返回 null。
# 2 选择匹配的多个元素 querySelectorAll
语法:
document.querySelectorAll('css选择器'); |
得到的是一个 <font color="red"> 伪数组 </font>:
- 有长度有索引号的数组
- 但是没有 pop (),push () 等数组方法
想要得到里面的每一个对象,则需要遍历 (for) 的方式来获得。
注意事项:
- 哪怕只有一个元素,通过 querySelectorAll () 获取过来的也是一个 < font color="red"> 伪数组 </font>,里面只有一个元素而已。
代码:
<body> | |
<ul> | |
<li>1</li> | |
<li>2</li> | |
<li>3</li> | |
</ul> | |
<script> | |
//querySelectorAll 选择匹配多个元素 | |
const lis = document.querySelectorAll('ul li'); | |
console.dir(lis); | |
</script> | |
</body> |
结果:
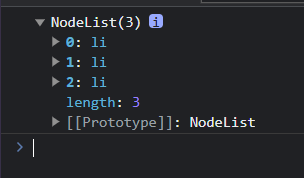
li:1

li:2

li:3
修改样式:
如果先要修改其中某一个改变颜色 则只需要加一个判断每个元素的值通过 innerHTML 来获取等于该值后就改变颜色
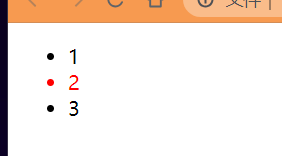
<body> | |
<ul> | |
<li>1</li> | |
<li>2</li> | |
<li>3</li> | |
</ul> | |
<script> | |
//querySelectorAll 选择匹配多个元素 | |
const lis = document.querySelectorAll('ul li'); | |
for (let i = 0; i < lis.length; i++) { | |
if(lis[i].innerHTML == '2'){ | |
lis[i].style.color = 'red'; | |
} | |
} | |
</script> | |
</body> |
效果:
参数:
包含一个或多个有效的 CSS 选择器 <font color="red"> 字符串 </font>。
返回值:
CSS 选择器匹配的 <font color="red">NodeList 对象集合 </font>。
总结:
获取一个 DOM 元素我们使用谁?能直接操作修改吗?
querySelector()
可以
获取多个 DOM 元素我们使用谁?能直接修改吗?如果不能可以怎么做到修改?
- querySelectorAll()
- 不可以,只能通过遍历的方式一次给里面的元素做修改但是也可以做一些判断来达到预期
<strong style="color:red"> 因为获取的是标签对象改变的是标签里的属性,标签是不变的所以可以使用 const 来声明 </strong>。
获取页面中的标签我们最终常用的哪两种方式?
- querySelectorAll();
- querySelector();
它们两者的区别是什么?
- querySelector (); 只能选择一个元素,可以直接操作
- querySelectorAll (); 可以选择多个元素,得到的是伪数组,需要遍历得到每一个元素对象
它们两者小括号里面的参数有什么注意事项?
- 里面写 css 选择器
- <strong style="color:red"> 必须是字符串,也就是必须加引号 </strong>。
# 其它获取 DOM 元素方法 (了解)🌳
// 根据 id 获取一个元素 | |
document.getElementById('nav'); | |
// 根据 标签获取一类元素 获取页面 所有 div | |
document.getElementsByTagName('div'); | |
// 根据 类名获取元素 获取页面 所有类名为 w 的 | |
document.getElementsByClassName('w'); |
后面 getElements 带 s 的都是 <font color="red"> 伪数组 </font> id 获取的是 < font color="red"> 单个 </font>。
# 操作元素内容
目标:能够修改元素的文本更换内容
DOM 对象都是根据标签生成的,所以操作标签,本质上就是操作 DOM 对象。
就是操作对象使用的点语法。
如果想要修改标签元素的里面的 <font color="red"> 内容 </font>,则可以使用如下几种方式:
- 对象.innerText 属性
- 对象.innerHTML 属性
<strong style="color:red"> 注意 </strong>:属性不加小括号.innerXXX 后面没有小括号。
# 对象.innerText 属性
将文本内容添加 / 更新到任意标签位置
<strong style="color:red"> 显示纯文本,不解析标签 </strong>。
代码:
<body> | |
<div class="box">我是文字的内容</div> | |
<script> | |
// 1. 获取元素 | |
const box = document.querySelector('.box') | |
// 修改文字内容 对象.innerText 属性 | |
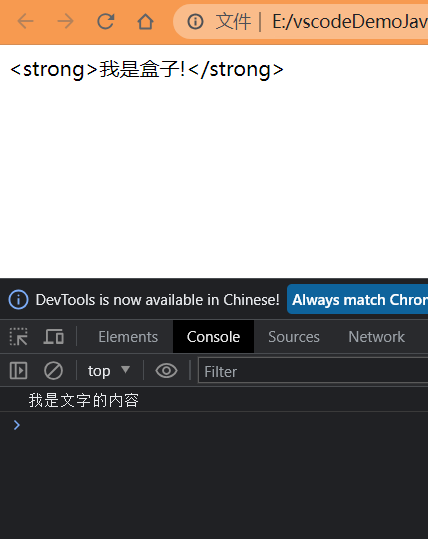
console.log(box.innerText) | |
box.innerText = '<strong>我是盒子!</strong>' // 修改盒子内容 并且 它是不解析内容的标签的 | |
</script> | |
</body> |
效果:
# 对象.innerHTML 属性
将文本内容添加 / 更新到任意标签位置
<strong style="color:red"> 会解析标签,多标签建议使用模板字符 </strong>。
代码:
<body> | |
<div class="box">我是文字的内容</div> | |
<script> | |
// 1. 获取元素 | |
const box = document.querySelector('.box') | |
// 修改文字内容 对象.innerHTML 属性 | |
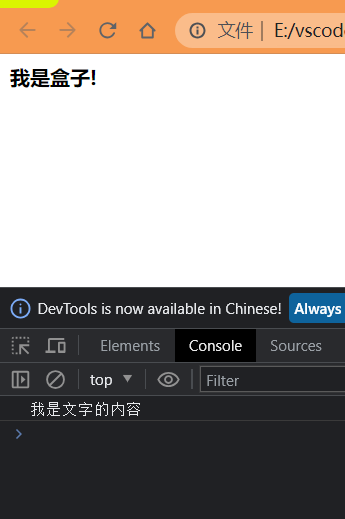
console.log(box.innerHTML) | |
box.innerHTML = '<strong>我是盒子!</strong>'// 修改盒子内容并且会解析内容标签 | |
</script> | |
</body> |
效果:
# 总结:
设置 / 修改 DOM 元素内容有哪 2 种方式?
- 元素.innerText 属性
- 元素.innerHTML 属性
二者的区别是什么?
- 元素.innerText 属性 只识别文本,不能解析标签
- 元素.innerHTML 属性 能识别文本,能够解析标签
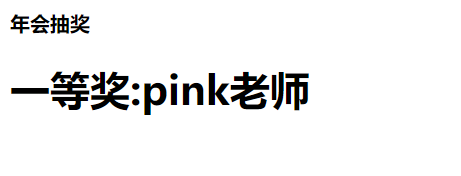
# 随机抽奖案例
需求:从数组随机抽取一等奖,显示到对应的标签里面。抽取到的人就从数组中删除不能重复抽到一个人。
代码:
<body> | |
<div class="wrapper"> | |
<strong>年会抽奖</strong> | |
<h1>一等奖:<span id="one">???</span></h1> | |
</div> | |
<script> | |
const personArr = ['周杰伦','刘德华','周星驰','pink老师','张学友'] | |
// 随机生成数组下标 | |
const random = Math.floor(Math.random() * personArr.length) | |
const one = document.querySelector('#one') | |
one.innerHTML = personArr[random] | |
personArr.splice(random,1) | |
</script> | |
</body> |
效果:
# 操作元素属性
- 操作元素常用属性
- 操作元素样式属性
- 操作表单元素属性
- 自定义属性
# 1 操作元素常用属性
- 还可以通过 JS 设置 / 修改标签元素属性,比如通过 src 更换 图片
- 最常见的属性比如:href,title,src 等
- 语法:
对象.属性 = 值 |
# 举例说明
//1. 获取元素 | |
const pic = document.querySelector('img') | |
//2. 操作元素 | |
pic.src = './image/b02.jpg' | |
pic.title = '刘德华' |
代码:
<body> | |
<img src="./image/pic.jpg" alt=""/> | |
<script> | |
const img = document.querySelector('img') | |
img.src = './image/scale.jpg' | |
img.title = '空旷的城市' | |
</script> | |
</body> |
效果:

# 2 操作元素样式属性
- 还可以通过 JS 设置 / 修改标签元素的样式属性.
- 比如通过 轮播图小圆点自动更换颜色样式
- 点击按钮可以滚动图片,这是移动的图片的位置 left 等等
学习路径:
- 通过 style 属性操作 CSS
- 操作类名 (className) 操作 CSS
- 通过 classList 操作类控制 CSS
# 通过 style 属性操作 CSS
语法:
对象.style.样式属性 = 值 |
# 举例说明
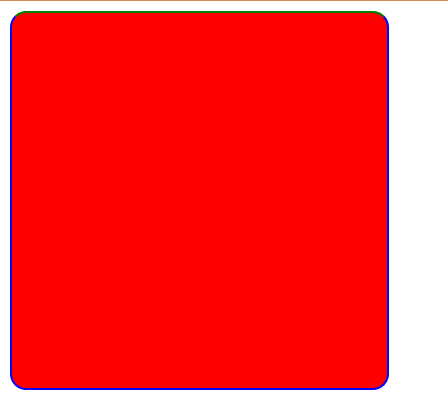
const box = document.querySelector('.box') | |
box.style.width = '200px' | |
box.style.marginTop = '15px' | |
box.style.backgroundColor = 'pink' |
注意:
- 修改样式通过 <font color=red>style</font > 属性引出
- 如果属性有 - 连接符 (多组单词) ,需要转换为 <font color=red > 小驼峰 </font> 命名法
- 赋值的时候,需要的时候不要忘记加 <font color=red>CSS 单位 </font>.
- 样式属性,一定别忘记,大部分数字后面都需要加单位
- 生成的是行内样式表,权重比较高
代码:
<body> | |
<div class="box"></div> | |
<script> | |
const div = document.querySelector('.box') | |
div.style.width = '300px' | |
div.style.height = '300px' | |
// 多组单词 采用 小驼峰命名法 | |
div.style.backgroundColor = 'red' | |
div.style.borderRadius = '13px' | |
div.style.border = '2px blue solid' | |
div.style.borderTop = '2px green solid' | |
</script> | |
</body> |
效果:
# 3 操作类名 (className) 操作 CSS
- 如果修改的样式比较多,直接通过 style 属性修改比较繁琐,我们可以通过借助于 css 类名的形式。
语法:
//active 是一个 css 类名 | |
元素.className = 'active' |
- 注意:
- 由于 class 是关键字,所以使用 className 去代替
- className 是使用新值 <font color=red> 换 </font > 旧值,如果需要添加一个类,需要保留之前的类名。
- 元素.className = 'active nav box'
- 用 className js 添加的属性会把 css 写的给替换掉无论权重多高 想使用多个就在 js 继续加
代码:
<style> | |
div { | |
width: 200px; | |
height: 200px; | |
background-color: pink; | |
} | |
.box { | |
width: 300px; | |
height: 300px; | |
background-color: skyblue; | |
margin: 100px auto; | |
padding: 10px; | |
border: 1px #000 solid; | |
} | |
.nav { | |
background-color: red !important; | |
} | |
</style> | |
</head> | |
<body> | |
<div></div> | |
<script> | |
// 1. 获取元素 | |
const div = document.querySelector('div') | |
// 2. 添加类名 class 是个关键字所以用 className js 添加的属性会把 css 写的给替换掉无论权重多高 想使用多个就在 js 继续加 | |
div.className = 'nav box' | |
</script> | |
</body> |
效果:
# 4 通过 classList 操作类控制 CSS⭐️
为了解决 className 容易覆盖以前的类名,我们可以通过 classList 方式追加和删除类名
语法:
// 追加一个类 | |
元素.classList.add('类名') | |
// 删除一个类 | |
元素.classList.remove('类名') | |
// 切换一个类 | |
元素.classList.toggle('类名') | |
// 判断是否存在该属性 存在返回 true 不存在返回 false | |
元素.classList.contains('类名') |
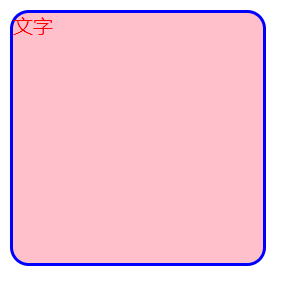
代码:
<style> | |
.box { | |
width: 200px; | |
height: 200px; | |
color: #333; | |
} | |
.active { | |
color: red; | |
background-color:pink; | |
} | |
.nav { | |
border: 3px blue solid; | |
border-radius: 15px; | |
} | |
</style> | |
</head> | |
<body> | |
<div class="box">文字</div> | |
<script> | |
// 1. 获取元素 | |
const box = document.querySelector('.box') | |
// 在没有删除 box 类名的时候不添加也会保留 box 的属性的 className 则会替换掉 js 中添加的类名之前的就会没有 | |
// 2. 修改样式 | |
// 追加类 add () 类名不加点,字符串 | |
box.classList.add('active') | |
box.classList.add('nav') | |
// 删除类 remove () 类名不加点,字符串 | |
box.classList.remove('box') | |
// 切换类 toggle () 有还是没有。有就删除,没有就加上 | |
box.classList.toggle('box') | |
</script> | |
</body> |
效果:
# 使用 className 和 classList 的区别
- 修改大量样式的更方便
- 修改不多样式的时候方便
- classList 是追加和删除不影响以前类名.
# 3 操作表单元素属性
表单很多情况,也需要修改属性,比如点击眼睛,可以看到密码,本质是把表单类型转换为文本框
![image-20230728225249025]()
正常的有属性有取值的 跟其它的标签属性没有任何区别.
获取:DOM 对象。属性名
设置 / 修改:DOM 对象。属性名 = 新值

表单.value = '用户名' | |
表单.type = 'password' |
- 表单属性中添加就有效果,移除就没有效果,一律使用布尔值表示如果为 true 代表添加了该属性,如果是 false 代表移除了该属性
- 比如:disabled,checked,selected
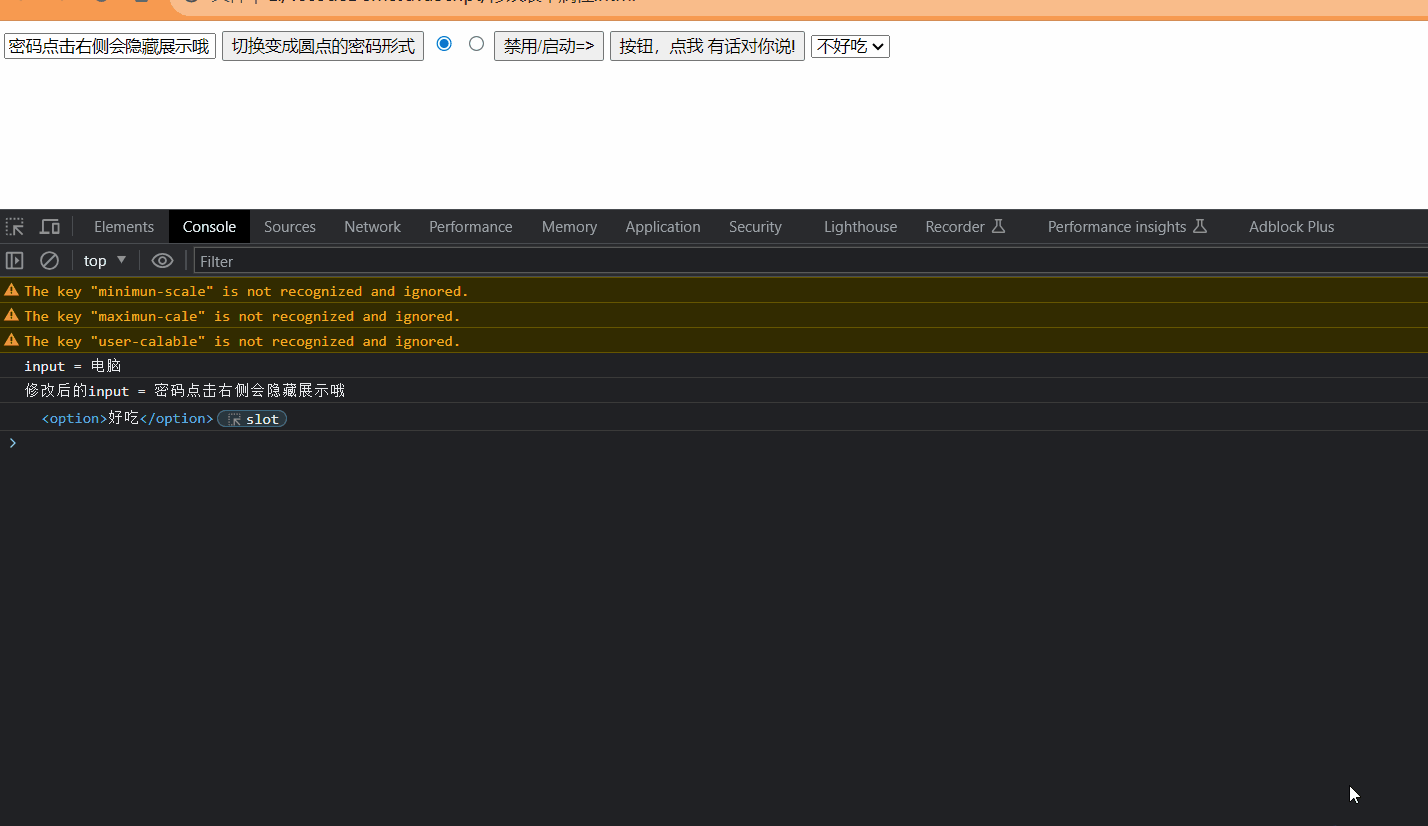
代码:
html
<body> | |
<input type="text" value="电脑"/> | |
<button id="qie">切换变成圆点的密码形式</button> | |
<input type="radio" id="dan" name="dan"> | |
<input type="radio" id="dan1" name="dan"> | |
<button id="jin">禁用/启动=></button> | |
<button id="yong">按钮,点我 有话对你说!</button> | |
<select> | |
<option>好吃</option> | |
<option>不好吃</option> | |
</select> | |
<script src="./js/修改表单属性.js"></script> | |
</body> |
js
// 1. 获取元素 | |
const input = document.querySelector('input') | |
// 2. 获取表单的值 | |
let val = input.value | |
console.log(`input = ${val}`) | |
// 3. 修改表单的值 | |
input.value = '密码点击右侧会隐藏展示哦' | |
// 3.1 获取修改后的表单的值 | |
let val1 = input.value | |
console.log(`修改后的input = ${val1}`) | |
// 修改 input 的 type 属性值 | |
const qie = document.querySelector('#qie') | |
qie.addEventListener('click',function() { | |
if(input.type == 'text') | |
input.type = 'password' | |
else | |
input.type = 'text' | |
}) | |
// 修改单选框属性值 | |
const radio = document.querySelector('#dan') | |
// 修改默认为选中状态 | |
// radio.checked = true | |
// 这样的也会默认选中,因为除了空字符串为 fals 其它都为 true (隐式转换) | |
// 因为 checked 只能接受一个布尔值所以隐式转换为一个对应的布尔值 a 字符串为 true | |
radio.checked = 'a' | |
const jin = document.querySelector('#jin') | |
const yong = document.querySelector('#yong') | |
jin.addEventListener('click',function() { | |
if(yong.disabled == false){ | |
yong.disabled = true | |
alert('右边的按钮被我禁用啦') | |
} else{ | |
yong.disabled = false | |
alert('右边按钮被解救了') | |
} | |
}) | |
yong.addEventListener('click',function() { | |
alert('当心我左边的按钮它会禁用我的,我不想被禁用') | |
}) | |
//select 元素获取过来的是一个数组形式的对象通过下标来访问 option | |
const select = document.querySelector('select') | |
console.log(select[0]) | |
// 设置默认选中下标为 1 的 option | |
select[1].selected = true |
效果:
# 自定义属性
- 标准属性:标签天生自带的属性比如 class id title 等,可以直接使用点语法操作比如:disabled,checked,selected
- 自定义属性:
- 在 html5 中推出来了专门的 data - 自定义属性.
- 在标签上一律以 data - 开头.
- 在 DOM 对象上一律以 dataset 对象方式获取
示例:
<body> | |
<div class="box" data-id="10">盒子</div> | |
<script> | |
const box = document.querySelector('.box') | |
console.log(box.dataset.id) | |
</script> | |
</body> |
代码:
html
<body> | |
<!-- data - 自定义属性 --> | |
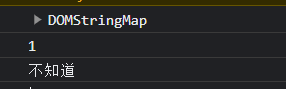
<div data-id="1" data-spm="不知道">1</div> | |
<div data-id="2">2</div> | |
<div data-id="3">3</div> | |
<div data-id="4">4</div> | |
<div data-id="5">5</div> | |
<script src="./js/自定义属性.js"></script> | |
</body> |
js
const div = document.querySelector('div') | |
// 得到 data 数据的集合 | |
console.log(div.dataset) | |
// 得到 data 中的 id 值 | |
console.log(div.dataset.id) | |
// 得到 data 中的 spm 值 | |
console.log(div.dataset.spm) |
效果:
# 多余的小知识
标签选择 body,因为 body 是唯一的标签,可以直接写 document.body.style
# 定时器 - 间歇函数
目标:能够使用定时器函数重复执行代码
定时器函数可以开启和关闭定时器
# 定时器函数介绍
- 网页中经常会需要一种功能:每个一段时间需要 <font color=red> 自动 </font > 执行一段代码,不需要我们手动去触发
- 例如:网页中的倒计时
- 要实现这种需求,需要定时器函数
- 定时器函数有两种,今天先学习间歇函数
# 1 开启定时器
语法:
setInterval(函数,间隔时间) |
- 作用:每隔一段时间调用这个函数
- 间隔时间单位是毫秒
举例说明:
function repeat() { | |
console.log('前端程序员') | |
} | |
// 每隔一秒调用 repeat 函数 | |
setInterval(repeat,1000) |
注意:
- 函数名字不需要加括号
- 定时器返回的是一个 id 数字 (序号 每个定时器都是唯一的)
- 定时器要开要关会有重新赋值的操作,接收返回的 id 数字建议使用 let 来声明而不是 <font color=red>const</font>.
- 比如说:
const num = 10 num = 10 常量再次赋值就会报错
- 比如说:
代码:
html
<body> | |
<script src="./js/定时器.js"></script> | |
</body> |
js
// 直接执行一个函数体 | |
// 定时器返回使用 let 来声明变量因为返回的是数字型,可能会发生变化的,定时器要开要关会有重新赋值的操作 | |
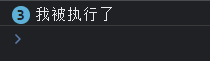
let num = setInterval(()=>{ | |
console.log('我被执行了') | |
},1000) | |
console.log(num) | |
function fun() { | |
console.log('我也被执行了哦') | |
} | |
// 代码从上往下执行,当到了下面的 setInterval 时 等待 1000 毫秒后才执行的函数体 并不是立刻执行的 | |
// 调用函数名执行函数体 | |
// 定时器返回使用 let 来声明变量因为返回的是数字型,可能会发生变化的,定时器要开要关会有重新赋值的操作 | |
let num1 = setInterval(fun,1000) | |
console.log(num1) | |
// 错误写法 | |
// setInterval('fun',1000) |
效果:
定时器返回的序号

定时器的间歇执行函数体

# 2 关闭定时器
语法:
let 变量名 = setInterval(函数,间隔时间) | |
clearInterval(变量名) |
代码:
html
<body> | |
<script src="./js/定时器.js"></script> | |
</body> |
js
// 定时器 1 | |
let num = setInterval(()=>{ | |
console.log('我被执行了') | |
},1000) | |
// 定时器 2 | |
// 定时器返回使用 let 来声明变量因为返回的是数字型,可能会发生变化的 | |
let num1 = setInterval(fun,1000) | |
function fun() { | |
console.log('我也被执行了哦') | |
} | |
// 关闭第二个定时器,将变量名传入即可 | |
clearInterval(num1) |
效果:
一半情况下不会刚创建定时器就关闭而是触发某个事件后才关闭的。
# 轮播图定时器案例
需求:每隔一秒 切换一个 图片
分析:
- 准备一个数组对象,里面包含详细信息 (素材包含)
- 获取元素
- 设置定时器函数
- 设置一个变量 ++
- 找到变量对应的对象
- 更改图片,文字信息
- 激活小圆点:移除上一个高亮的类名,当前变量对应的小圆点添加类
- 处理图片自动复原从头播放 (放到变量 ++ 后面,紧挨)
- 如果把图片播放到最后一张,就是大于等于数组的长度
- 则把变量重置为 0
代码:
html
<style> | |
* { | |
box-sizing: border-box; | |
} | |
.slider { | |
width: 560px; | |
height: 400px; | |
overflow: hidden; | |
} | |
.slider-wrapper { | |
width: 100%; | |
height: 320px; | |
} | |
.slider-wrapper img { | |
width: 100%; | |
height: 100%; | |
display: block; | |
} | |
.slider-footer { | |
height: 80px; | |
background-color: rgb(100, 67, 68); | |
padding: 12px 12px 0 12px; | |
position: relative; | |
} | |
.slider-footer .toggle { | |
position: absolute; | |
right: 0; | |
top: 12px; | |
display: flex; | |
} | |
.slider-footer .toggle button { | |
margin-right: 12px; | |
width: 28px; | |
height: 28px; | |
appearance: none; | |
border: none; | |
background: rgba(255, 255, 255, 0.1); | |
color: #fff; | |
border-radius: 4px; | |
cursor: pointer; | |
} | |
.slider-footer .toggle button:hover { | |
background: rgba(255, 255, 255, 0.2); | |
} | |
.slider-footer p { | |
margin: 0; | |
color: #fff; | |
font-size: 18px; | |
margin-bottom: 10px; | |
} | |
.slider-indicator { | |
margin: 0; | |
padding: 0; | |
list-style: none; | |
display: flex; | |
align-items: center; | |
} | |
.slider-indicator li { | |
width: 8px; | |
height: 8px; | |
margin: 4px; | |
border-radius: 50%; | |
background: #fff; | |
opacity: 0.4; | |
cursor: pointer; | |
} | |
.slider-indicator li.active { | |
width: 12px; | |
height: 12px; | |
opacity: 1; | |
} | |
</style> | |
</head> | |
<body> | |
<div class="slider"> | |
<div class="slider-wrapper"> | |
<img src="./image/slider01.jpg" alt="" /> | |
</div> | |
<div class="slider-footer"> | |
<p>对人类来说会不会太超前了?</p> | |
<ul class="slider-indicator"> | |
<li class="active"></li> | |
<li></li> | |
<li></li> | |
<li></li> | |
<li></li> | |
<li></li> | |
<li></li> | |
<li></li> | |
</ul> | |
<div class="toggle"> | |
<button class="prev"><</button> | |
<button class="next">></button> | |
</div> | |
</div> | |
</div> | |
<script src="./js/轮播图定时器版.js"></script> | |
</body> |
js
// 1. 初始数据 | |
const sliderData = [ | |
{ url: './image/slider01.jpg', title: '对人类来说会不会太超前了?', color: 'rgb(100, 67, 68)' }, | |
{ url: './image/slider02.jpg', title: '开启剑与雪的黑暗传说!', color: 'rgb(43, 35, 26)' }, | |
{ url: './image/slider03.jpg', title: '真正的jo厨出现了!', color: 'rgb(36, 31, 33)' }, | |
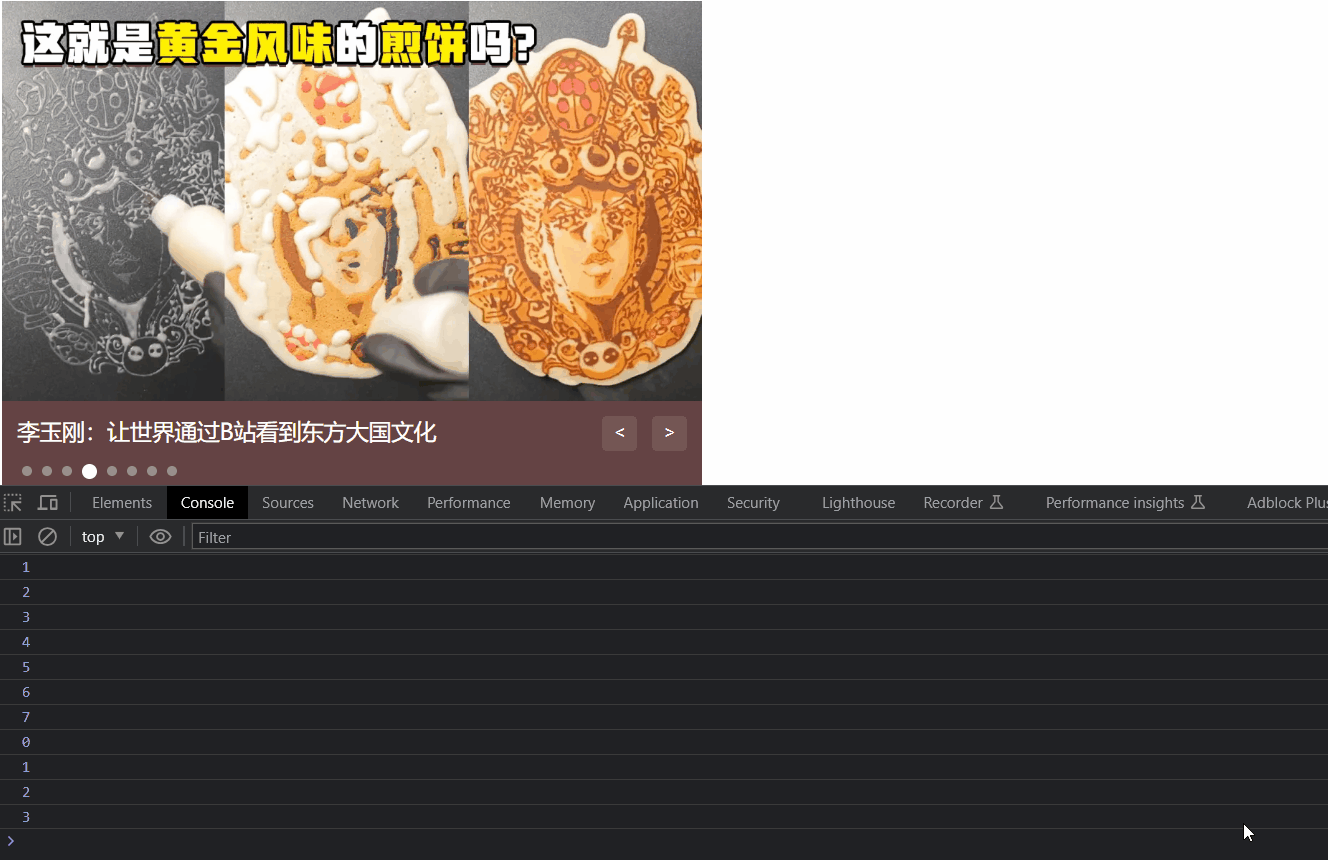
{ url: './image/slider04.jpg', title: '李玉刚:让世界通过B站看到东方大国文化', color: 'rgb(139, 98, 66)' }, | |
{ url: './image/slider05.jpg', title: '快来分享你的寒假日常吧~', color: 'rgb(67, 90, 92)' }, | |
{ url: './image/slider06.jpg', title: '哔哩哔哩小年YEAH', color: 'rgb(166, 131, 143)' }, | |
{ url: './image/slider07.jpg', title: '一站式解决你的电脑配置问题!!!', color: 'rgb(53, 29, 25)' }, | |
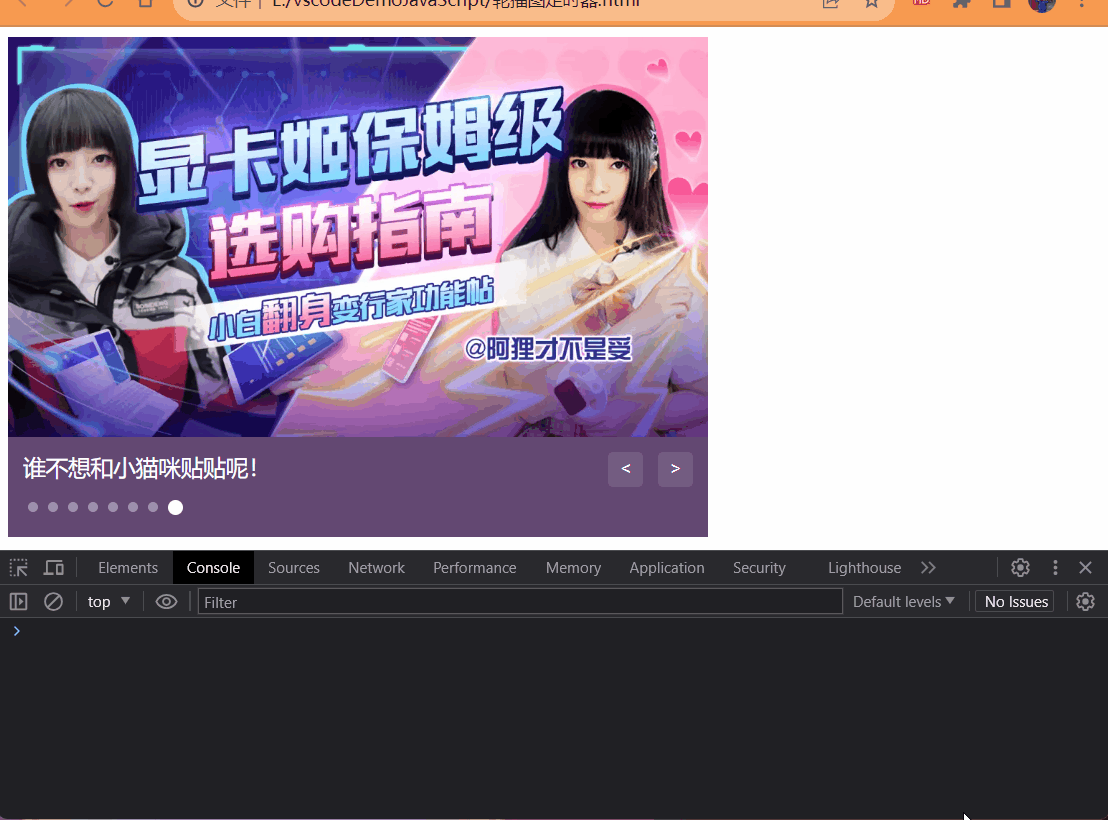
{ url: './image/slider08.jpg', title: '谁不想和小猫咪贴贴呢!', color: 'rgb(99, 72, 114)' }, | |
] | |
// 1. 获取元素对象 | |
const img = document.querySelector('.slider-wrapper img') | |
const p = document.querySelector('.slider-footer p') | |
const bgColor = document.querySelector('.slider-indicator') | |
const beijing = document.querySelector('.slider-footer') | |
let i = 0 | |
let num = setInterval(fun, 1000) | |
function fun() { | |
// 无缝衔接位置 | |
//img,p,li 这些标签原本初始化就带有了样式的第一次从 1 开始往后从 0 开始循环遍历 可以打开 console 来看下区别 | |
i++ | |
if (i >= sliderData.length){ | |
i = 0 | |
} | |
console.log(i) | |
let obj = sliderData[i] | |
img.src = obj.url | |
p.innerHTML = obj.title | |
// 选中之前的 active 并删除 | |
document.querySelector(`.slider-indicator .active`).classList.remove('active') | |
// 在当前的 li 中添加 active | |
document.querySelector(`.slider-indicator li:nth-child(${(i + 1)})`).classList.add('active') | |
beijing.style.backgroundColor = sliderData[i].color | |
// 每次都循环一整个 可以打开 console 来看下区别 | |
// console.log(i) | |
// if (i == sliderData.length - 1){ | |
// i = 0 | |
// return | |
// } | |
// i++ | |
} |
效果:
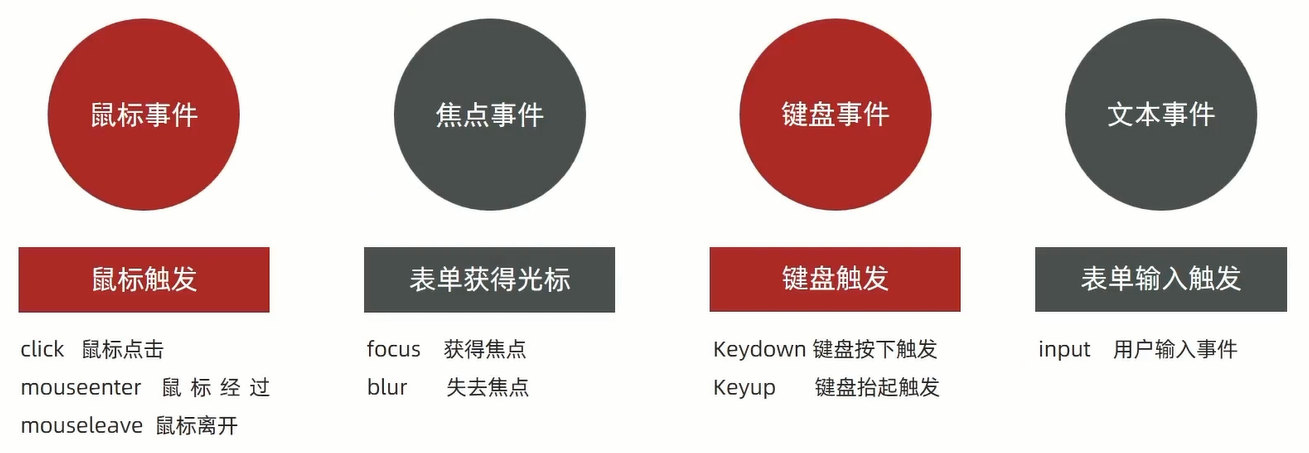
# 事件监听 (绑定)
- 事件监听
- 扩展阅读 - 事件监听版本
# 什么是事件?
事件是在编程时系统内发生的动作或者发生的事情
比如用户在网页上单击一个按钮
# 什么是事件监听?
就是让程序检测是否有事件产生,一旦有事件触发,就立即调用一个函数做出响应,也成为 绑定事件或者注册事件.
比如鼠标经过显示下拉菜单,比如点击可以播放轮播图等等
语法:
元素对象.addEvenListener('事件类型',要执行的函数) |
- 事件监听三要素
- 事件源:哪个 dom 元素被事件触发了,要获取 dom 元素 (谁被触发了)
- 事件类型:用什么方式触发,比如鼠标单击 click,鼠标经过 mouseover 等 (用什么方式触发的)
- 事件调用的函数:要做什么事
举例说明:
<button class="btn">按钮</button> | |
<script> | |
const btn = document.querySelector('.btn') | |
btn.addEventListener('click',function(){ | |
alert('被点击了~') | |
}) | |
</script> |
注意:
- 事件类型要加单引号.
- 函数是点击之后再去执行,每次点击都会执行一次 触发一次就执行一次.
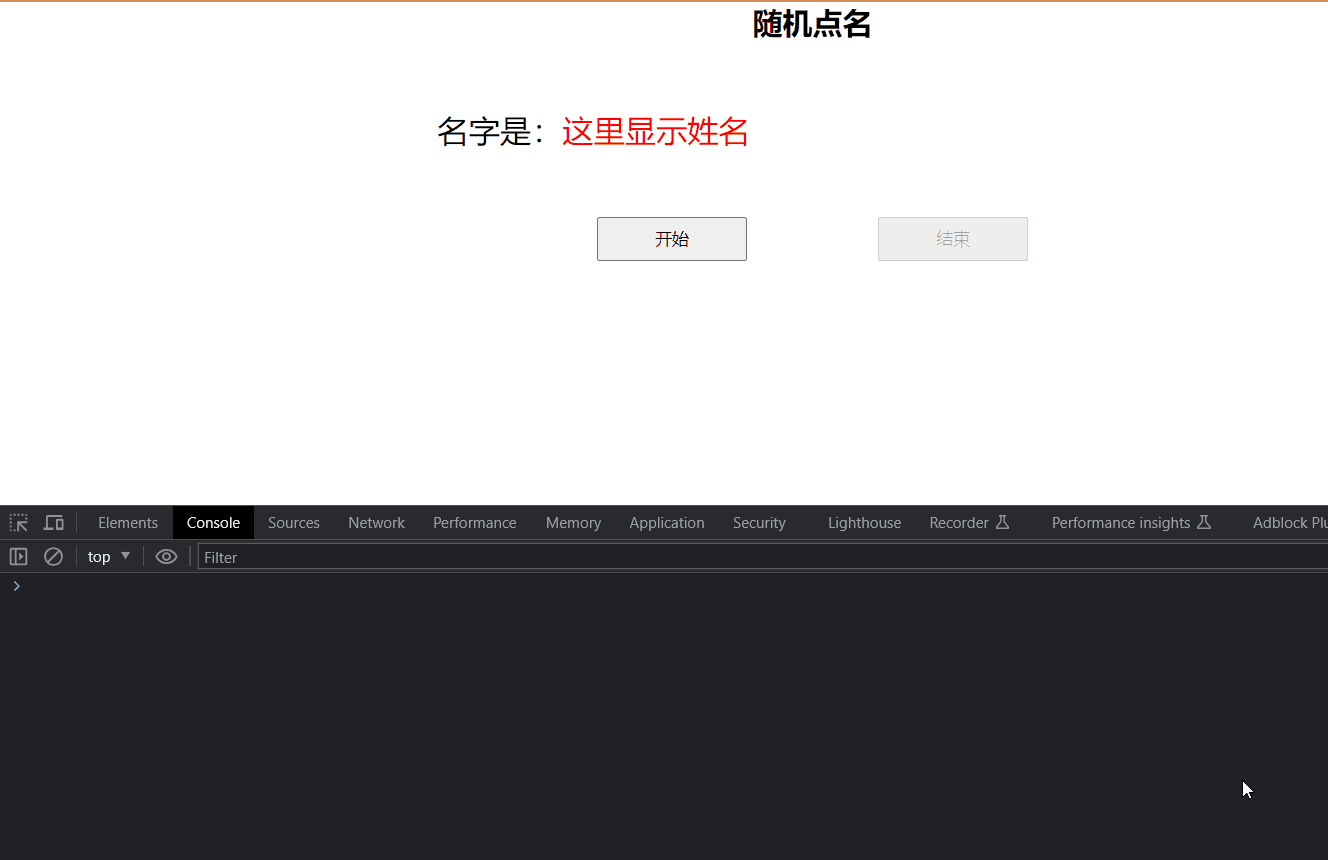
# 案例 - 随机抽取一个人
代码:
html
<!DOCTYPE html> | |
<html lang="en"> | |
<head> | |
<meta charset="UTF-8"> | |
<meta name="viewport" content="width=device-width, initial-scale=1.0"> | |
<title>Document</title> | |
<style> | |
* { | |
margin: 0; | |
padding: 0; | |
} | |
h2 { | |
text-align: center; | |
} | |
.box { | |
width: 600px; | |
margin: 50px auto; | |
display: flex; | |
font-size: 25px; | |
line-height: 40px; | |
} | |
.qs { | |
width: 150px; | |
height: 40px; | |
color: red; | |
} | |
.btns { | |
text-align: center; | |
} | |
.btns button { | |
width: 120px; | |
height: 35px; | |
margin: 0 50px; | |
} | |
</style> | |
</head> | |
<body> | |
<h2>随机点名</h2> | |
<div class="box"> | |
<span>名字是:</span> | |
<div class="qs">这里显示姓名</div> | |
<span class="gong"> </span> | |
</div> | |
<div class="btns"> | |
<button class="start">开始</button> | |
<button class="end">结束</button> | |
</div> | |
<script src="./js/随机点名案例.js"></script> | |
</body> | |
</html> |
js
// 数据数组 | |
const arr = ['马超', '黄忠', '赵云', '关羽', '张飞'] | |
// 开始按钮 | |
const start = document.querySelector('.start') | |
// 显示抽到的人的名字 | |
const qs = document.querySelector('.qs') | |
// 结束按钮 | |
const end = document.querySelector('.end') | |
// 显示祝贺 | |
const gong = document.querySelector('.gong') | |
// 对按钮进行禁用的操作保证不出现人为的故障 | |
// 默认禁用结束按钮 | |
end.disabled = true; | |
let val = 0 | |
let num = 0 | |
start.addEventListener('click', function() { | |
if (end.disabled == true) | |
end.disabled = false | |
start.disabled = true | |
val = setInterval(function() { | |
num = parseInt(Math.random() * arr.length) | |
// 随机展示 | |
qs.innerHTML = arr[num] | |
}, 30) | |
}) | |
end.addEventListener('click', function() { | |
if (start.disabled == true) | |
start.disabled = false | |
end.disabled = true | |
// 抽取一个删除一个 | |
arr.splice(num, 1) | |
clearInterval(val) | |
console.log(arr) | |
if (arr.length == 1){ | |
start.disabled = end.disabled = true | |
// 最终结果 | |
qs.innerHTML = arr[0] | |
gong.innerText = '恭喜你! ❀' | |
} | |
}) |
效果:
# 扩展阅读 - 事件监听版本
- DOM L0
- 事件源.on 事件 = function (){}
- 比如:事件源.onclick = 函数体 也就是给事件源绑定了一个单击事件,但是多个 on 事件会被覆盖
- DOM L2
- 事件源.addEventListener (事件,事件处理函数)
- 区别:
- on 方式会被覆盖,addEventLiestener 方式可绑定多次,拥有事件更多特性,推荐使用
- 发展史:
- DOM L0:是 DOM 的发展的第一个版本;L:level
- DOM L1:DOM 级别 1 于 1998 年 10 月 1 日成为 W3C 推荐标准
- DOM L2:使用 addEventListener 注册事件
- DOM L3:DOM3 级事件模块在 DOM2 级事件的基础上重新定义了这些事件,也添加了一些新事件类型
# 事件类型
| 事件 | 说明 |
|---|---|
| change | 当文本框内容发送改变并且离焦后执行 |
| loadend | 资源的加载进度停止之后被触发 (例如,触发 error , abort , load 事件之后) |
注意:事件类型全部都是小写的 没有大写的!
# 鼠标经过事件的区别
- 鼠标经过事件:
- mouseover 和 mouseout 会有冒泡效果
- mouseenter 和 mouseleave 没有冒泡效果 (推荐)
- 关于冒泡详细查看 <a href='# 事件流 '> 点击 </a>.
代码:
html
<body> | |
<div class="father"> | |
<div class="son"></div> | |
</div> | |
<script src="./js/鼠标经过事件区别.js"></script> | |
</body> |
js
const box = document.querySelector('.father') | |
const box1 = document.querySelector('.son') | |
box.addEventListener('mouseover',function () { | |
console.log('father 鼠标经过') | |
}) | |
box.addEventListener('mouseout',function () { | |
console.log('father 鼠标离开') | |
}) |
less
.father { | |
width: 400px; | |
height: 400px; | |
background-color: pink; | |
} | |
.son { | |
width: 200px; | |
height: 200px; | |
background-color: purple; | |
} |
效果:
# 鼠标事件之 - 完整的轮播图案例
代码:
html
<!DOCTYPE html> | |
<html lang="en"> | |
<head> | |
<meta charset="UTF-8" /> | |
<meta http-equiv="X-UA-Compatible" content="IE=edge" /> | |
<meta name="viewport" content="width=device-width, initial-scale=1.0" /> | |
<title>轮播图点击切换</title> | |
<style> | |
* { | |
box-sizing: border-box; | |
} | |
.slider { | |
width: 560px; | |
height: 400px; | |
overflow: hidden; | |
} | |
.slider-wrapper { | |
width: 100%; | |
height: 320px; | |
} | |
.slider-wrapper img { | |
width: 100%; | |
height: 100%; | |
display: block; | |
} | |
.slider-footer { | |
height: 80px; | |
background-color: rgb(100, 67, 68); | |
padding: 12px 12px 0 12px; | |
position: relative; | |
} | |
.slider-footer .toggle { | |
position: absolute; | |
right: 0; | |
top: 12px; | |
display: flex; | |
} | |
.slider-footer .toggle button { | |
margin-right: 12px; | |
width: 28px; | |
height: 28px; | |
appearance: none; | |
border: none; | |
background: rgba(255, 255, 255, 0.1); | |
color: #fff; | |
border-radius: 4px; | |
cursor: pointer; | |
} | |
.slider-footer .toggle button:hover { | |
background: rgba(255, 255, 255, 0.2); | |
} | |
.slider-footer p { | |
margin: 0; | |
color: #fff; | |
font-size: 18px; | |
margin-bottom: 10px; | |
} | |
.slider-indicator { | |
margin: 0; | |
padding: 0; | |
list-style: none; | |
display: flex; | |
align-items: center; | |
} | |
.slider-indicator li { | |
width: 8px; | |
height: 8px; | |
margin: 4px; | |
border-radius: 50%; | |
background: #fff; | |
opacity: 0.4; | |
cursor: pointer; | |
} | |
.slider-indicator li.active { | |
width: 12px; | |
height: 12px; | |
opacity: 1; | |
} | |
</style> | |
</head> | |
<body> | |
<div class="slider"> | |
<div class="slider-wrapper"> | |
<img src="./image/slider01.jpg" alt="" /> | |
</div> | |
<div class="slider-footer"> | |
<p>对人类来说会不会太超前了?</p> | |
<ul class="slider-indicator"> | |
<li class="active"></li> | |
<li></li> | |
<li></li> | |
<li></li> | |
<li></li> | |
<li></li> | |
<li></li> | |
<li></li> | |
</ul> | |
<div class="toggle"> | |
<button class="prev"><</button> | |
<button class="next">></button> | |
</div> | |
</div> | |
</div> | |
<script src="./js/轮播图定时器版.js"></script> | |
</body> | |
</html> |
js
// 1. 初始数据 | |
const sliderData = [ | |
{ url: './image/slider01.jpg', title: '对人类来说会不会太超前了?', color: 'rgb(100, 67, 68)' }, | |
{ url: './image/slider02.jpg', title: '开启剑与雪的黑暗传说!', color: 'rgb(43, 35, 26)' }, | |
{ url: './image/slider03.jpg', title: '真正的jo厨出现了!', color: 'rgb(36, 31, 33)' }, | |
{ url: './image/slider04.jpg', title: '李玉刚:让世界通过B站看到东方大国文化', color: 'rgb(139, 98, 66)' }, | |
{ url: './image/slider05.jpg', title: '快来分享你的寒假日常吧~', color: 'rgb(67, 90, 92)' }, | |
{ url: './image/slider06.jpg', title: '哔哩哔哩小年YEAH', color: 'rgb(166, 131, 143)' }, | |
{ url: './image/slider07.jpg', title: '一站式解决你的电脑配置问题!!!', color: 'rgb(53, 29, 25)' }, | |
{ url: './image/slider08.jpg', title: '谁不想和小猫咪贴贴呢!', color: 'rgb(99, 72, 114)' }, | |
] | |
// 1. 获取元素对象 | |
const img = document.querySelector('.slider-wrapper img') | |
const p = document.querySelector('.slider-footer p') | |
const bgColor = document.querySelector('.slider-footer') | |
const prev = document.querySelector('.prev') | |
const next = document.querySelector('.next') | |
const boos = document.querySelector('.slider') | |
const lis = document.querySelectorAll('.slider-indicator li') | |
let ibr = 0 | |
next.addEventListener('click', function() { | |
ibr++ | |
ibr = ibr >= sliderData.length ? 0:ibr | |
fun(ibr) | |
}) | |
prev.addEventListener('click', function() { | |
ibr-- | |
ibr = ibr < 0 ? sliderData.length - 1:ibr | |
fun(ibr) | |
}) | |
// 函数体写重复的代码减少代码量 | |
function fun(i) { | |
i = i | 0 | |
img.src = sliderData[i].url | |
p.innerText = sliderData[i].title | |
bgColor.style.backgroundColor = sliderData[i].color | |
document.querySelector('.slider-indicator .active').classList.remove('active') | |
document.querySelector(`.slider-indicator li:nth-child(${(i + 1)})`).classList.add('active') | |
} | |
// 自动播放模块 | |
let num = setInterval(function() { | |
// 利用 js 自动调用点击事件 | |
next.click() | |
},1000) | |
// 鼠标经过停止 | |
boos.addEventListener('mouseenter',function() { | |
clearInterval(num) | |
}) | |
// 鼠标移出开启 | |
boos.addEventListener('mouseleave',function() { | |
// 要开启定时器时先关闭一下这是一个好习惯 | |
clearInterval(num) | |
// 这里再次开启定时器一定写 num 而不是直接写定时器 | |
// 因为直接写就是又开启了一个新的没有名字的定时器 | |
// 这样会重复开启好多个 轮播速度就会越来越快 | |
// 也不要带声明因为就变成局部变量了和成员变量就是两回事儿了 | |
num = setInterval(function() { | |
// 利用 js 自动调用点击事件 | |
next.click() | |
},1000) | |
}) | |
// 点击小圆点切换图片 | |
for(let i = 0;i < sliderData.length;i ++){ | |
lis[i].addEventListener('click',function() { | |
// 将指针的位置重置 | |
ibr = i | |
// 打印当前点击小圆点的位置 | |
console.log(i) | |
fun(i) | |
}) | |
} |
效果:
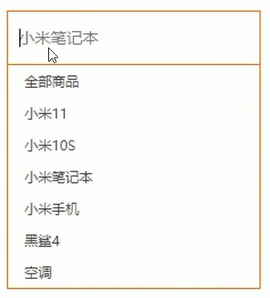
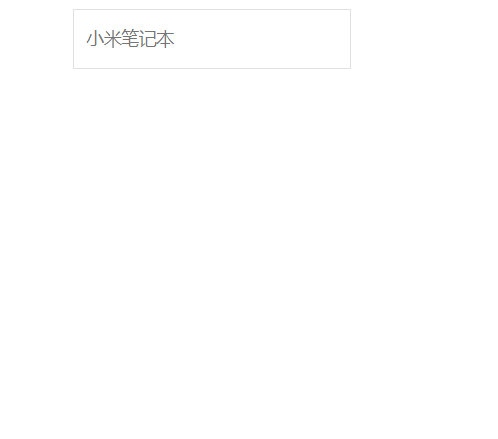
# 焦点事件之 - 小米搜索下拉框
需求:当表单得到焦点,显示下拉菜单,失去焦点隐藏下拉菜单
代码:
html
<!DOCTYPE html> | |
<html lang="en"> | |
<head> | |
<meta charset="UTF-8"> | |
<meta http-equiv="X-UA-Compatible" content="IE=edge"> | |
<meta name="viewport" content="width=device-width, initial-scale=1.0"> | |
<title>Document</title> | |
<style> | |
* { | |
margin: 0; | |
padding: 0; | |
box-sizing: border-box; | |
} | |
ul { | |
list-style: none; | |
} | |
.mi { | |
position: relative; | |
width: 223px; | |
margin: 100px auto; | |
} | |
.mi input { | |
width: 223px; | |
height: 48px; | |
padding: 0 10px; | |
font-size: 14px; | |
line-height: 48px; | |
border: 1px solid #e0e0e0; | |
outline: none; | |
} | |
.mi .search { | |
border: 1px solid #ff6700; | |
} | |
.result-list { | |
display: none; | |
position: absolute; | |
left: 0; | |
top: 48px; | |
width: 223px; | |
border: 1px solid #ff6700; | |
border-top: 0; | |
background: #fff; | |
} | |
.result-list a { | |
display: block; | |
padding: 6px 15px; | |
font-size: 12px; | |
color: #424242; | |
text-decoration: none; | |
} | |
.result-list a:hover { | |
background-color: #eee; | |
} | |
</style> | |
</head> | |
<body> | |
<div class="mi"> | |
<input type="search" placeholder="小米笔记本"> | |
<ul class="result-list"> | |
<li><a href="#">全部商品</a></li> | |
<li><a href="#">小米11</a></li> | |
<li><a href="#">小米10S</a></li> | |
<li><a href="#">小米笔记本</a></li> | |
<li><a href="#">小米手机</a></li> | |
<li><a href="#">黑鲨4</a></li> | |
<li><a href="#">空调</a></li> | |
</ul> | |
</div> | |
<script src="./js/小米搜索框.js"></script> | |
</body> | |
</html> |
js
// 获取元素对象 | |
const input = document.querySelector('input[type="search"]') | |
const lis = document.querySelector('.result-list') | |
// 绑定得到焦点事件 | |
input.addEventListener('focus',function() { | |
// 以块级元素显示 | |
lis.style.display = 'block' | |
// 添加类名 | |
input.classList.add('search') | |
}) | |
// 绑定失去焦点事件 | |
input.addEventListener('blur',function() { | |
// 隐藏 | |
lis.style.display = 'none' | |
// 删除类名 | |
input.classList.remove('search') | |
}) |
效果:
# 事件对象
- 获取事件对象
- 事件对象常用属性
# 获取事件对象
# 事件对象是什么
- 也是个对象,这个对象有事件触发时的相关信息.
- 例如:鼠标点击事件中,事件对象就存了鼠标点在哪个位置等信息
# 使用场景
- 可以判断用户按下哪个键,比如按下回车键可以发布消息
- 可以判断鼠标点击了哪个元素,从而做相应的操作
语法:如何获取
- 在事件绑定的回调函数的第一个参数就是事件对象
- 一般命名为
event,ev,e写什么都行但是这些是规范 event 就是事件的意思嘛
元素.addEventListener('click',function (e) {//e 就是事件对象 | |
函数体 (要做的事儿) | |
}) |
# 部分常用属性
- type
- 获取当前的事件类型
- clientX/clientY
- 获取光标相对于浏览器可见窗口左上角的位置
- offsetX/offsetY
- 获取光标相对于当前 DOM 元素左上角的位置
- key
- 用户按下的键盘的值
- 现在不提倡使用 keyCode
代码:
html
<body> | |
<button class="btn">按钮</button> | |
<input type="text"/> | |
<script src="./js/事件对象.js"></script> | |
</body> |
js
// 获取元素对象 按钮 | |
const button = document.querySelector('.btn') | |
// 绑定点击事件 () => {} 匿名写法 参数列表中获取事件对象 | |
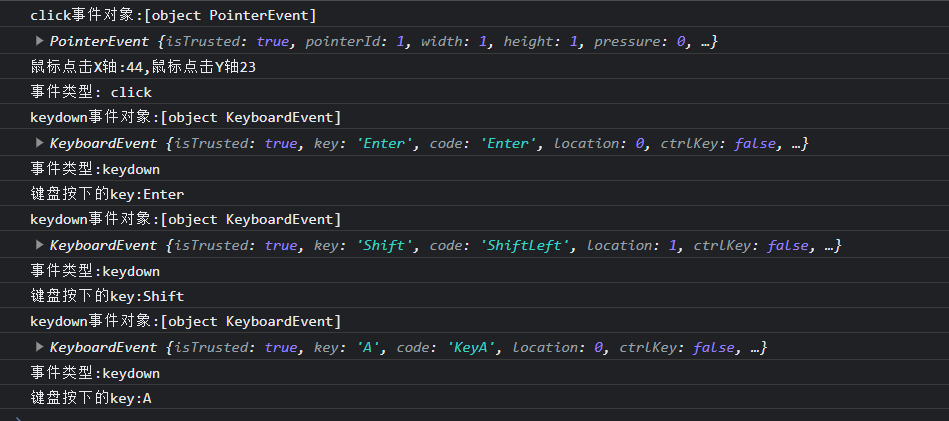
button.addEventListener('click', function(e) { | |
console.log(`click事件对象:${e}`) | |
console.log(e) | |
console.log(`鼠标点击X轴:${e.clientX},鼠标点击Y轴${e.clientY}`) | |
console.log(`事件类型: ${e.type}`) | |
}) | |
// 获取元素对象 输入文本框 | |
const input = document.querySelector('input[type="text"]') | |
// 绑定键盘按下事件 () => {} 匿名写法 参数列表中获取事件对象 | |
input.addEventListener('keydown', function(e) { | |
console.log(`keydown事件对象:${e}`) | |
console.log(e) | |
console.log(`事件类型:${e.type}`) | |
console.log(`键盘按下的key:${e.key}`) | |
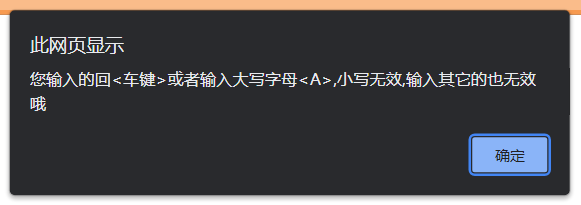
if (e.key == 'Enter' || e.key == 'A') | |
alert('您输入的回<车键>或者输入大写字母<A>,小写无效,输入其它的也无效哦') | |
}) |
效果:
# 案例 — 评论回车发布
需求:按下回车键,可以发布消息
分析:
- 用到按下键盘事件 keydown 或者 keyup 但是建议使用 keyup 因为 keydown 一直按一直触发并不合理。
- 如果用户按下回车键,发布消息
- 让留言信息模块显示,把拿到的数据渲染到对应标签内部
代码:
html
<style> | |
.wrapper { | |
min-width: 400px; | |
max-width: 800px; | |
display: flex; | |
justify-content: flex-end; | |
} | |
.avatar { | |
width: 48px; | |
height: 48px; | |
border-radius: 50%; | |
overflow: hidden; | |
background: url(./image/avatar.jpg) no-repeat center / cover; | |
margin-right: 20px; | |
} | |
.wrapper textarea { | |
outline: none; | |
border-color: transparent; | |
resize: none; | |
background: #f5f5f5; | |
border-radius: 4px; | |
flex: 1; | |
padding: 10px; | |
transition: all 0.5s; | |
height: 30px; | |
} | |
.wrapper textarea:focus { | |
border-color: #e4e4e4; | |
background: #fff; | |
height: 50px; | |
} | |
.wrapper button { | |
background: #00aeec; | |
color: #fff; | |
border: none; | |
border-radius: 4px; | |
margin-left: 10px; | |
width: 70px; | |
cursor: pointer; | |
} | |
.wrapper .total { | |
margin-right: 80px; | |
color: #999; | |
margin-top: 5px; | |
opacity: 0; | |
transition: all 0.5s; | |
} | |
.list { | |
min-width: 400px; | |
max-width: 800px; | |
display: flex; | |
} | |
.list .item { | |
width: 100%; | |
display: flex; | |
} | |
.list .item .info { | |
flex: 1; | |
border-bottom: 1px dashed #e4e4e4; | |
padding-bottom: 10px; | |
} | |
.list .item p { | |
margin: 0; | |
} | |
.list .item .name { | |
color: #FB7299; | |
font-size: 14px; | |
font-weight: bold; | |
} | |
.list .item .text { | |
color: #333; | |
padding: 10px 0; | |
} | |
.list .item .time { | |
color: #999; | |
font-size: 12px; | |
} | |
</style> | |
</head> | |
<body> | |
<div class="wrapper"> | |
<i class="avatar"></i> | |
<textarea id="tx" placeholder="发一条友善的评论" rows="2" maxlength="200"></textarea> | |
<button>发布</button> | |
</div> | |
<div class="wrapper"> | |
<span class="total">0/200字</span> | |
</div> | |
<div class="list"> | |
<div class="item" style="display: none;"> | |
<i class="avatar"></i> | |
<div class="info"> | |
<p class="name">清风徐来</p> | |
<p class="text">大家都辛苦啦,感谢各位大大的努力,能圆满完成真是太好了[笑哭][支持]</p> | |
<p class="time">2022-10-10 20:29:21</p> | |
</div> | |
</div> | |
</div> | |
<script src="./js/评论回车发布.js"></script> | |
</body> |
js
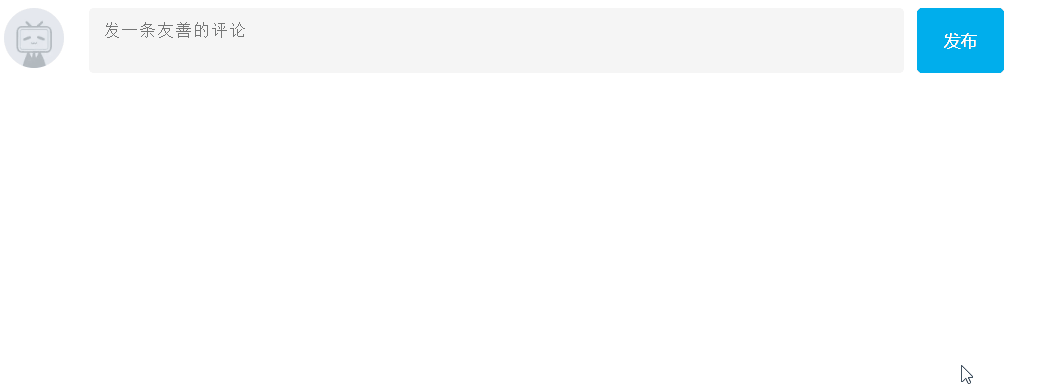
const textArea = document.querySelector('#tx') | |
const total = document.querySelector('.total') | |
const item = document.querySelector('.item') | |
const text = document.querySelector('.text') | |
const info = document.querySelector('.info') | |
// 当我们文本域获得了焦点,就让 total 显示 | |
textArea.addEventListener('focus', function() { | |
total.style.opacity = 1 | |
}) | |
// 当我们文本域失去了焦点,就让 total 隐藏 | |
textArea.addEventListener('blur', function() { | |
total.style.opacity = 0 | |
}) | |
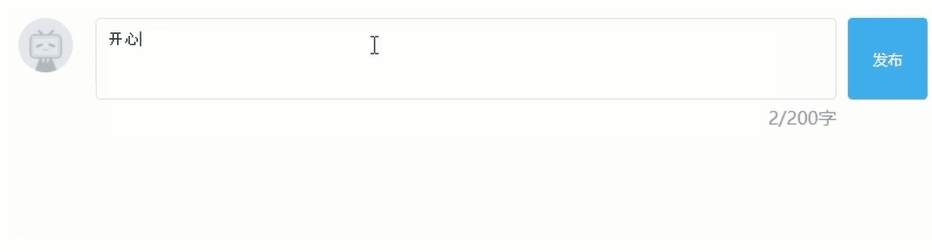
textArea.addEventListener('input', function() { | |
let max = textArea.value.length | |
console.log(max) | |
if (max > 200) { | |
max = 200 | |
alert('内容满了') | |
} | |
total.innerText = `${max}/200字` | |
}) | |
textArea.addEventListener('keyup', function(e) { | |
if (e.key === 'Enter') { | |
if (!textArea.value.trim()) { | |
alert('内容为空') | |
} else { | |
item.style.display = 'block' | |
text.innerText = textArea.value | |
// 按下回车发送消息后清空文本框内容 | |
} | |
textArea.value = '' | |
let max = textArea.value.length | |
total.innerText = `${max}/200字` | |
} | |
}) |
效果:
# 环境对象
目标:能够分析判断函数运行在不同环境中 this 所指代的对象.
环境对象:指的是函数内部特殊的变量 this,它代表着当前函数运行时所处的环境
作用: 弄清楚 this 的指向,可以让我们代码更简洁
- 函数 的调用方式不同,this 指代的对象也不同
- [<font color=red> 谁调用,this 就是谁 </font>] 是判断 this 指向的粗略规则
直接调用函数,其实相当于是 window. 函数,所以 this 指代 window
代码:
html
<body> | |
<button>点击</button> | |
<script src="./js/环境对象.js"></script> | |
</body> |
js
// 每个函数都有 this 环境对象普通函数里面 this 指向的是 window | |
function fun() { | |
console.log(this) | |
} | |
fun() | |
window.fun() | |
const button = document.querySelector('button') | |
// 使用 function 函数 this 就是 谁调用我,我就指向谁 也就是现在指向了 button | |
button.addEventListener('click', function () { | |
console.log(this) | |
}) | |
const button1 = document.querySelector('button') | |
// 使用箭头函数 this 指向的就是 window | |
button1.addEventListener('click',() => { | |
console.log(this) | |
}) |
效果:

# 回调函数
如果将函数 A 做为参数传递给函数 B 时,我们称函数 A 为回调函数.
回调函数本质还是函数,只不过把它当做参数使用
使用匿名函数做为回调函数比较常见
简单理解:当一个函数当做参数来传递给另外一个函数的时候,这个函数就是回调函数.
- 常见的使用场景
function fun() {// 函数 A | |
console.log('我是回调函数') | |
} | |
//fun 传递给了 setInterval,fun 就是回调函数 | |
setInterval(fun,1000) // 函数 B,每过一秒调用一次函数 | |
//setInterval 第一个参数就是回调函数 |
box.addEventListener('click',function () { | |
console.log('我也是回调函数') | |
}) |
# 综合案例 - Table 栏切换
需求:鼠标经过不同的选项卡,底部可以显示 不同的内容
代码:
html
<style> | |
* { | |
margin: 0; | |
padding: 0; | |
} | |
.tab { | |
width: 590px; | |
height: 340px; | |
margin: 20px; | |
border: 1px solid #e4e4e4; | |
} | |
.tab-nav { | |
width: 100%; | |
height: 60px; | |
line-height: 60px; | |
display: flex; | |
justify-content: space-between; | |
} | |
.tab-nav h3 { | |
font-size: 24px; | |
font-weight: normal; | |
margin-left: 20px; | |
} | |
.tab-nav ul { | |
list-style: none; | |
display: flex; | |
justify-content: flex-end; | |
} | |
.tab-nav ul li { | |
margin: 0 20px; | |
font-size: 14px; | |
} | |
.tab-nav ul li a { | |
text-decoration: none; | |
border-bottom: 2px solid transparent; | |
color: #333; | |
} | |
.tab-nav ul li a.active { | |
border-color: #e1251b; | |
color: #e1251b; | |
} | |
.tab-content { | |
padding: 0 16px; | |
} | |
.tab-content .item { | |
display: none; | |
} | |
.tab-content .item.active { | |
display: block; | |
} | |
</style> | |
</head> | |
<body> | |
<div class="tab"> | |
<div class="tab-nav"> | |
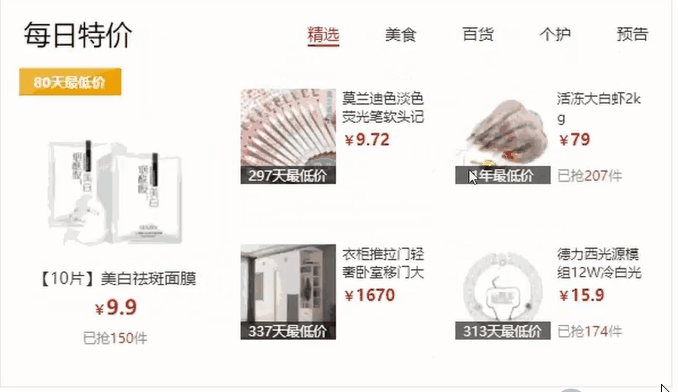
<h3>每日特价</h3> | |
<ul> | |
<li><a class="active" href="javascript:;">精选</a></li> | |
<li><a href="javascript:;">美食</a></li> | |
<li><a href="javascript:;">百货</a></li> | |
<li><a href="javascript:;">个护</a></li> | |
<li><a href="javascript:;">预告</a></li> | |
</ul> | |
</div> | |
<div class="tab-content"> | |
<div class="item active"><img src="./image/tab00.png" alt="" /></div> | |
<div class="item"><img src="./image/tab01.png" alt="" /></div> | |
<div class="item"><img src="./image/tab02.png" alt="" /></div> | |
<div class="item"><img src="./image/tab03.png" alt="" /></div> | |
<div class="item"><img src="./image/tab04.png" alt="" /></div> | |
</div> | |
</div> | |
<script src="./js/tab栏切换.js"></script> | |
</body> |
js
// 获取元素对象 | |
const as = document.querySelectorAll('.tab-nav a') | |
// 给 5 个 as 对象绑定鼠标经过事件 | |
for(let i = 0;i < as.length;i ++) | |
as[i].addEventListener('mouseenter',function () { | |
// 排它思想 | |
// 移除类 active | |
document.querySelector('.tab-nav .active').classList.remove('active') | |
// 添加类 active | |
// document.querySelector(`.tab-nav li:nth-child(${(i + 1)}) a`).classList.add('active') | |
// 简写方式 | |
this.classList.add('active') | |
document.querySelector('.tab-content .active').classList.remove('active') | |
document.querySelector(`.tab-content .item:nth-child(${(i + 1)})`).classList.add('active') | |
}) |
# 全选文本框案例 1
需求:用户点击全选,则下面复选框全部选择,取消全选则全部取消
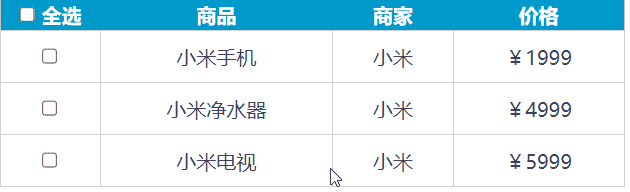
分析:
- 全选复选框点击,可以得到当前按钮的 checked
- 把下面所有的小复选框状态 checked,改为和全选复选框一致
代码:
html
<style> | |
* { | |
margin: 0; | |
padding: 0; | |
} | |
table { | |
border-collapse: collapse; | |
border-spacing: 0; | |
border: 1px solid #c0c0c0; | |
width: 500px; | |
margin: 100px auto; | |
text-align: center; | |
} | |
th { | |
background-color: #09c; | |
font: bold 16px "微软雅黑"; | |
color: #fff; | |
height: 24px; | |
} | |
td { | |
border: 1px solid #d0d0d0; | |
color: #404060; | |
padding: 10px; | |
} | |
.allCheck { | |
width: 80px; | |
} | |
body { | |
perspective: 300px | |
} | |
input { | |
transform-style: preserve-3d; | |
} | |
input:checked { | |
animation: move 1s; | |
} | |
@keyframes move { | |
from { | |
transform: rotate(0deg) | |
} | |
to { | |
transform: rotateY(360deg) | |
} | |
} | |
</style> | |
</head> | |
<body> | |
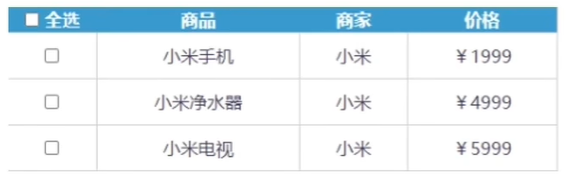
<table> | |
<tr> | |
<th class="allCheck"> | |
<input type="checkbox" name="" id="checkAll"> <span class="all">全选</span> | |
</th> | |
<th>商品</th> | |
<th>商家</th> | |
<th>价格</th> | |
</tr> | |
<tr> | |
<td> | |
<input type="checkbox" name="check" class="ck"> | |
</td> | |
<td>小米手机</td> | |
<td>小米</td> | |
<td>¥1999</td> | |
</tr> | |
<tr> | |
<td> | |
<input type="checkbox" name="check" class="ck"> | |
</td> | |
<td>小米净水器</td> | |
<td>小米</td> | |
<td>¥4999</td> | |
</tr> | |
<tr> | |
<td> | |
<input type="checkbox" name="check" class="ck"> | |
</td> | |
<td>小米电视</td> | |
<td>小米</td> | |
<td>¥5999</td> | |
</tr> | |
</table> | |
<script src="./js/全选反选案例.js"></script> | |
</body> |
js
// 获取元素对象 | |
const checkAll = document.querySelector('#checkAll') | |
// 获取元素对象集合 | |
const ck = document.querySelectorAll('.ck') | |
// 给大 check 绑定单击事件 | |
// let num = 1 | |
checkAll.addEventListener('click', function () { | |
// 循环 遍历小 check 集合并设置 checked 属性为大 check 的属性状态 完成 全选和全不选 | |
for (let i = 0; i < ck.length; i++) { | |
ck[i].checked = this.checked | |
// if (this.checked === true) | |
// num++ | |
// else | |
// num-- | |
} | |
}) | |
for (let i = 0; i < ck.length; i++) | |
ck[i].addEventListener('click', function () { | |
// 每次触发点击事件后获取全部的 ck 中被选中的 ck 然后获取长度来判断是否满足条件 | |
checkAll.checked = document.querySelectorAll('.ck:checked').length === ck.length | |
// if (ck[i].checked === false) | |
// checkAll.checked = false | |
// if (ck[i].checked === true) | |
// num++ | |
// else | |
// num-- | |
// if (num > ck.length) | |
// checkAll.checked = true | |
// console.log(num) | |
}) |
# 事件流
- 事件流与两个阶段说明
- 事件捕获
- 事件冒泡
- 阻止冒泡
- 解绑事件
# 1 事件流和两个阶段说明
- 事件流指的是事件完整执行过程中的流动路径.
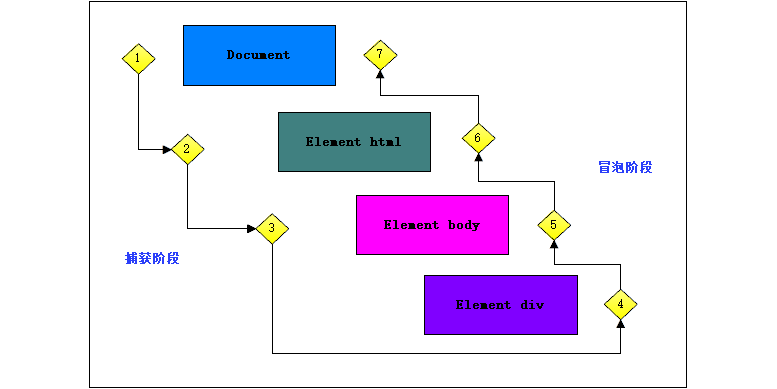
说明:假设页面里面有个 div,当触发事件时,会经历两个阶段,分别是捕获阶段,冒泡阶段。
简单来说:捕获阶段是 从父到子 冒泡阶段是 从子到父.
<font color=red> 实际工作都是使用事件冒泡为主 </font>.
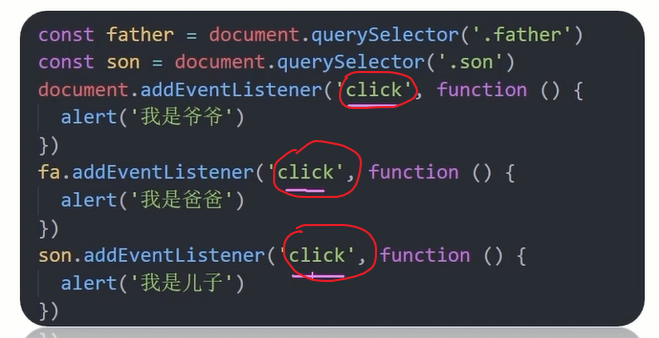
# 1.2 事件捕获
- 事件捕获概念:
从 DOM 的根元素开始去执行对应的事件 (从外到里)
- 事件捕获需要写对应代码才能看到效果
代码:
DOM.addEventListener(事件类型,事件处理函数,是否使用捕获机制) |
- 说明:
- addEventListener 第三个参数传入布尔值 (true /false 默认) 代表是否捕获阶段触发 (很少使用)
- addEventListener 默认不使用捕获机制 除非在第三个参数中开启
代码:
html
<body> | |
<div class="father"> | |
<div class="son"></div> | |
</div> | |
<script src="./js/事件流.js"></script> | |
</body> |
js
const fa = document.querySelector('.father') | |
const son = document.querySelector('.son') | |
document.addEventListener('click', function () { | |
alert('我是爷爷') | |
}) | |
fa.addEventListener('click', function () { | |
alert('我是爸爸') | |
}) | |
son.addEventListener('click', function () { | |
alert('我是儿子') | |
}) |
效果:

# 使用捕获机制
js
const fa = document.querySelector('.father') | |
const son = document.querySelector('.son') | |
document.addEventListener('click', function () { | |
alert('我是爷爷') | |
},true) | |
fa.addEventListener('click', function () { | |
alert('我是爸爸') | |
},true) | |
son.addEventListener('click', function () { | |
alert('我是儿子') | |
},true)// 开启捕获机制 |
效果:

# 注意
若是用 L0 事件监听,则只有冒泡阶段,没有捕获
# 1.3 事件冒泡
事件冒泡概念
当一个元素的事件被触发时,同样的事件将会在该元素的所有祖先元素中依次被触发。这一过程称为事件冒泡
- 简单理解:当一个元素触发事件后,会依次向上调用所有父级元素的 <font color=red> 同名事件 </font>.
![image-20230731002517078]()
- 都是点击才会给你冒泡,同名事件
- <font color=red> 事件冒泡是默认存在的 </font>.
- L2 事件监听第三个参数是 false,或者默认都是冒泡 (默认就是 false,true 为捕获机制)
- 如果没有冒泡指的是小盒子开启了 e.stopPropagation () 阻止冒泡,给大盒子注册点击事件,点击的是里面的小盒子,会导致大盒子的点击无法执行.
# 1.4 阻止冒泡
- 问题:因为默认就有冒泡模式的存在,所以容易导致事件影响到父级元素.
- 需求:若想把事件就限制在当前元素内,就需要阻止事件冒泡.
- 前提:阻止事件冒泡需要拿到事件对象.
语法:
事件对象.stopPropagation() |
- 注意:此方法可以阻断事件流动传播,不光在冒泡阶段有效,捕获阶段也有效.
代码:
html
<body> | |
<div class="father"> | |
<div class="son"></div> | |
</div> | |
<script src="./js/事件流.js"></script> | |
</body> |
js
const fa = document.querySelector('.father') | |
const son = document.querySelector('.son') | |
document.addEventListener('click', function () { | |
alert('我是爷爷') | |
}) | |
fa.addEventListener('click', function () { | |
alert('我是爸爸') | |
}) | |
son.addEventListener('click', function (e) { | |
alert('我是儿子') | |
// 阻止冒泡 | |
e.stopPropagation() | |
}) |
效果:

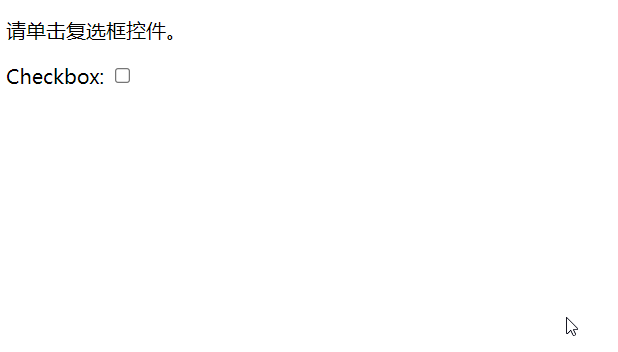
# 1.5 阻止事件默认行为
在事件流的任何阶段调用 preventDefault() 都会取消事件,这意味着任何通常被该实现触发并作为结果的默认行为都不会发生。
你可以使用 Event.cancelable 来检查该事件是否支持取消。为一个不支持 cancelable 的事件调用 preventDefault() 将没有效果。
语法:
event.preventDefault(); |
代码:
html
<body> | |
<p>请单击复选框控件。</p> | |
<form> | |
<label for="id-checkbox">Checkbox:</label> | |
<input type="checkbox" id="id-checkbox" /> | |
</form> | |
<div id="output-box"></div> | |
<script src="./js/阻止默认行为.js"></script> | |
</body> |
js
document.querySelector("#id-checkbox").addEventListener("click", function (event) { | |
document.getElementById("output-box").innerHTML += | |
"抱歉! <code>preventDefault()</code> 不会让你检查的!<br>"; | |
// 阻止事件的默认行为 也就是 阻止复选框点击后的勾选状态可不是阻止点击事件哦 | |
event.preventDefault(); | |
}); |
效果:
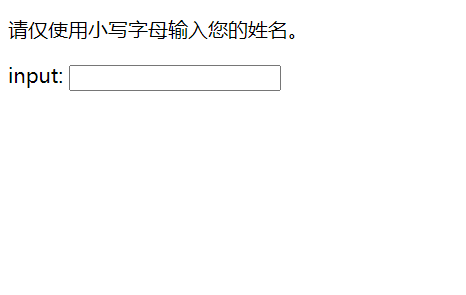
代码案例 2 阻止 input 输入的默认行为
代码:
html
<body> | |
<p>请仅使用小写字母输入您的姓名。</p> | |
<label for="id-text">input:</label> | |
<input type="text" id="id-text" /> | |
<script src="./js/阻止默认行为.js"></script> | |
</body> |
less
.warning { | |
border: 2px solid #f39389; | |
border-radius: 2px; | |
padding: 10px; | |
position: absolute; | |
background-color: #fbd8d4; | |
color: #3b3c40; | |
} |
js
//beforeinput 在 input 或 select 或 textArea 的值即将被修改时触发事件 | |
const myText = document.querySelector("#id-text") | |
myText.addEventListener("keydown", function (e) { | |
console.log(e) | |
let val = +e.keyCode | |
console.log(val) | |
if (val !== 0) | |
if (val < 65 || val > 90) { | |
e.preventDefault() | |
msgFun("请仅使用小写字母。\n" + "keyCode:" + val + "!\n") | |
} | |
}); | |
let warningtimeout; | |
const warningBox = document.createElement('div') | |
warningBox.classList.add('warning') | |
function msgFun(msg) { | |
// 盒子的内容 | |
warningBox.innerText = msg | |
// 判断 body 中是否包含了 warningBox 元素 | |
if (document.body.contains(warningBox)) { | |
// 包含了就删除上一次的定时器 | |
window.clearTimeout(warningtimeout); | |
} else { | |
console.log(myText.parentNode)//body 标签 | |
// 将 wanringBox 插入到 myText 的父盒子的前面 | |
//insertBefore () 参数一:用于插入的节点,参数二:将要插在这个节点之前 | |
myText.parentNode.insertBefore(warningBox, myText.nextSibling); | |
} | |
// 第二次执行 满足 if 删除了上一次的定时器 下面执行又创建了一个新的定时器 也就是 刷新定时器 | |
// 创建定时器 2 秒后执行操作 | |
warningtimeout = setTimeout(function () { | |
// 删除 wanringBox 盒子 | |
warningBox.parentNode.removeChild(warningBox); | |
}, 2000); | |
} |
效果:
# 1.6 解绑事件
# 解绑事件分两个方式
- on 事件方式,直接使用 null 覆盖就可以实现事件的解绑了
语法:
// 绑定事件 | |
btn.onclick = function(){ | |
alert('点击了') | |
} | |
// 解绑事件 | |
btn.onclick = null |
代码:
html
<body> | |
<button>点击</button> | |
<script src="./js/事件解绑.js"></script> | |
</body> |
js
const button = document.querySelector('button') | |
button.onclick = function() { | |
// L0 事件移除解绑方式 也可以写在函数体中点击后执行弹出后就解绑了后面点击无效 只有 页面加载后 点击一次有效 | |
button.onclick = null | |
alert('点击了') | |
} | |
// L0 事件移除解绑方式 上来就解绑 | |
// button.onclick = null |
效果:

- addEventListener 方式,必须使用:removeEventListener (事件类型,事件处理函数,[获取捕获或者冒泡阶段])
- addEventListener 参数列表中 第三个参数是 [] 抱起来的说明可以省略的。
语法:
function fun() { | |
alert('点击了') | |
} | |
// 绑定事件 | |
btn.addEventListener('click',fun) | |
// 解绑事件 | |
btn.removeEventListener('click',fun) |
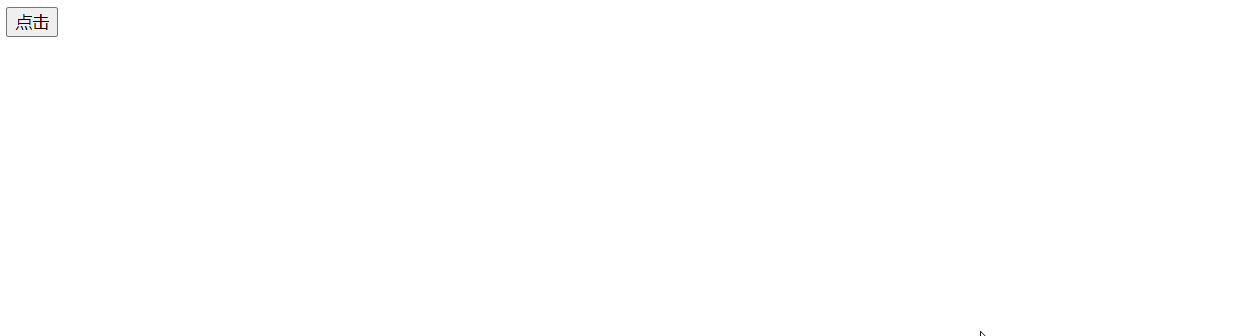
注意:<font color=red> 匿名函数无法被解绑 </font>.
代码:
html
<body> | |
<button>点击</button> | |
<script src="./js/事件解绑.js"></script> | |
</body> |
js
const button = document.querySelector('button') | |
function fun () { | |
alert('点击了') | |
} | |
// 绑定事件 | |
button.addEventListener('click',fun) | |
// 解绑事件 | |
button.removeEventListener('click',fun) |
效果:
# 两种注册事件的区别
- 传统 on 注册 (L0)
- 同一个对象,后面注册的事件会覆盖前面注册 (同一个事件)
- 直接使用 null 覆盖就可以实现事件的解绑.
- 都是冒泡阶段执行的,没有捕获机制
- 事件监听注册 (L2)
- 语法:addEventListener (事件类型,事件处理函数,是否使用捕获)
- 后面注册的事件不会覆盖前面注册的事件 (同一个事件)
- 可以通过第三个参数去确定是在冒泡或者捕获阶段执行.
- 必须使用 removeEventListener (事件类型,事件处理函数,获取捕获或者冒泡阶段) 解绑事件,<font color=red> 无法解绑匿名函数事件 </font>.
- <font color=red> 匿名函数无法被解绑 </font>.
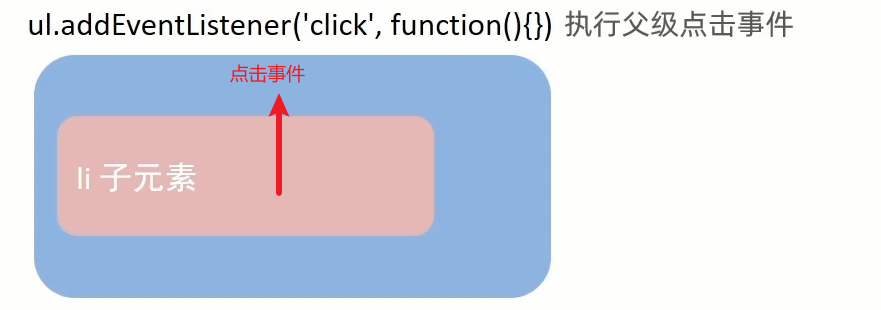
# 事件委托
# 思考
如果同时给多个元素注册事件,我们怎么做?
- for 循环注册事件
代码:
<ul><li>我是第1个小li</li>
<li>我是第2个小li</li>
<li>我是第3个小li</li>
<li>我是第4个小li</li>
<li>我是第5个小li</li>
</ul>绑定事件:
const lis = document.querySelectorAll('ul li')
for (let i = 0;i < lis.length;i ++)
lis[i].addEventListener('click',function () {
alert('点击了')
})
有没有一种 <font color=red> 技巧 </font> 注册一次事件就 1 能完成以上效果呢?
- 使用 <font color=red> 事件委托 </font>.
事件委托是利用事件流的特征解决一些开发需求的知识 <font color=red> 技巧 </font>.
优点:减少注册次数,提高程序性能
原理:事件委托其实是利用事件冒泡的特点.
给 <font color=red> 父元素注册事件 </font>,当我们触发子元素的时候,会冒泡到父元素身上,从而触发父元素的事件.
实现:事件对象.target.tagName 可以获得真正触发事件的元素大写命名的.
e.target 这个对象可以实时获取当前页面点击的 DOM 元素对象
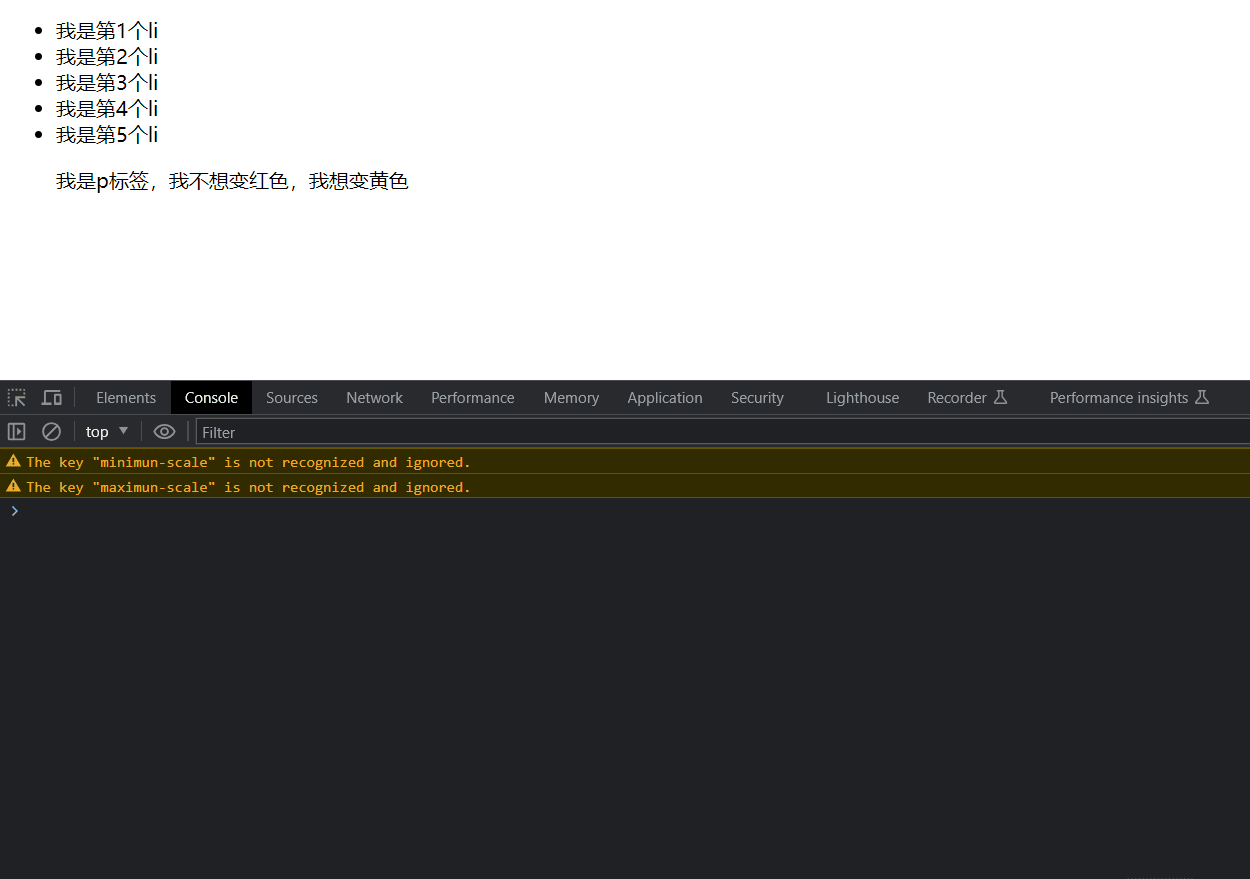
代码:
html
<body> | |
<ul> | |
<li>我是第1个li</li> | |
<li>我是第2个li</li> | |
<li>我是第3个li</li> | |
<li>我是第4个li</li> | |
<li>我是第5个li</li> | |
<p>我是p标签,我不想变红色,我想变黄色</p> | |
</ul> | |
<script src="./js/事件委托.js"></script> | |
</body> |
js
// 点击 ul 中的子元素 li 点击哪个哪个字体变为红色 | |
// 按照事件委托的方式 委托给父级,事件写到父级身上 | |
// 获取 li 父级元素对象 | |
const ul = document.querySelector('ul') | |
// 绑定单击事件 | |
ul.addEventListener('click', function (e) { | |
console.dir(e.target)// 事件对象.target 就是点击的对象 点了哪个 li 对象就是哪个 li | |
//target 中有一个属性是 tagName 是该标签的大写命名可以用来进行判断点击的是哪个标签 | |
if (e.target.tagName === 'LI') | |
e.target.style.color = 'red' | |
else | |
// 注意,如果直接 else 判断被点击的父元素 ul 中子元素都会变成黄色的,所以不想让点击 p 时却所有的 ul 子元素都跟着改变一定记得做判断! | |
e.target.style.color = 'yellow' | |
}) |
效果:
总结:
- 事件委托的好处是什么?
- 减少注册次数,提高了程序性能
- 事件委托是委托给了谁?父元素还是子元素?
- 父元素
- 如何找到真正触发的元素
- 事件对象.target.tagName
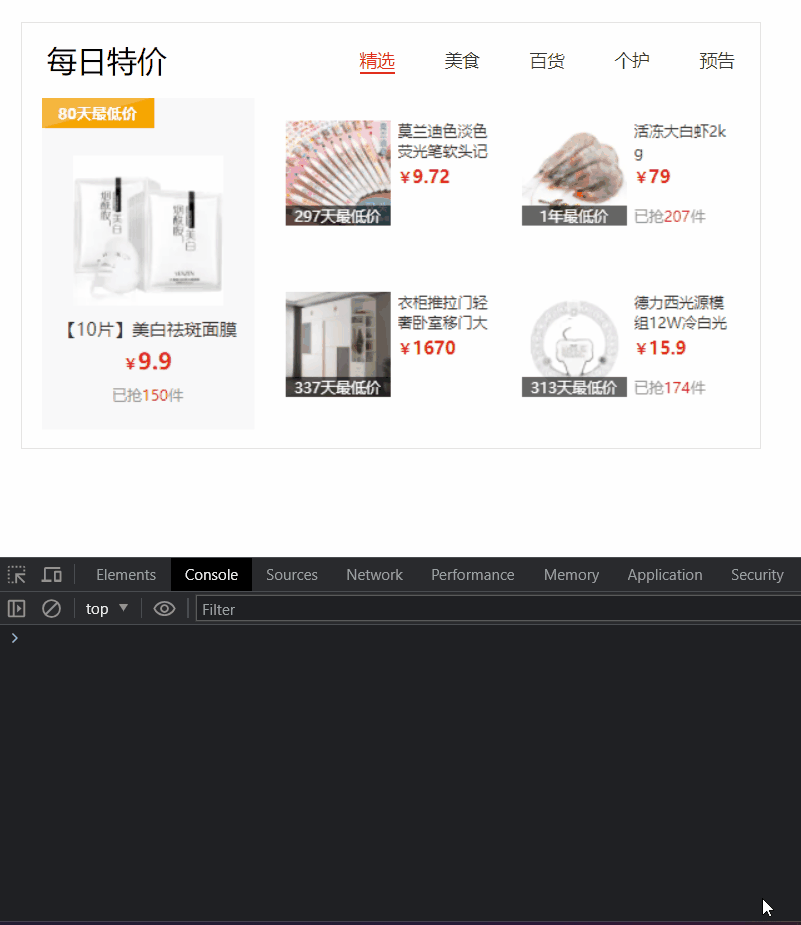
# 案例 —table 栏切换 — 事件委托方式
需求:优化程序,将 tab 切换案例改为 <font color=red> 事件委托 </font > 写法

代码:
html
<style> | |
* { | |
margin: 0; | |
padding: 0; | |
} | |
.tab { | |
width: 590px; | |
height: 340px; | |
margin: 20px; | |
border: 1px solid #e4e4e4; | |
} | |
.tab-nav { | |
width: 100%; | |
height: 60px; | |
line-height: 60px; | |
display: flex; | |
justify-content: space-between; | |
} | |
.tab-nav h3 { | |
font-size: 24px; | |
font-weight: normal; | |
margin-left: 20px; | |
} | |
.tab-nav ul { | |
list-style: none; | |
display: flex; | |
justify-content: flex-end; | |
} | |
.tab-nav ul li { | |
margin: 0 20px; | |
font-size: 14px; | |
} | |
.tab-nav ul li a { | |
text-decoration: none; | |
border-bottom: 2px solid transparent; | |
color: #333; | |
} | |
.tab-nav ul li a.active { | |
border-color: #e1251b; | |
color: #e1251b; | |
} | |
.tab-content { | |
padding: 0 16px; | |
} | |
.tab-content .item { | |
display: none; | |
} | |
.tab-content .item.active { | |
display: block; | |
} | |
</style> | |
</head> | |
<body> | |
<div class="tab"> | |
<div class="tab-nav"> | |
<h3>每日特价</h3> | |
<ul> | |
<!-- 为每个 a 添加自定义属性 便于展示下面的 div img--> | |
<li><a class="active" href="javascript:;" data-id="0">精选</a></li> | |
<li><a href="javascript:;" data-id="1">美食</a></li> | |
<li><a href="javascript:;" data-id="2">百货</a></li> | |
<li><a href="javascript:;" data-id="3">个护</a></li> | |
<li><a href="javascript:;" data-id="4">预告</a></li> | |
</ul> | |
</div> | |
<div class="tab-content"> | |
<div class="item active"><img src="./image/tab00.png" alt="" /></div> | |
<div class="item"><img src="./image/tab01.png" alt="" /></div> | |
<div class="item"><img src="./image/tab02.png" alt="" /></div> | |
<div class="item"><img src="./image/tab03.png" alt="" /></div> | |
<div class="item"><img src="./image/tab04.png" alt="" /></div> | |
</div> | |
</div> | |
<script src="./js/tab栏切换.js"></script> | |
</body> |
js
// 获取元素对象 | |
const as = document.querySelector('.tab .tab-nav ul') | |
//img 显示第二种写法 | |
const items = document.querySelectorAll('.tab .tab-content .item') | |
// 给 5 个 as 对象绑定鼠标经过事件 | |
as.addEventListener('mouseover',function (e) { | |
if(e.target.tagName === 'A'){ | |
// 排它思想 | |
// 移除类 active | |
document.querySelector('.tab-nav .active').classList.remove('active') | |
// 添加类 active | |
// document.querySelector(`.tab-nav li:nth-child(${(i + 1)}) a`).classList.add('active') | |
// 简写方式 | |
console.dir(e.target) | |
e.target.classList.add('active') | |
// this.classList.add('active') | |
// 通过 e.target.dataset.id 来获取自定义属性的值 但是需要注意获取到的是字符串类型的 | |
console.log(e.target.dataset.id) | |
document.querySelector('.tab-content .active').classList.remove('active') | |
//e.target.dataset.id 获取为字符串类型值 + 1 后就是拼接字符串了所以使用 + 来隐式转换数据类型 | |
// 第一种写法 | |
// document.querySelector(`.tab-content .item:nth-child(${(+(e.target.dataset.id) + 1)})`).classList.add('active') | |
// 第二种写法 | |
console.log(items) | |
items[+(e.target.dataset.id)].classList.add('active') | |
} | |
}) |
效果:
# 其它事件
- 页面加载事件
- 元素滚动事件
- 页面尺寸事件
目标:掌握新的事件,做更强交互
# 1 页面加载事件
等待外部资源 <font color=red> 全部 </font>(如 图片,外联 CSS 和 JavaScript 等) 加载完毕时触发的事件
为什么要学?
- 有些时候需要等页面资源全部处理完了做一些事情
- 老代码喜欢把 script 写在 head 中 ,这时候直接找 dom 元素找不到,因为文档从上往下先 css 然后 html 然后 script
事件名:load (翻译:等待)
监听页面所有资源加载完毕:
- 给 window 最大的对象添加 load 事件
语法:
// 页面加载事件 | |
window.addEventListener('load',function() { | |
// 执行操作 | |
}) |
注意:<font color=red> 不光可以监听整个页面资源加载完毕,也可以针对某个资源绑定 load 事件 </font>.
img.addEvnetListener('load',function () { | |
// 等待图片加载完毕,再执行操作 | |
}) |
代码:
html
<!DOCTYPE html> | |
<html lang="en"> | |
<head> | |
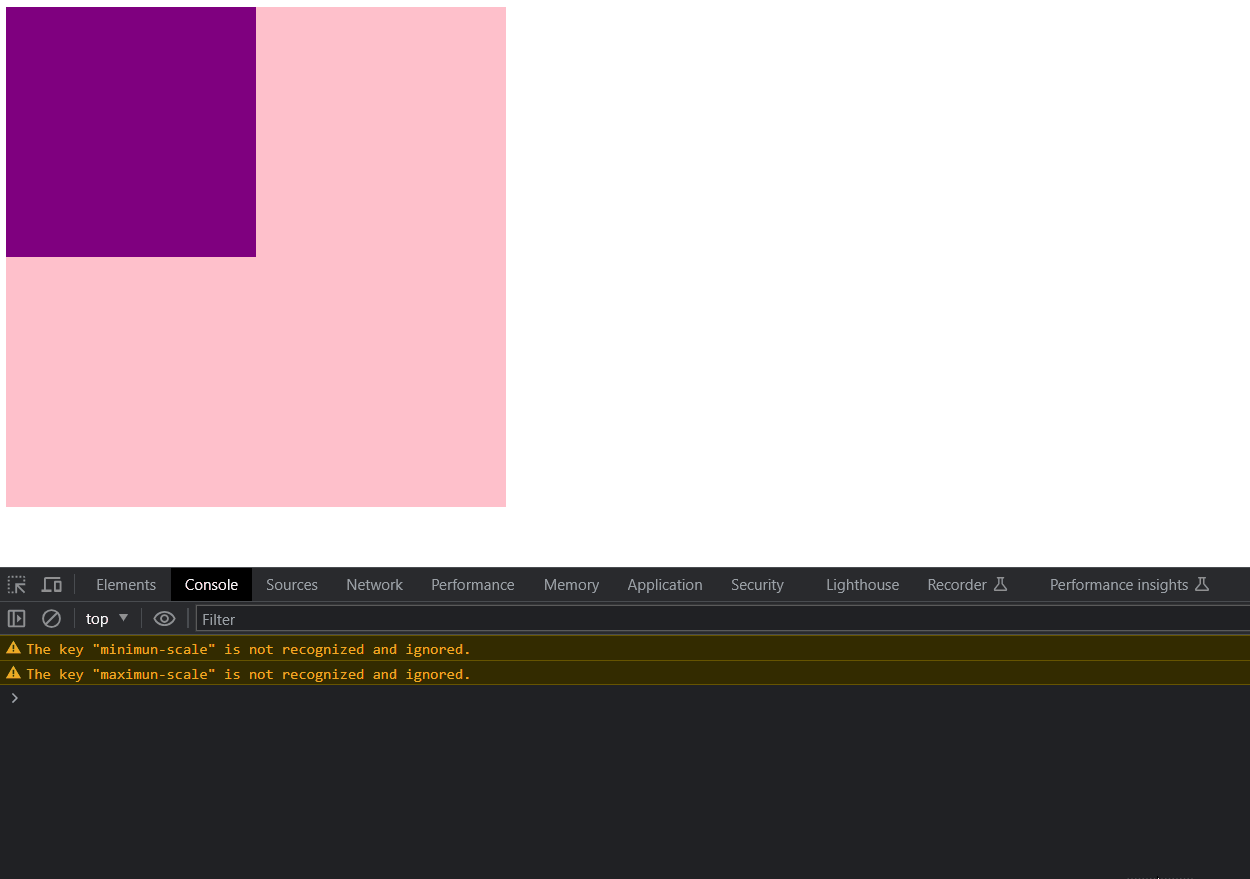
<meta charset="UTF-8"> | |
<meta name="viewport" content="width=device-width, initial-scale=1.0, | |
minimun-scale=1.0,maximun-scale=1.0,user-scalable=no"> | |
<title>Document</title> | |
<script src="./js/load.js"></script> | |
</head> | |
<body> | |
<button>按钮</button> | |
</body> | |
</html> |
js
// 等待页面资源加载完后再执行回调函数 | |
window.addEventListener('load', function () { | |
const button = document.querySelector('button') | |
button.addEventListener('click', function () { | |
alert('点击了') | |
}) | |
}) |
效果:

# 1.1 HTML 结构加载事件
- 当初始 HTML 文档被完全加载和解析完成之后,DOMContentLoaded 事件被触发,而无需等待样式表,图像等完全加载.
- 事件名:DOMContentLoaded
- 监听页面 DOM 加载完毕:
- 给 document 文档对象添加 DOMContentLoaded 事件
语法:
document.addEventListener('DOMContentLoaded',function() { | |
// 执行的操作 | |
}) |
代码:
html
<!DOCTYPE html> | |
<html lang="en"> | |
<head> | |
<meta charset="UTF-8"> | |
<meta name="viewport" content="width=device-width, initial-scale=1.0, | |
minimun-scale=1.0,maximun-scale=1.0,user-scalable=no"> | |
<title>Document</title> | |
<script src="./js/load.js"></script> | |
</head> | |
<body> | |
<button>按钮</button> | |
</body> | |
</html> |
js
// 等待 HTML 结构加载完成后执行回调函数 | |
document.addEventListener('DOMContentLoaded', function () { | |
const button = document.querySelector('button') | |
button.addEventListener('click', function () { | |
alert('点击了') | |
}) | |
}) |
效果:

# 2 页面滚动事件
滚动条在滚动的时候持续触发的事件
使用场景
- 我们想要页面滚动一段距离,比如 100px,就让某些元素 显示 / 隐藏
- 可以使用 scroll 来检测滚动的距离
为什么要学?
- 很多网页需要检测用户把页面滚动到某个区域后做一些处理,比如固定导航栏,比如返回顶部
事件名:scroll
监听整个页面滚动:
语法:
// 页面滚动事件 | |
window.addEventListener('scroll',function() { | |
// 执行的操作 | |
}) | |
// 页面滚动事件 | |
document.addEventListener('scroll',function() { | |
// 执行的操作 | |
}) |
- 给 window 或 document 添加 scroll 事件都可以 <font color=red> 建议给 window 添加 </font>.
代码:
html
<link rel="stylesheet" href="./css/scroll.css"/> | |
</head> | |
<body> | |
<script src="./js/scroll.js"></script> | |
</body> |
less
body { | |
height: 3000px; | |
} |
js
window.addEventListener('scroll',function() { | |
console.log('滚动了') | |
}) |
效果:
<font color=red> 注意细节 </font>:<font color=red > 只要滚动条 </font> 不在原位 <font color=red> 上刷新页面也算是触发了 scroll 事件了 </font>.
# 2.1 页面滚动事件 — 获取位置
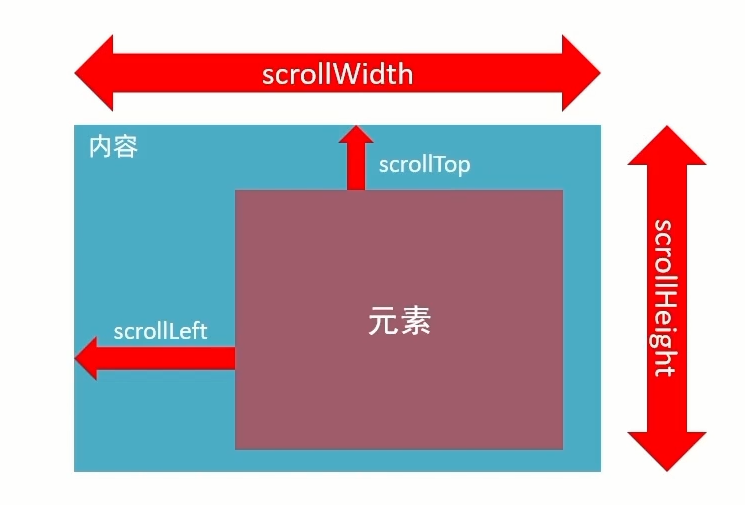
scrollLeft 和 scrollTop (属性)
- 获取被卷去的大小
- 获取元素内容往左,网上滚出去看不到的距离
- 这两个值是可 <font color=red> 读写 </font > 的
代码:
html
<title>Document</title> | |
<link rel="stylesheet" href="./css/scroll.css"/> | |
</head> | |
<body> | |
<div> | |
里面有很多很多的文字 | |
里面有很多很多的文字 | |
里面有很多很多的文字 | |
里面有很多很多的文字 | |
里面有很多很多的文字 | |
里面有很多很多的文字 | |
里面有很多很多的文字 | |
里面有很多很多的文字 | |
里面有很多很多的文字 | |
里面有很多很多的文字 | |
里面有很多很多的文字 | |
里面有很多很多的文字 | |
里面有很多很多的文字 | |
里面有很多很多的文字 | |
里面有很多很多的文字 | |
里面有很多很多的文字 | |
里面有很多很多的文字 | |
里面有很多很多的文字 | |
里面有很多很多的文字 | |
里面有很多很多的文字 | |
里面有很多很多的文字 | |
里面有很多很多的文字 | |
里面有很多很多的文字 | |
里面有很多很多的文字 | |
里面有很多很多的文字 | |
里面有很多很多的文字 | |
里面有很多很多的文字 | |
里面有很多很多的文字 | |
里面有很多很多的文字 | |
里面有很多很多的文字 | |
里面有很多很多的文字 | |
里面有很多很多的文字 | |
里面有很多很多的文字 | |
里面有很多很多的文字 | |
里面有很多很多的文字 | |
里面有很多很多的文字 | |
里面有很多很多的文字 | |
里面有很多很多的文字 | |
里面有很多很多的文字 | |
里面有很多很多的文字 | |
里面有很多很多的文字 | |
里面有很多很多的文字 | |
里面有很多很多的文字 | |
里面有很多很多的文字 | |
里面有很多很多的文字 | |
里面有很多很多的文字 | |
里面有很多很多的文字 | |
</div> | |
<script src="./js/scroll.js"></script> | |
</body> |
less
body { | |
height: 3000px; | |
} | |
div { | |
overflow: auto; | |
margin: 100px auto; | |
width: 300px; | |
height: 300px; | |
border: 2px #000 solid; | |
} |
js
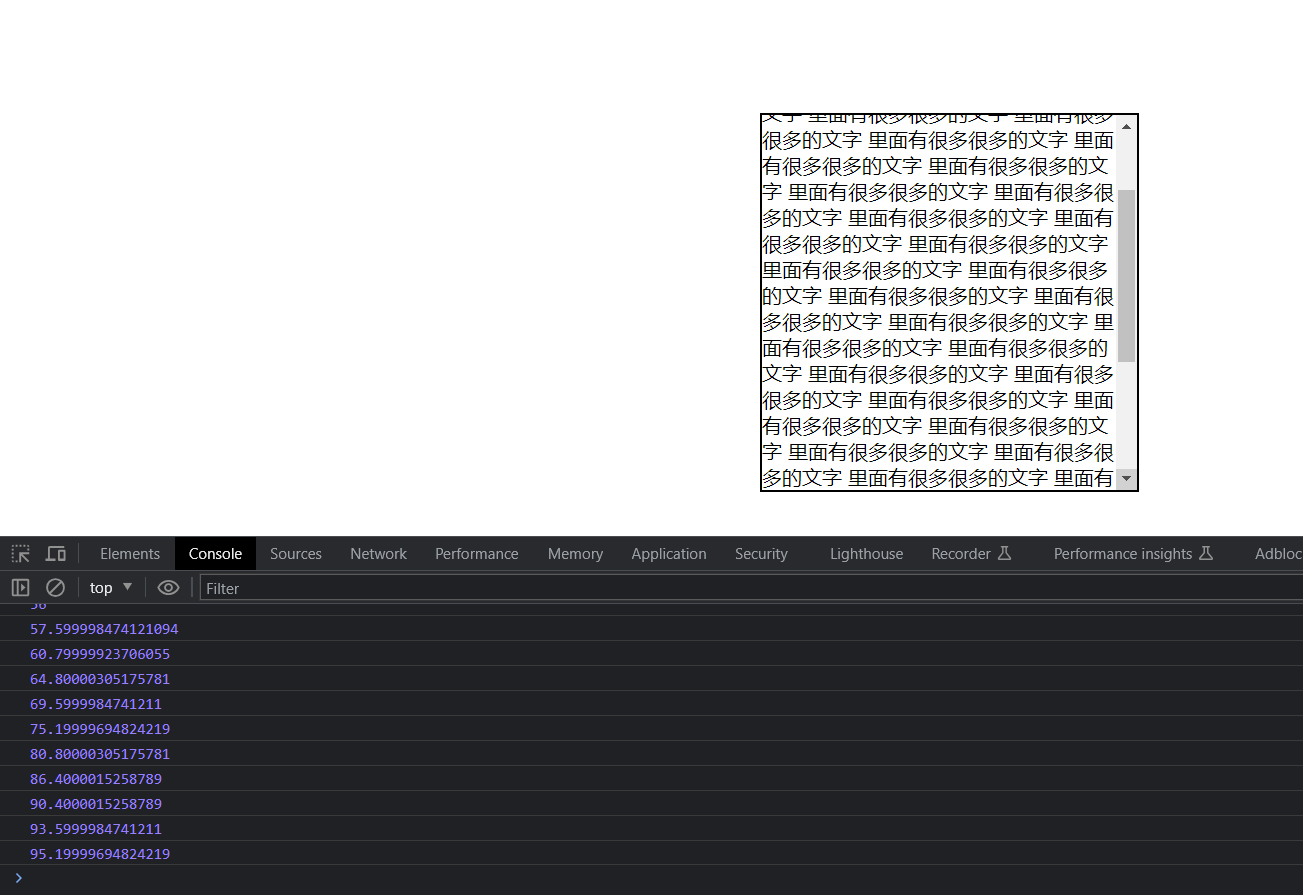
const div = document.querySelector('div') | |
div.addEventListener('scroll',function() { | |
// 打印往上滚动的距离 | |
console.log(this.scrollTop) | |
}) |
效果:
# 2.2 页面滚动事件 — 滚动到指定的坐标
- scrollTop () 方法可把内容滚动到指定的坐标
- 语法:元素.scrollTo (x,y)
// 让页面滚动到 y 轴 1000 像素的位置 | |
window.scrollTo(0,1000) |
# 2.3 获取 html 标签的写法
document.documentElement HTML 文档返回对象为

- 开发中,我们经常检测页面滚动的距离,比如页面滚动 100 像素,就可以显示一个元素,或者固定一个元素
语法:
// 页面滚动事件 | |
window.addEventListener('scroll',function() { | |
//document.documentElement 是 html 元素获取方式 | |
const n = document.documentElement.scrollTop | |
console.log(n) | |
}) |
代码:
html
<link rel="stylesheet" href="./css/scroll.css"/> | |
</head> | |
<body> | |
<div class="box" style="display:none"> | |
里面有很多很多的文字 | |
里面有很多很多的文字 | |
里面有很多很多的文字 | |
里面有很多很多的文字 | |
里面有很多很多的文字 | |
里面有很多很多的文字 | |
里面有很多很多的文字 | |
里面有很多很多的文字 | |
里面有很多很多的文字 | |
里面有很多很多的文字 | |
里面有很多很多的文字 | |
里面有很多很多的文字 | |
里面有很多很多的文字 | |
里面有很多很多的文字 | |
里面有很多很多的文字 | |
里面有很多很多的文字 | |
里面有很多很多的文字 | |
里面有很多很多的文字 | |
里面有很多很多的文字 | |
里面有很多很多的文字 | |
里面有很多很多的文字 | |
里面有很多很多的文字 | |
里面有很多很多的文字 | |
里面有很多很多的文字 | |
里面有很多很多的文字 | |
里面有很多很多的文字 | |
里面有很多很多的文字 | |
里面有很多很多的文字 | |
里面有很多很多的文字 | |
里面有很多很多的文字 | |
里面有很多很多的文字 | |
里面有很多很多的文字 | |
里面有很多很多的文字 | |
里面有很多很多的文字 | |
里面有很多很多的文字 | |
里面有很多很多的文字 | |
里面有很多很多的文字 | |
里面有很多很多的文字 | |
里面有很多很多的文字 | |
里面有很多很多的文字 | |
里面有很多很多的文字 | |
里面有很多很多的文字 | |
里面有很多很多的文字 | |
里面有很多很多的文字 | |
里面有很多很多的文字 | |
里面有很多很多的文字 | |
里面有很多很多的文字 | |
</div> | |
<div class="top" style="display:none">返回顶部</div> | |
<script src="./js/scroll.js"></script> | |
</body> |
less
body { | |
height: 3000px; | |
.box { | |
position: fixed; | |
overflow: auto; | |
left: 50%; | |
top: 10px; | |
transform: translate(-50%); | |
width: 300px; | |
height: 300px; | |
border: 2px #000 solid; | |
} | |
.top { | |
position: fixed; | |
right: 10px; | |
bottom: 50px; | |
width: 33px; | |
height: 43px; | |
background-color: #ccc; | |
} | |
} |
js
// 获取元素对象 | |
const box = document.querySelector('.box') | |
const top1 = document.querySelector('.top') | |
window.addEventListener('scroll', function () { | |
// 打印往上滚动的距离 | |
const n = document.documentElement.scrollTop | |
console.log(n) | |
// 满足条件后以块级元素显示 不满足后不展示 | |
if (n >= 300) | |
box.style.display = 'block' | |
else | |
box.style.display = 'none' | |
// 满足条件后以块级元素显示 不满足后不展示 | |
if (n >= 1236) | |
top1.style.display = 'block' | |
else | |
top1.style.display = 'none' | |
}) | |
// 绑定点击事件 | |
top1.addEventListener('click',function() { | |
// 滚动条到 0 的位置 也就是页面的顶部 | |
document.documentElement.scrollTop = 0 | |
}) |
效果:

# 总结
- 被卷去的头部或者左侧用哪个属性?是否可以读取和修改?
- scrollTop/scrollLeft
- 可以读取,也可以修改 (赋值)
- 检测页面滚动的头部距离 (被卷去的头部) 用哪个属性?
- document.documentElement.scrollTop
# 3 页面尺寸事件
会在窗口尺寸改变的时候触发事件:
resize
window.addEventListener('resize',function() { | |
// 执行代码 | |
}) |
- 检测屏幕宽度大小:
- document.documentElement.clientWidth
window.addEventListener('resize',function () { | |
let w = document.documentElement.clientWidth | |
console.log(w) | |
}) |
效果:

# 3.1 页面尺寸事件 — 获取元素宽高
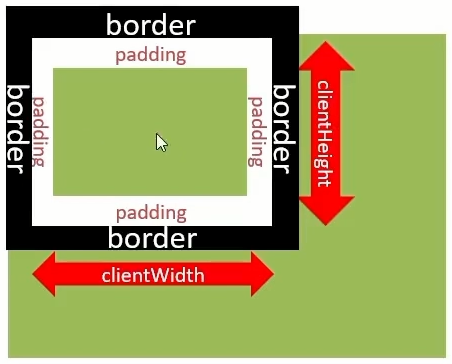
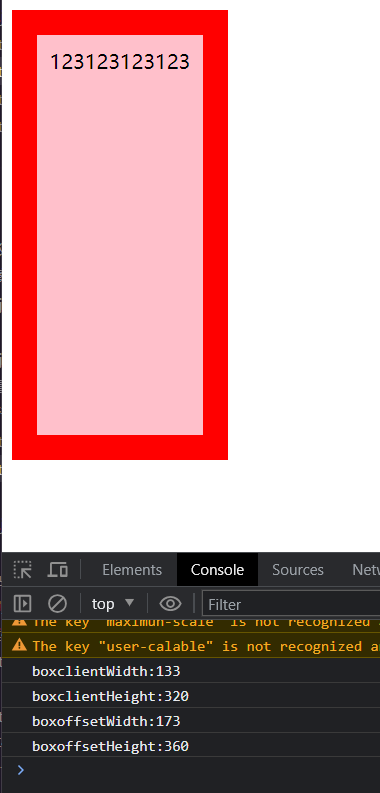
- 获取宽高:
- 获取元素的可见部分宽高 (不包含 border,margin,scroll 等)
- clientWidth 和 clientHeight.
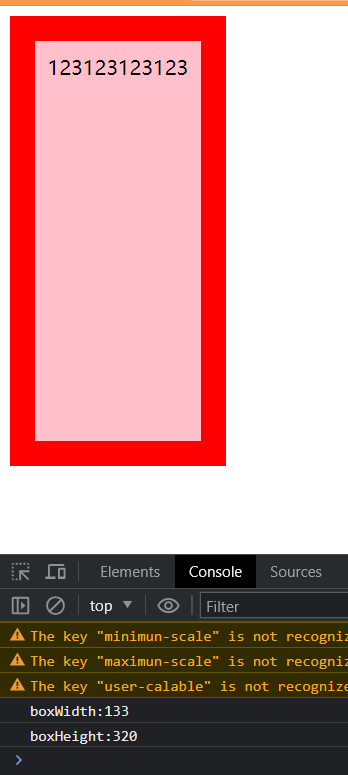
代码:
html
<link rel="stylesheet" href="./css/clientWidth和clientHeight.css"/> | |
</head> | |
<body> | |
<div class="box">123123123123</div> | |
<script src="./js/clientWidth和clientHeight.js"></script> | |
</body> |
less
.box { | |
display: inline-block; | |
height: 300px; | |
background-color: pink; | |
padding: 10px; | |
border: 20px red solid; | |
} |
js
const box = document.querySelector('.box') | |
console.log(`boxWidth:${box.clientWidth}`) | |
console.log(`boxHeight:${box.clientHeight}`) |
效果:
# 元素尺寸与位置
- 使用场景
- 前面案例滚动多少距离,都是我们自己算的,最好是页面滚动到某个元素,就可以做某些事。
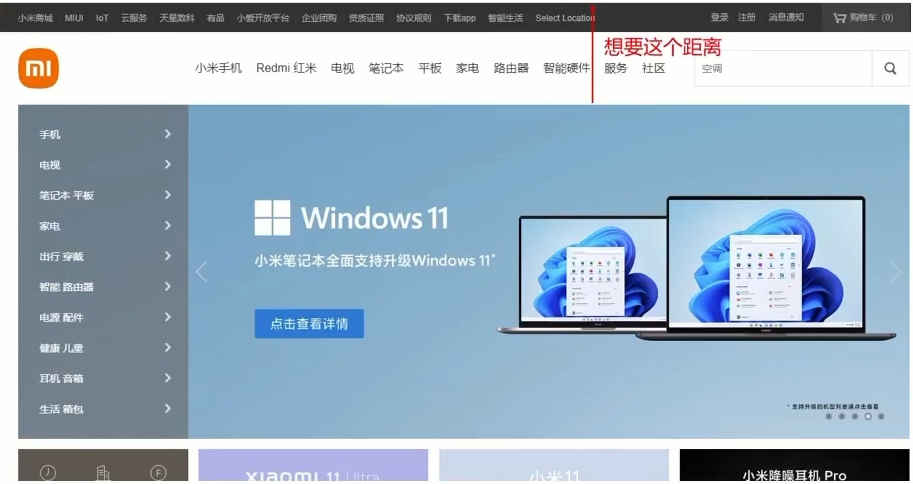
- 简单说,就是通过 js 的方式,得到 <font color=red> 元素在页面中的位置 </font>.
- 这样我们可以做,页面滚动到这个位置,就可以做某些操作,省去计算了
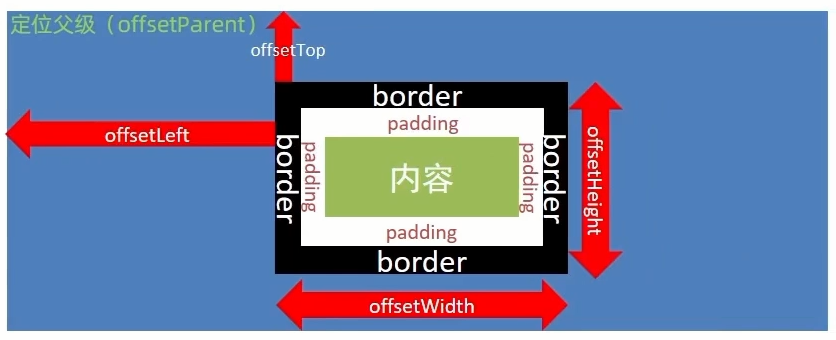
# 1 元素尺寸与位置 — 尺寸
- 获取宽高:
- 获取元素的自身宽高,包含元素自身设置的宽高,padding,border.
- offsetWidth 和 offsetHeight
- 获取出来的是数值,方便计算
- 注意:获取的是可视宽高,如果盒子是隐藏的,获取的结果是 0.
- 获取元素位置:
- 获取元素距离自己定位父级元素有定位的父级元素以父级元素为准的左,上距离
- offsetLect 和 offsetTop 注意是 <font color=red> 只读属性 </font>.
代码:
html
<link rel="stylesheet" href="./css/offsetLeft.css"/> | |
</head> | |
<body> | |
<div class="box"> | |
<p class="p"></p> | |
</div> | |
<script src="./js/offsetLeft.js"></script> | |
</body> |
less
.box { | |
width: 200px; | |
height: 200px; | |
background-color: pink; | |
margin: 100px; | |
} | |
.box .p { | |
width: 100px; | |
height: 100px; | |
background-color: purple; | |
margin: 50px; | |
} |
js
const box = document.querySelector('.box') | |
const p = document.querySelector('.p') | |
console.log(`boxWidth:${box.offsetWidth}`) | |
console.log(box.offsetHeight) | |
// 获取元素位置 | |
console.log(box.offsetLeft) | |
console.log(box.offsetTop) | |
// 检测盒子的位置,最近一级带有定位的祖先元素 | |
console.log(p.offsetTop) |
效果:
总结:
- offsetWidth 和 offsetHeight 是得到元素什么的宽高?
- 内容 + padding + border
- offsetTop 和 offsetLeft 得到位置以谁为准?
- 带有定位的父级.
- 如果都没有则以,文档左上角为准
offset 与 client 获取元素宽高的区别效果:
# 2 元素尺寸与位置 - 尺寸
- 获取位置:
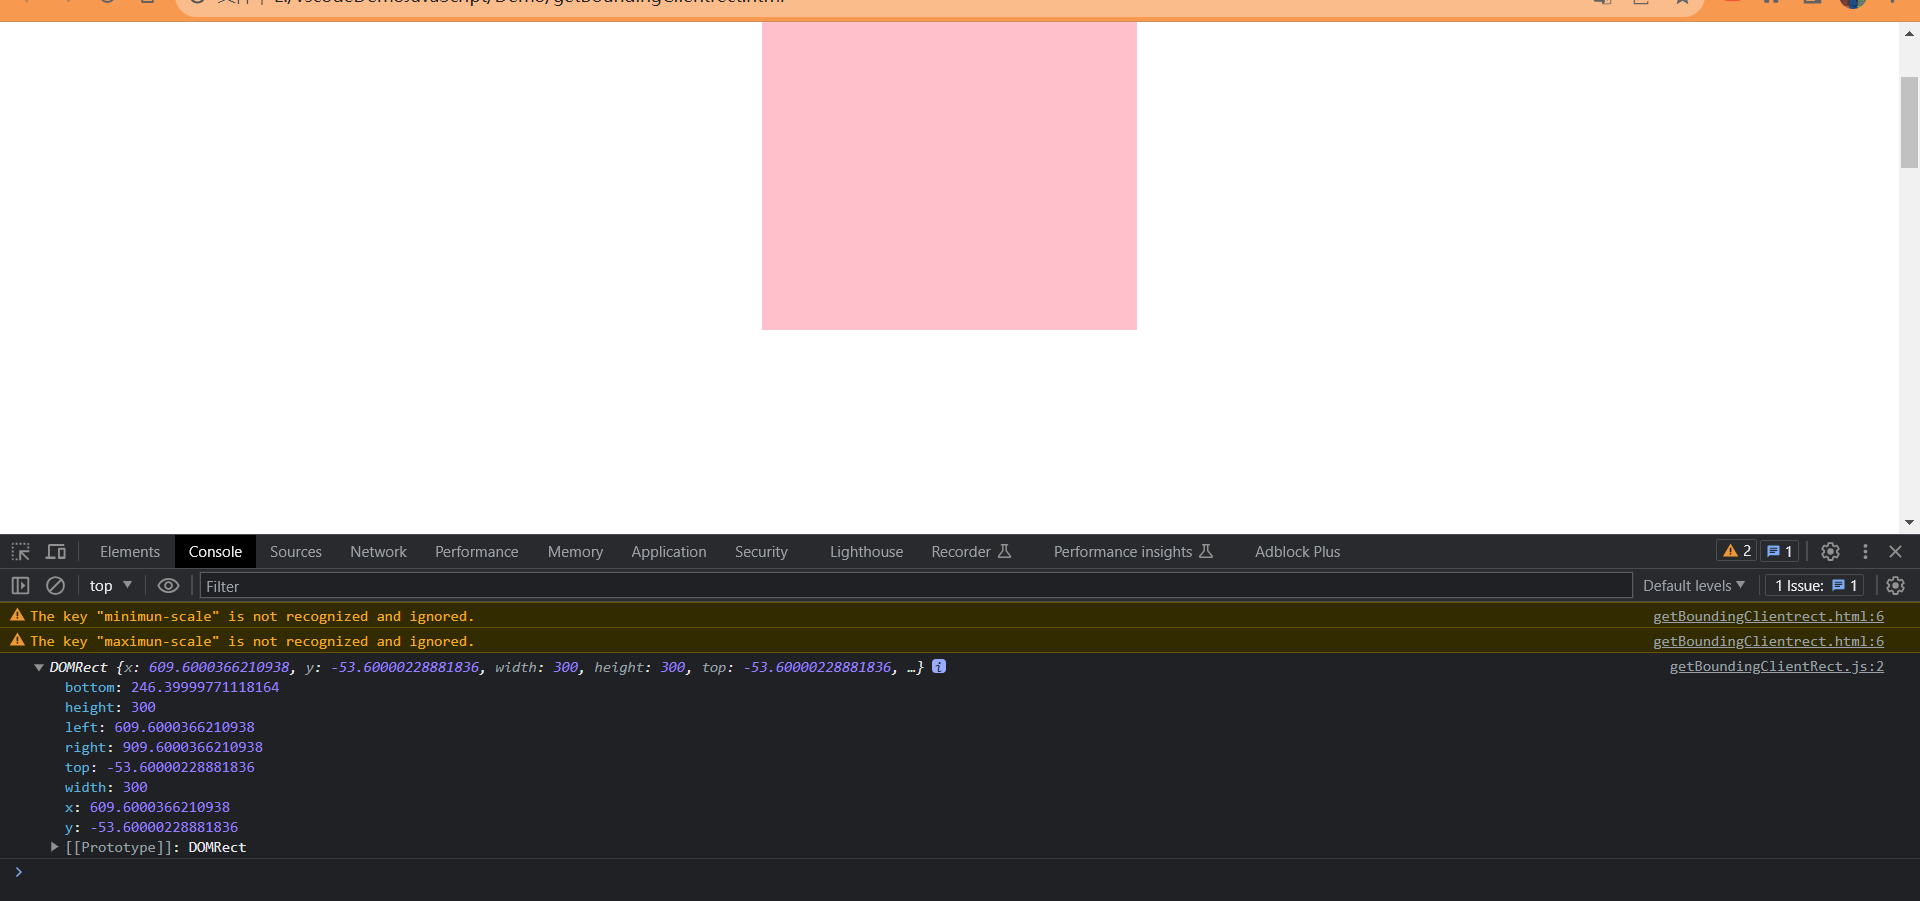
element.getBoundingClientRect()
方法返回元素的大小及其相对于视口的位置.
代码:
html
<link rel="stylesheet" href="./css/getBoundingClientRect.css"/> | |
</head> | |
<body> | |
<div class="box"></div> | |
<script src="./js/getBoundingClientRect.js"></script> | |
</body> |
less
body { | |
height: 2000px; | |
} | |
.box { | |
width: 300px; | |
height: 300px; | |
background-color: pink; | |
margin: 100px auto; | |
} |
js
const box = document.querySelector('.box') | |
console.log(box.getBoundingClientRect()) |
效果:

将滚动条向上卷去
# 总结
| 属性 | 作用 | 说明 |
|---|---|---|
| scrollLeft 和 scrollTop | 被卷去的头部和左侧 | 配合页面滚动来用,<font color=red> 可读写 </font>. |
| clientWidth 和 clientHeight | 获得元素宽度和高度 | 不包含 border,margin,scroll 用于 js 获取元素大小,只读属性。 |
| offsetWidth 和 offsetHeight | 获得元素高度和宽度 | 包含 border,padding,scroll 等,只读属性. |
| offsetLeft 和 offsetTop | 获取元素距离自己定位父级元素的左,上距离 | 获取元素位置的时候使用,只读属性. |
| getBoundingClientRect | 方法返回元素的大小及其相对于视口的位置. | 不受有定位的父元素的影响,得到的是相对于视口的坐标. |