# 八、服务异步通讯🎄
实用篇 - RabbitMQ
学习内容:
- 初始 MQ
- RabbitMQ 快速入门
- SpringAMQP
# 8.1、初始 MQ🌳
- 同步通讯
- 异步通讯
- MQ 常见框架
# 8.1.1、同步调用的问题🌲
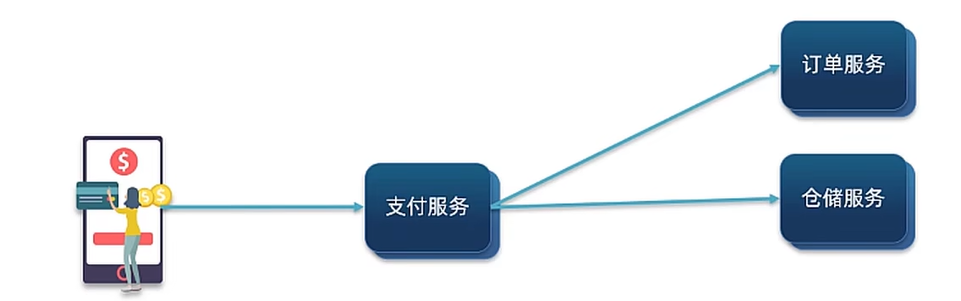
微服务间基于 Feign 的调用就属于同步方式,存在一些问题。
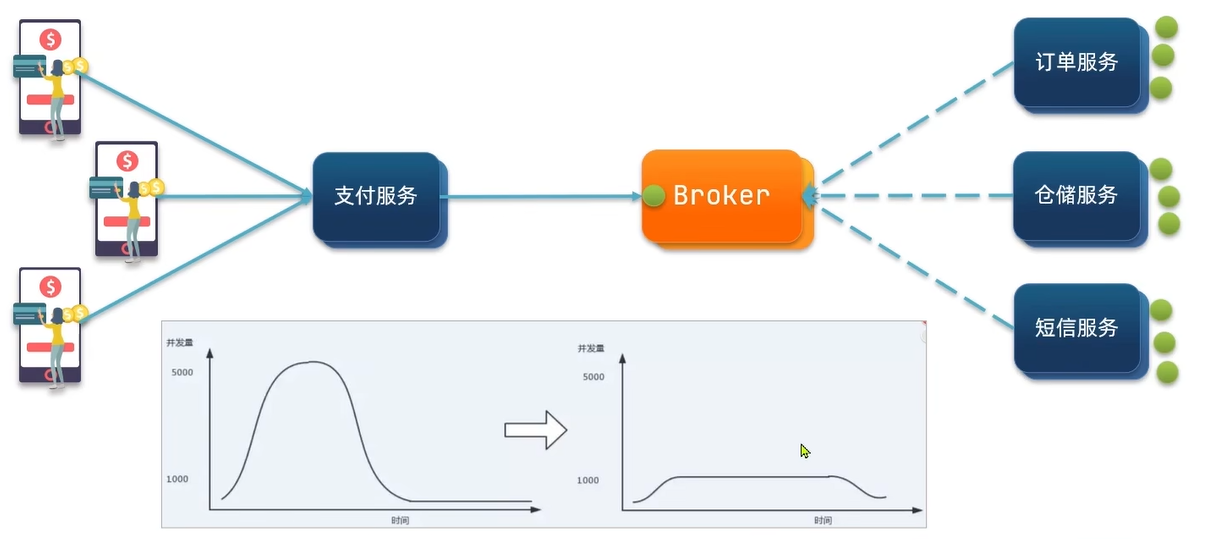
我们做一个购买商品的业务,用户支付调用支付服务。支付成功后需要调用订单业务,修改订单状态。然后还要去调用仓储服务,因为要给用户发货。
支付服务调用订单服务也好,调用仓储服务也好它都需要等待对方的响应。所以这种调用是事实的调用也就是同步调用
它的问题:
1、耦合问题
如果需要增加业务而需要改动支付服务的代码

2、性能下降
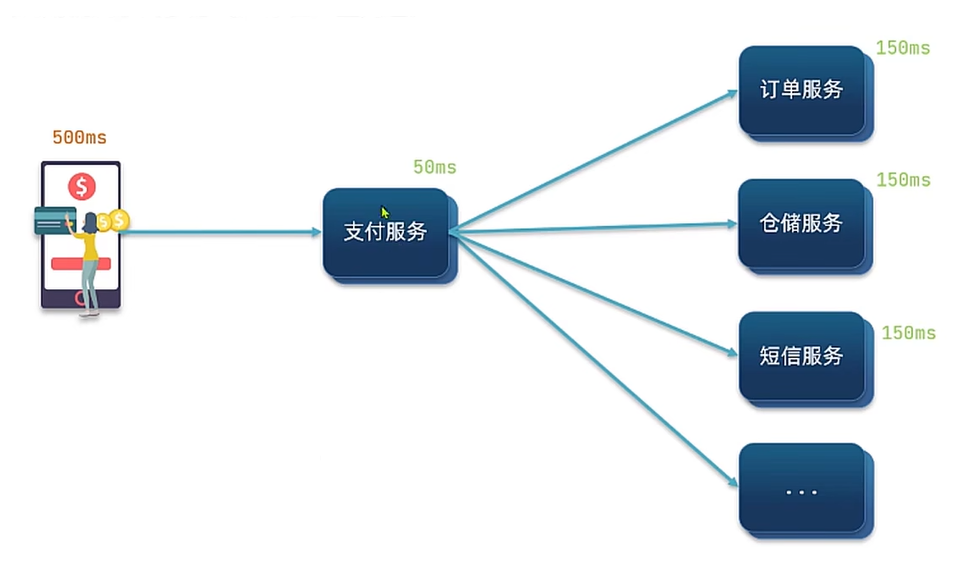
用户来调用支付业务,假如说支付业务耗时 50ms,紧接着支付服务调用其它服务,其它服务都耗时 150ms。支付服务调用再调用其它服务是同步调用所以它必须等待其它服务的执行结果才能执行其它的工作。而这一套流程下来就达到了耗时:500ms。这样的业务也太烂了
3、资源浪费
支付服务在不能执行下一步操作时一直都是在占用 CPU,占用内存的
4、级联失败问题
假如说中间某个服务报错了就会产生阻塞,等待时长较长结果且是失败的。用户体验极差
综上所述:
同步调用尽管时效性还不错但是却存在其它问题
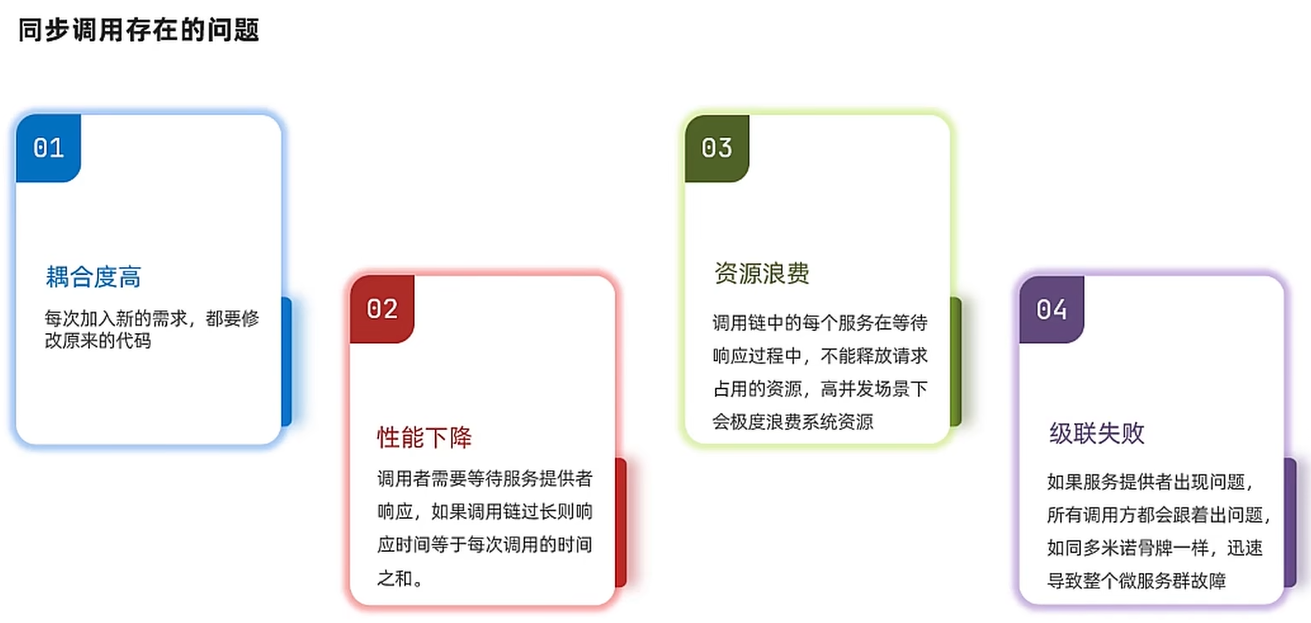
总结:
同步调用的优点:
- 时效性较强,可以立即得到结果
同步调用的问题:
- 耦合度高
- 性能和吞吐能力下降
- 有额外的资源消耗
- 有级联失败问题
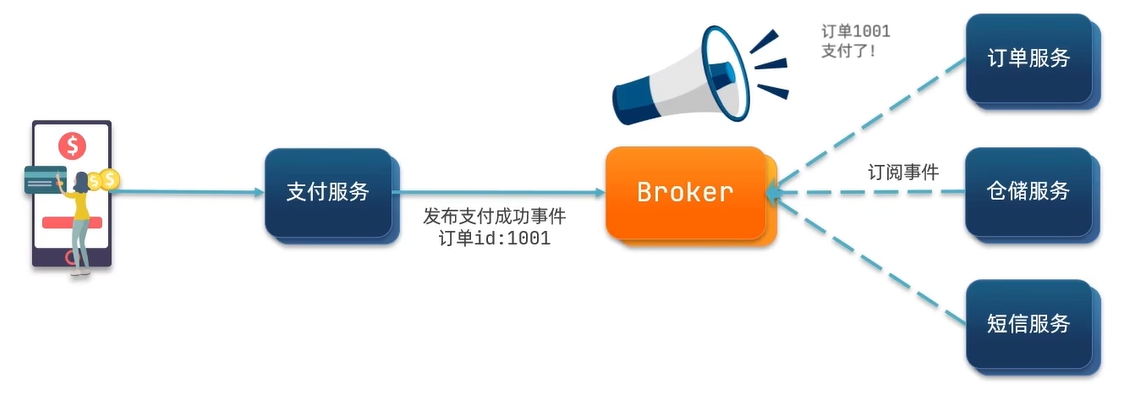
# 8.1.2、异步调用方案🌲
异步调用常见实现就是事件驱动模式
引入了一个新的东西叫:Broker (事件代理者)
支付服务通知 Broker,Broker 通过其它服务
在整个过程当中,支付服务完成事件发布后就立即结束了自己的业务,可以去返回给用户了,而不需要去等其它服务完成结果
这种方式就是异步方式
优势:
1、服务解耦
有新的业务只需要订阅 Broker 就行了跟支付服务没有任何关系
2、性能提升,吞吐量提高
3、没有强依赖关系,不担心级联失败问题
4、流量削峰
解释 “流量削峰” :假如说一瞬间来了三个请求,订单服务,仓储服务,短信服务每一时刻只能处理一个,这时 Broker 可以起到缓冲的 作用。然后其它服务就一个一个处理,处理完了就到 Broker 去取,这样这些服务就能一直按照自己平时的处理速度来工作。一切压力由 Broker 扛着,这样一个高度的并发就可以变成低度的并发,这!就是 流量削峰
总结:
异步通信的优点:
- 耦合度低
- 吞吐量提升
- 故障隔离
- 流量削峰
异步通信的缺点:
- 依赖于 Broker 的可靠性,安全性,吞吐能力
- 架构复杂了,业务没有明显的流程线,不好追踪管理
# 8.1.3、什么是 MQ🌲
MQ (MessageQueue) ,中文是消息队列,字面来看就是存放消息的队列。也就是事件驱动架构中的 Broker
| RabbitMQ | ActiveMQ | RocketMQ | KafKa | |
|---|---|---|---|---|
| 公司 / 社区 | Rabbit | Apache | 阿里 | Apache |
| 开发语言 | Erlang | Java | Java | Scala&Java |
| 协议支持 | AMQP,XMPP,STOMP | OpenWire,STOMP,REST,XMPP,AMQP | 自定义协议 | 自定义协议 |
| 可用性 | 高 | 一般 | 高 | 高 |
| 单机吞吐量 | 一般 | 差 | 高 | 非常高 |
| 消息延迟 | 微秒级 | 毫秒级 | 毫秒级 | 毫秒以内 |
| 消息可靠性 | 高 | 一般 | 高 | 一般 |
# 8.1.4、RabbitMQ 快速入门🌲
- RabbitMQ 概述和安装
- 常见消息模型
- 快速入门
# 8.1.4.1、RabbitMQ 概述🌴
RabbitMQ 是基于 Erlang 语言开发的开源消息通信中间件,官网地址:https://www.rabbitmq.com/
安装 RabbitMQ 可以点击查看详细文章:RabbitMQ 安装部署指南.
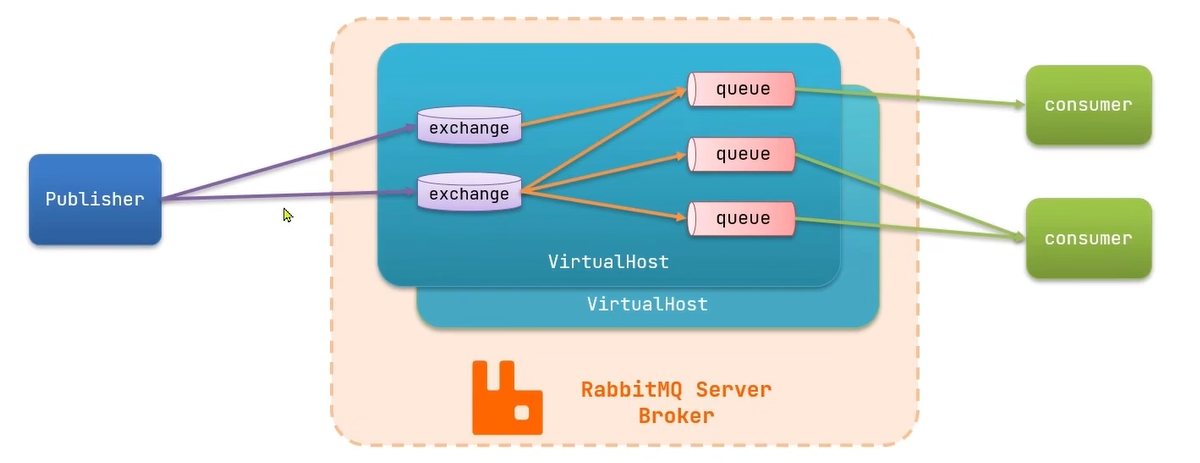
RabbitMQ 的结构和概念
Publisher 是消息发送者,consumer 就是消息消费者,发送者会把消息发送到 exchange 也就是交换机。交换机负责路由把消息投递到 queue 队列,队列负责暂存消息,然后消费者再去从队列中获取消息然后处理消息
VirtulHost 就是虚拟主机,将来有多个用户它会有自己的一个虚拟主机,各个虚拟主机之间互相隔离避免干扰
这就是整体 MQ 的架构了
总结:
RabbitMQ 中的几个概念:
- channel:操作 MQ 的工具
- exchange:路由消息到队列中
- queue:缓存消息
- virtual host:虚拟主机,是对 queue,exchange 等资源的逻辑分组
# 8.1.4.2、常见消息模型🌴
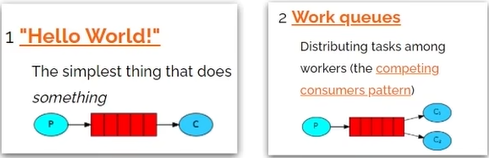
MQ 的官方文档中给出了 5 个 MQ 的 demo 示例,对应了几种不同的用法:
- 基本消息队列 (BasicQueue)
- 工作消息队列 (WorkQueue)
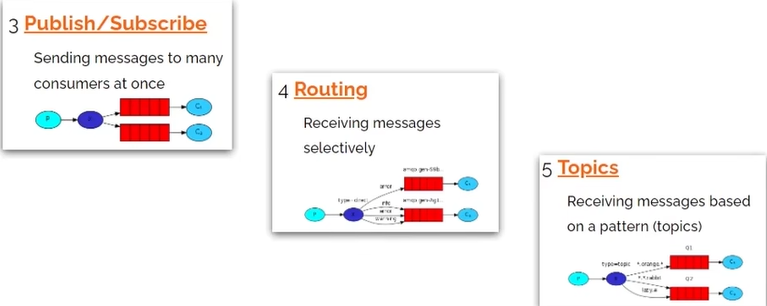
发布订阅 (Publish ,Subscribe),又根据交换机类型不同分为三种:
- Fanout Exchange:广播
- Direct Exchange:路由
- Topic Exchange:主题
图中,紫色的就是交换机
# 8.1.4.3、HelloWorld 案例🌴
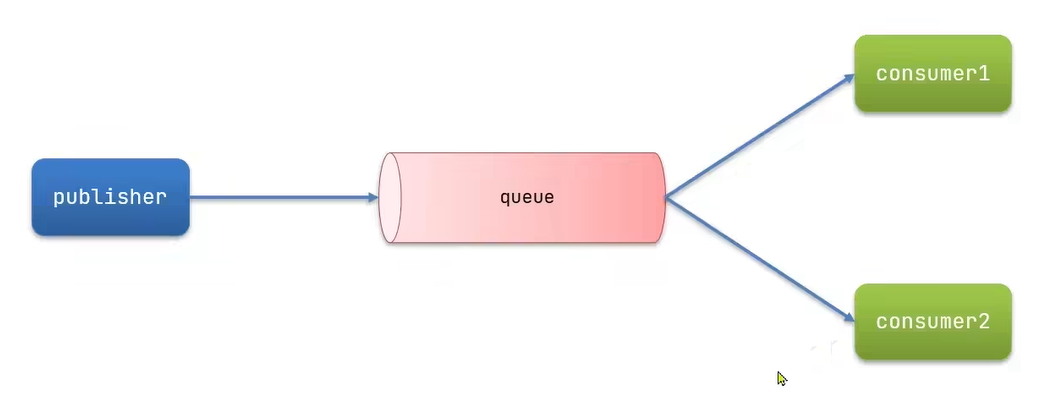
官方的 HelloWorld 是基于最基础的消息队列模型来实现的,只包括三个角色:
- publisher:消息发布者,将消息发送到队列 queue
- queue:消息队列,负责接受并缓存消息
- consumer:订阅队列,处理队列中的消息

发布者代码:
debug 运行代码
import com.rabbitmq.client.Channel; | |
import com.rabbitmq.client.Connection; | |
import com.rabbitmq.client.ConnectionFactory; | |
import org.junit.Test; | |
import java.io.IOException; | |
import java.util.concurrent.TimeoutException; | |
public class PublisherTest { | |
@Test | |
public void testSendMessage() throws IOException, TimeoutException { | |
// 1. 建立连接 | |
* ConnectionFactory factory = new ConnectionFactory(); | |
// 1.1. 设置连接参数,分别是:主机名、端口号、vhost、用户名、密码 | |
factory.setHost("192.168.249.128"); | |
factory.setPort(5672); | |
factory.setVirtualHost("/"); | |
factory.setUsername("itcast"); | |
factory.setPassword("123321"); | |
// 1.2. 建立连接 | |
Connection connection = factory.newConnection(); | |
// 2. 创建通道 Channel | |
Channel channel = connection.createChannel(); | |
// 3. 创建队列 | |
String queueName = "simple.queue"; | |
channel.queueDeclare(queueName, false, false, false, null); | |
// 4. 发送消息 | |
String message = "hello, rabbitmq!"; | |
channel.basicPublish("", queueName, null, message.getBytes()); | |
System.out.println("发送消息成功:【" + message + "】"); | |
// 5. 关闭通道和连接 | |
channel.close(); | |
connection.close(); | |
} | |
} |
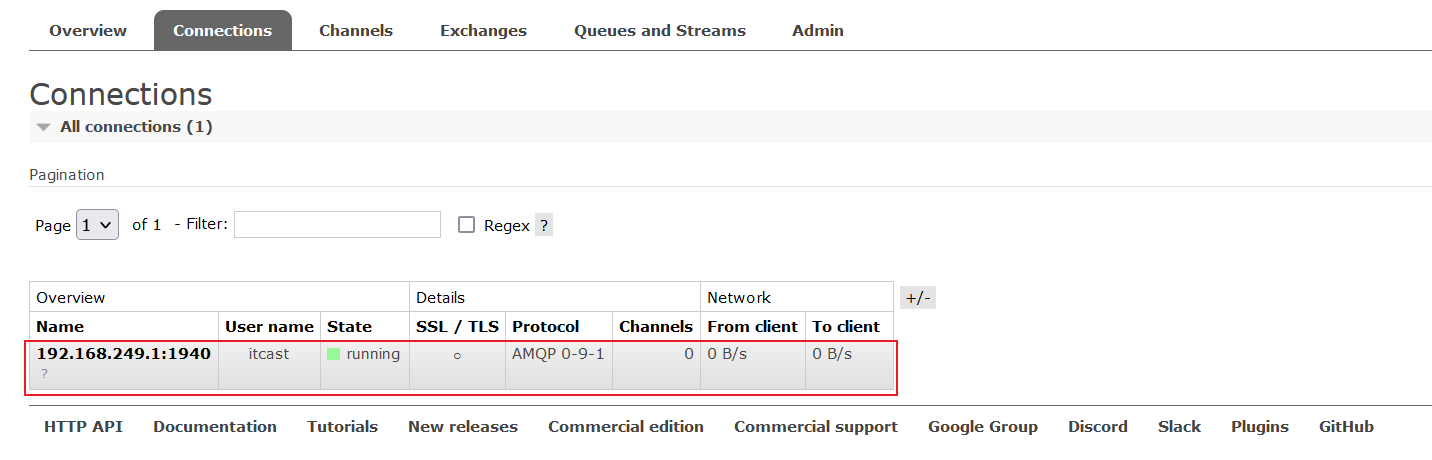
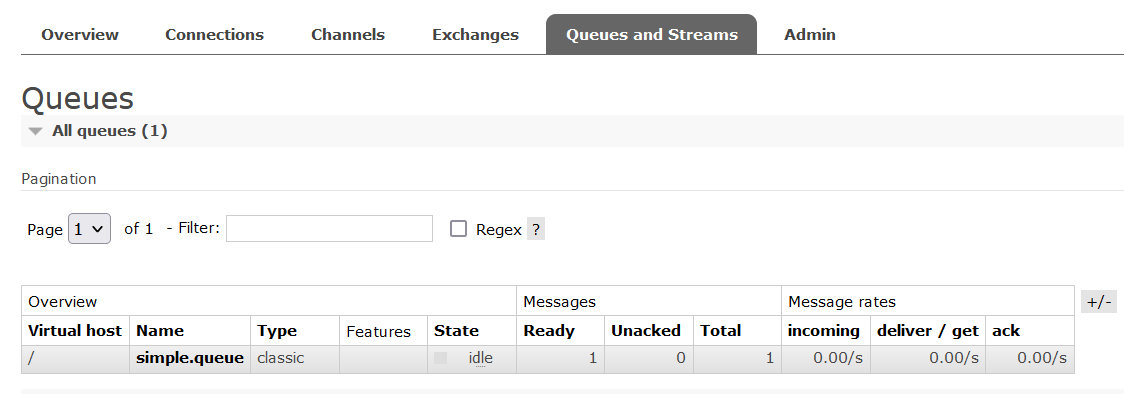
代码走到建立连接没有报错的话,查看下 RabbitMQ 的 ui 管理平台中的 Connections
里面就会出现一个主机的连接信息
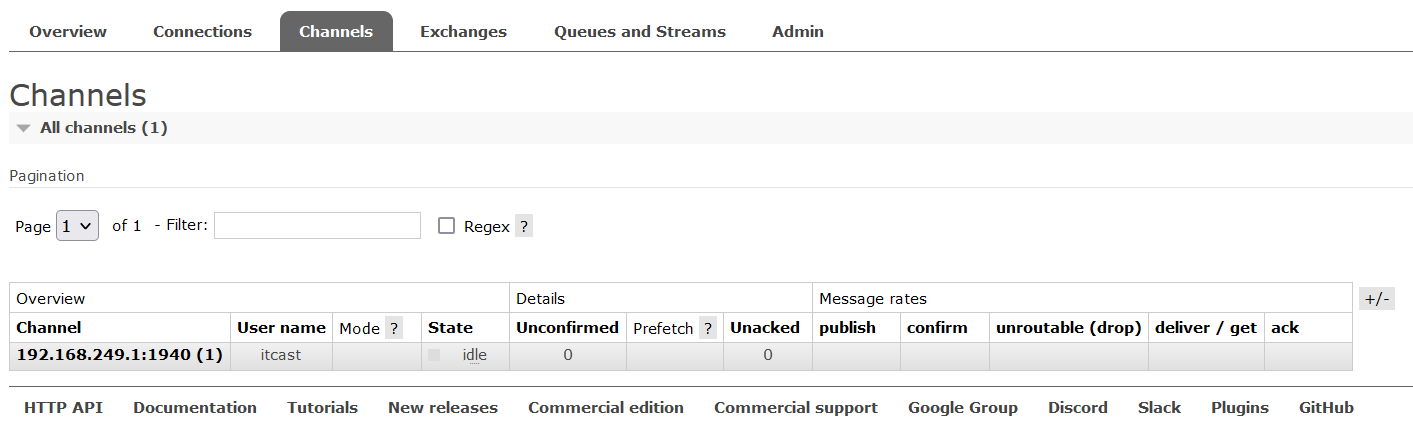
再往下创建通道
再往下创建队列
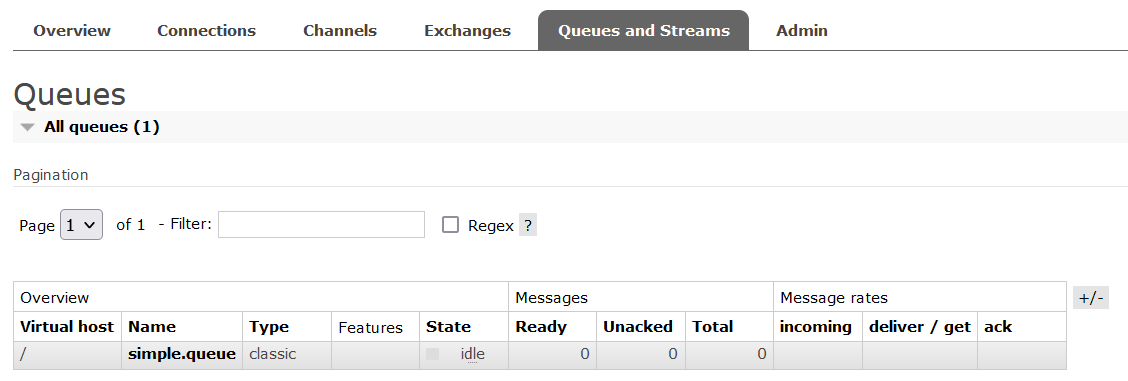
再往下准备发送消息往队列中发送 queName,将消息转为字节发送 getBytes ()
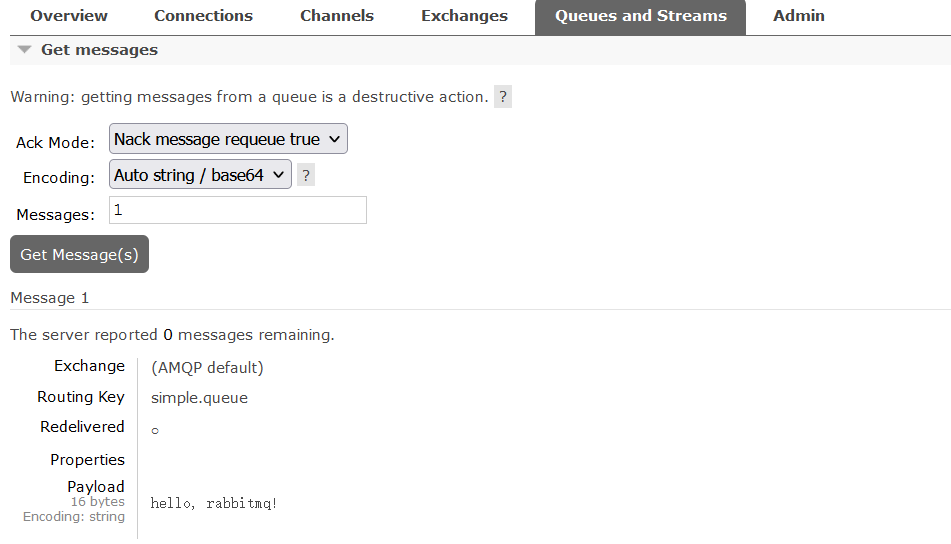
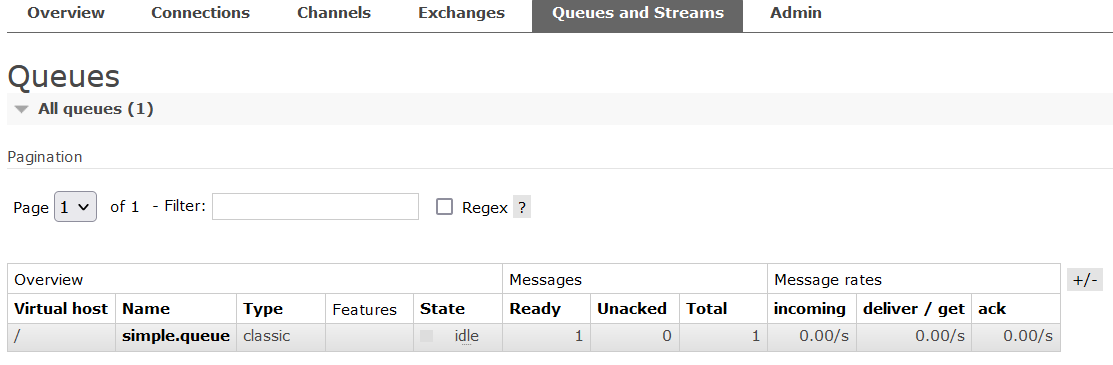
下面就可以看到队列中有一条消息:Ready = 1
我们可以点击 Name,点击进去然后点击 Get Message 里面可以看到发送的消息
消费者代码
debug 运行
import com.rabbitmq.client.*; | |
import java.io.IOException; | |
import java.util.concurrent.TimeoutException; | |
public class ConsumerTest { | |
public static void main(String[] args) throws IOException, TimeoutException { | |
// 1. 建立连接 | |
ConnectionFactory factory = new ConnectionFactory(); | |
// 1.1. 设置连接参数,分别是:主机名、端口号、vhost、用户名、密码 | |
factory.setHost("192.168.249.128"); | |
factory.setPort(5672); | |
factory.setVirtualHost("/"); | |
factory.setUsername("itcast"); | |
factory.setPassword("123321"); | |
// 1.2. 建立连接 | |
Connection connection = factory.newConnection(); | |
// 2. 创建通道 Channel | |
Channel channel = connection.createChannel(); | |
// 3. 创建队列 | |
String queueName = "simple.queue"; | |
channel.queueDeclare(queueName, false, false, false, null); | |
// 4. 订阅消息 | |
channel.basicConsume(queueName, true, new DefaultConsumer(channel){ | |
@Override | |
public void handleDelivery(String consumerTag, Envelope envelope, | |
AMQP.BasicProperties properties, byte[] body) throws IOException { | |
// 5. 处理消息 | |
String message = new String(body); | |
System.out.println("接收到消息:【" + message + "】"); | |
} | |
}); | |
System.out.println("等待接收消息。。。。"); | |
} | |
} |
在消费者代码中又进行了创建队列,发布者已经产生时创建了一个队列了,但是消费者为什么又要创建队列呢?
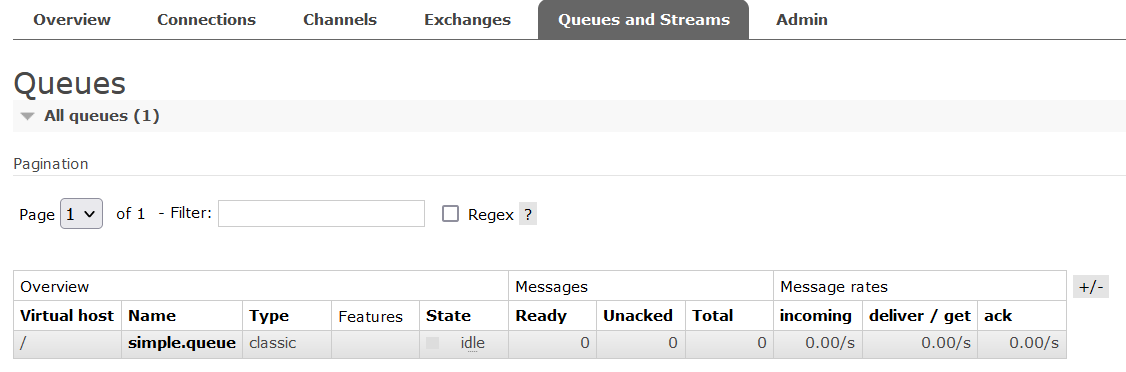
这是因为,发布者和消费者它们启动的顺序不确定。万一消费者先启动的呢,那找队列找不到怎么办。为了避免这种问题发生它们各自都去声明队列,虽然代码是重复的但是我们可以看下 RabbitMQ-ui 控制台的 Queue 管理页面
它并没有去创建这个队列,所以发布者与消费者都写只是一个保险措施防止不存在队列
第四步消费消息
消费者最终在 idea 控制台的打印信息
等待接收消息。。。。
接收到消息:【hello, rabbitmq!】
先打印了 main 函数的 “等待接收消息。。。。” 这段话,而后打印了 消费的消息。
因为回调机制消费者处理函数 handleDelivery 与队列进行了绑定 queueName。但是消息还并没有过来然后再继续往下执行打印了 “等待接收消息。。。。” ,等 rabbitMQ 把消息投递回来了再打印 “接收到消息:【hello, rabbitmq!】”,这就说明 RabbitMQ 处理消息是异步的
总结:
基本消息队列的消息发送流程:
- 建立 connection
- 创建 channel
- 利用 channel 声明队列
- 利用 channel 向队列发送消息
基本消息队列的消息接收流程:
- 建立 connection
- 创建 channel
- 利用 channel 声明队列
- 定义 consumer 的消费行为 handleDelivery ()
- 利用 channel 将消费者与队列绑定
# 8.1.5、SpringAMQP🌲
- Basic Queue 简单队列模型
- Work Queue 工作队列模型
- 发布,订阅模型 - Fanout
- 发布,订阅模型 - Direct
- 发布,订阅模型 - Topic
- 消息转换器
# 8.1.5.1、什么是 SpringAMQP🌴
SpringAMQP 官方地址:https://spring.io/projects/spring-amqp
# 8.1.5.2、案例,利用 SpringAMQP 实现 HelloWorld 中的基础消息队列功能🌴
流程如下:
1、在父工程中引入 spring-amqp 的依赖
因为 publisher 和 consumer 服务都需要 amqp 依赖,因此这里把依赖直接放到父工程 mq-demo 中:
<!--AMQP 依赖,包含 RabbitMQ--> | |
<dependency> | |
<groupId>org.springframework.boot</groupId> | |
<artifactId>spring-boot-starter-amqp</artifactId> | |
</dependency> |
2、在 publisher 服务中利用 RabbitTemplate 发送消息到 simple.queue 到这个队列
在 publisher 中编写测试方法,向 simple.queue 发送消息
2.1、在 publisher 服务中编写 application.yml,添加 mq 连接信息:
spring: | |
rabbitmq: | |
host: 192.168.249.128 # RabbitMQ 的 ip 地址 | |
port: 5672 # RabbitMQ 的端口号 | |
username: itcast # 用户名 | |
password: 123321 # 密码 | |
virtual-host: / # 虚拟主机 |
2.2、在 publisher 服务中新建一个测试类,编写测试方法:
import org.junit.Test; | |
import org.junit.runner.RunWith; | |
import org.springframework.amqp.rabbit.core.RabbitTemplate; | |
import org.springframework.beans.factory.annotation.Autowired; | |
import org.springframework.boot.test.context.SpringBootTest; | |
import org.springframework.test.context.junit4.SpringRunner; | |
/** | |
* @author Dkx | |
* @version 1.0 | |
* @2023/10/119:18 | |
* @function | |
* @comment | |
*/ | |
@SpringBootTest | |
@RunWith(SpringRunner.class) | |
public class SpringAmqpTest { | |
@Autowired | |
private RabbitTemplate rabbitTemplate; | |
@Test | |
public void test() | |
{ | |
String queueName = "simple.queue"; | |
String message = "hello,Spring Amqp"; | |
rabbitTemplate.convertAndSend(queueName, message); | |
} | |
} |
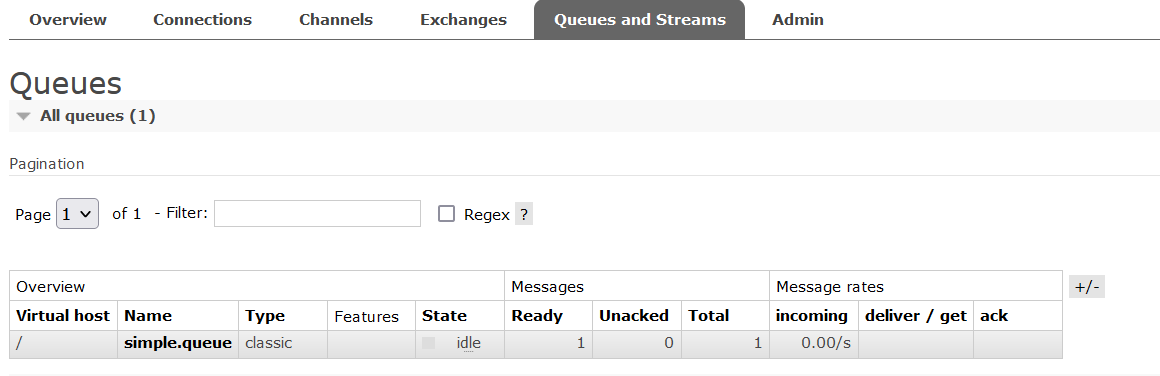
查看 rabbitmq 的 ui 管理平台的队列信息

总结:
什么是 AMQP
- 应用间消息通信的一种协议,与语言和平台无关
SpringAMQP 如何发送消息?
- 引入 amqp 的 starter 依赖
- 配置 RabbitMQ 地址
- 利用 RabbitTemplate 的 convertAndSend 方法发送消息到指定队列中
3、在 consumer 服务中编写消费逻辑,绑定 simple.queue 这个队列
在 consumer 中编写消息逻辑,监听 simple.queue
3.1、在 consumer 服务中编写 application.yml,添加 mq 连接信息:
spring: | |
rabbitmq: | |
host: 192.168.249.128 # RabbitMQ 的 ip 地址 | |
port: 5672 # RabbitMQ 的端口号 | |
username: itcast # 用户名 | |
password: 123321 # 密码 | |
virtual-host: / # 虚拟主机 |
3.2、在 consumer 服务中新建一个类,编写消费逻辑:
不能写在 test 中进行测试是因为它需要被 Spring 所管理注册为 Bean
import org.springframework.amqp.rabbit.annotation.RabbitListener; | |
import org.springframework.stereotype.Component; | |
/** | |
* @author Dkx | |
* @version 1.0 | |
* @2023/10/119:34 | |
* @function | |
* @comment | |
*/ | |
@Component | |
public class SpringRabbitListener { | |
@RabbitListener(queues = "simple.queue") | |
public void listenerSimpleQueue(String msg) | |
{ | |
System.out.println("消费者接收到simple.queue的消息为:" + msg); | |
} | |
} | |
//---------------------- 打印结果 ---------------------- | |
. ____ _ __ _ _ | |
/\\ / ___'_ __ _ _(_)_ __ __ _ \ \ \ \ | |
( ( )\___ | '_ | '_| | '_ \/ _` | \ \ \ \ | |
\\/ ___)| |_)| | | | | || (_| | ) ) ) ) | |
' |____| .__|_| |_|_| |_\__, | / / / / | |
=========|_|==============|___/=/_/_/_/ | |
:: Spring Boot :: (v2.3.9.RELEASE) | |
10-11 09:37:32:584 INFO 1164 --- [ main] cn.itcast.mq.ConsumerApplication : Starting ConsumerApplication on Jfier with PID 1164 (E:\微服务\实用篇\资料\day04-MQ\资料\mq-demo\consumer\target\classes started by Administrator in E:\微服务\实用篇\资料\day04-MQ\资料\mq-demo) | |
10-11 09:37:32:594 INFO 1164 --- [ main] cn.itcast.mq.ConsumerApplication : No active profile set, falling back to default profiles: default | |
10-11 09:37:34:476 INFO 1164 --- [ main] o.s.a.r.c.CachingConnectionFactory : Attempting to connect to: [192.168.249.128:5672] | |
10-11 09:37:34:531 INFO 1164 --- [ main] o.s.a.r.c.CachingConnectionFactory : Created new connection: rabbitConnectionFactory#640dc4c6:0/SimpleConnection@7a0f244f [delegate=amqp://itcast@192.168.249.128:5672/, localPort= 3380] | |
10-11 09:37:34:610 INFO 1164 --- [ main] cn.itcast.mq.ConsumerApplication : Started ConsumerApplication in 2.755 seconds (JVM running for 4.791) | |
消费者接收到simple.queue的消息为:hello,Spring Amqp |
总结:
SPringAMQP 如何接收消息?
- 引入 amqp 的 starter 依赖
- 配置 RabbitMQ 地址
- 定义类,添加 @Component 注解
- 类中声明方法,添加 @RabbitListener 注解,方法参数就是消息
# 8.1.6、Work Queue 工作队列🌲
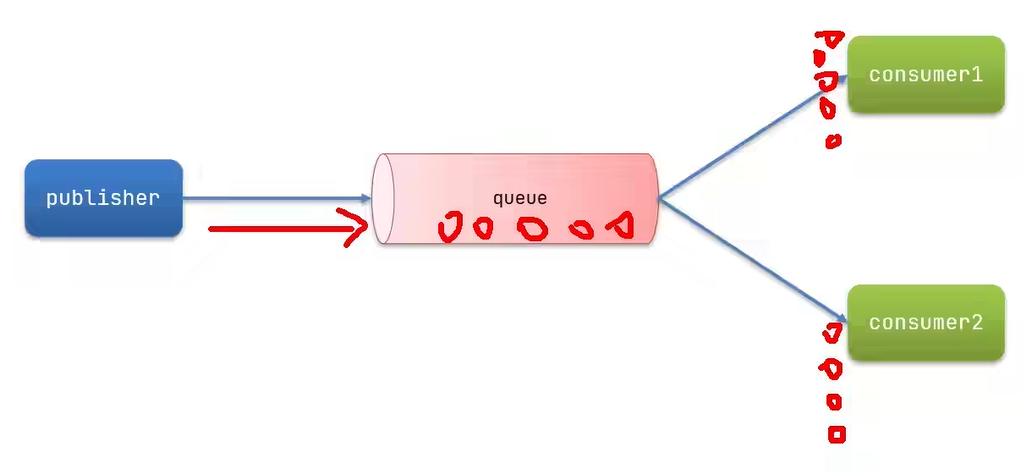
它也具备消息发布和消费,但是不同的是它后面挂了两个消费者。两个消费者共同处理发布者的消息,
比如发布者发送 50 消息,consumer1 消费 25,consumer2 消费 25。被消费过的消息就会被删除不可能会再被其它消费者消费已经消费过的消息。
# 8.1.6.1、模拟 WorkQueue,实现一个队列绑定多个消费者🌴
基本思路如下:
1、在 publisher 服务中定义测试方法,每秒产生 50 条消息,发送到 simple.queue
@Test | |
public void workQueueTest() | |
{ | |
String queueName = "simple.queue"; | |
String message = "hello,Spring Amqp __ "; | |
int i = 0; | |
for(;i < 50;i++) | |
{ | |
try { | |
Thread.sleep(10); | |
} catch (InterruptedException e) { | |
throw new RuntimeException(e); | |
} | |
rabbitTemplate.convertAndSend(queueName, message + i); | |
} | |
} |
2、在 consumer 服务中定义两个消息监听者,都监听 simple.queue 队列
2.1、消费者 1 每秒处理 50 条消息,消费者 2 每秒处理 10 条消息
@RabbitListener(queues = "simple.queue") | |
public void listenerSimpleQueue1(String msg) | |
{ | |
System.out.println("消费者1接收到simple.queue的消息为:" + msg); | |
try { | |
Thread.sleep(20); | |
} catch (InterruptedException e) { | |
throw new RuntimeException(e); | |
} | |
} | |
@RabbitListener(queues = "simple.queue") | |
public void listenerSimpleQueue2(String msg) | |
{ | |
System.err.println("消费者2......接收到simple.queue的消息为:" + msg); | |
try { | |
Thread.sleep(200); | |
} catch (InterruptedException e) { | |
throw new RuntimeException(e); | |
} | |
} | |
//-------------------- 打印结果 -------------------- | |
. ____ _ __ _ _ | |
/\\ / ___'_ __ _ _(_)_ __ __ _ \ \ \ \ | |
( ( )\___ | '_ | '_| | '_ \/ _` | \ \ \ \ | |
\\/ ___)| |_)| | | | | || (_| | ) ) ) ) | |
' |____| .__|_| |_|_| |_\__, | / / / / | |
=========|_|==============|___/=/_/_/_/ | |
:: Spring Boot :: (v2.3.9.RELEASE) | |
消费者1接收到simple.queue的消息为:hello,Spring Amqp __ 1---2023-10-11T10:16:47.564155 | |
消费者2......接收到simple.queue的消息为:hello,Spring Amqp __ 0---2023-10-11T10:16:47.564155 | |
消费者1接收到simple.queue的消息为:hello,Spring Amqp __ 3---2023-10-11T10:16:47.602944400 | |
消费者1接收到simple.queue的消息为:hello,Spring Amqp __ 5---2023-10-11T10:16:47.634311 | |
消费者1接收到simple.queue的消息为:hello,Spring Amqp __ 7---2023-10-11T10:16:47.663563900 | |
消费者1接收到simple.queue的消息为:hello,Spring Amqp __ 9---2023-10-11T10:16:47.693902600 | |
消费者1接收到simple.queue的消息为:hello,Spring Amqp __ 11---2023-10-11T10:16:47.724277700 | |
消费者1接收到simple.queue的消息为:hello,Spring Amqp __ 13---2023-10-11T10:16:47.754720 | |
消费者2......接收到simple.queue的消息为:hello,Spring Amqp __ 2---2023-10-11T10:16:47.784759800 | |
消费者1接收到simple.queue的消息为:hello,Spring Amqp __ 15---2023-10-11T10:16:47.784759800 | |
消费者1接收到simple.queue的消息为:hello,Spring Amqp __ 17---2023-10-11T10:16:47.814876500 | |
消费者1接收到simple.queue的消息为:hello,Spring Amqp __ 19---2023-10-11T10:16:47.845253300 | |
消费者1接收到simple.queue的消息为:hello,Spring Amqp __ 21---2023-10-11T10:16:47.876696200 | |
消费者1接收到simple.queue的消息为:hello,Spring Amqp __ 23---2023-10-11T10:16:47.907389600 | |
消费者1接收到simple.queue的消息为:hello,Spring Amqp __ 25---2023-10-11T10:16:47.938559800 | |
消费者1接收到simple.queue的消息为:hello,Spring Amqp __ 27---2023-10-11T10:16:47.968268500 | |
消费者1接收到simple.queue的消息为:hello,Spring Amqp __ 29---2023-10-11T10:16:47.998623300 | |
消费者2......接收到simple.queue的消息为:hello,Spring Amqp __ 4---2023-10-11T10:16:47.998623300 | |
消费者1接收到simple.queue的消息为:hello,Spring Amqp __ 31---2023-10-11T10:16:48.028620600 | |
消费者1接收到simple.queue的消息为:hello,Spring Amqp __ 33---2023-10-11T10:16:48.058770700 | |
消费者1接收到simple.queue的消息为:hello,Spring Amqp __ 35---2023-10-11T10:16:48.089572100 | |
消费者1接收到simple.queue的消息为:hello,Spring Amqp __ 37---2023-10-11T10:16:48.119707200 | |
消费者1接收到simple.queue的消息为:hello,Spring Amqp __ 39---2023-10-11T10:16:48.149984400 | |
消费者1接收到simple.queue的消息为:hello,Spring Amqp __ 41---2023-10-11T10:16:48.179999600 | |
消费者2......接收到simple.queue的消息为:hello,Spring Amqp __ 6---2023-10-11T10:16:48.210307400 | |
消费者1接收到simple.queue的消息为:hello,Spring Amqp __ 43---2023-10-11T10:16:48.210307400 | |
消费者1接收到simple.queue的消息为:hello,Spring Amqp __ 45---2023-10-11T10:16:48.240964800 | |
消费者1接收到simple.queue的消息为:hello,Spring Amqp __ 47---2023-10-11T10:16:48.270986500 | |
消费者1接收到simple.queue的消息为:hello,Spring Amqp __ 49---2023-10-11T10:16:48.301165400 | |
消费者2......接收到simple.queue的消息为:hello,Spring Amqp __ 8---2023-10-11T10:16:48.423433300 | |
消费者2......接收到simple.queue的消息为:hello,Spring Amqp __ 10---2023-10-11T10:16:48.636403400 | |
消费者2......接收到simple.queue的消息为:hello,Spring Amqp __ 12---2023-10-11T10:16:48.848982300 | |
消费者2......接收到simple.queue的消息为:hello,Spring Amqp __ 14---2023-10-11T10:16:49.060187200 | |
消费者2......接收到simple.queue的消息为:hello,Spring Amqp __ 16---2023-10-11T10:16:49.273197100 | |
消费者2......接收到simple.queue的消息为:hello,Spring Amqp __ 18---2023-10-11T10:16:49.484165800 | |
消费者2......接收到simple.queue的消息为:hello,Spring Amqp __ 20---2023-10-11T10:16:49.696880900 | |
消费者2......接收到simple.queue的消息为:hello,Spring Amqp __ 22---2023-10-11T10:16:49.908464300 | |
消费者2......接收到simple.queue的消息为:hello,Spring Amqp __ 24---2023-10-11T10:16:50.121477600 | |
消费者2......接收到simple.queue的消息为:hello,Spring Amqp __ 26---2023-10-11T10:16:50.333586300 | |
消费者2......接收到simple.queue的消息为:hello,Spring Amqp __ 28---2023-10-11T10:16:50.548236400 | |
消费者2......接收到simple.queue的消息为:hello,Spring Amqp __ 30---2023-10-11T10:16:50.759585700 | |
消费者2......接收到simple.queue的消息为:hello,Spring Amqp __ 32---2023-10-11T10:16:50.973508400 | |
消费者2......接收到simple.queue的消息为:hello,Spring Amqp __ 34---2023-10-11T10:16:51.185203800 | |
消费者2......接收到simple.queue的消息为:hello,Spring Amqp __ 36---2023-10-11T10:16:51.399855600 | |
消费者2......接收到simple.queue的消息为:hello,Spring Amqp __ 38---2023-10-11T10:16:51.610433700 | |
消费者2......接收到simple.queue的消息为:hello,Spring Amqp __ 40---2023-10-11T10:16:51.823352100 | |
消费者2......接收到simple.queue的消息为:hello,Spring Amqp __ 42---2023-10-11T10:16:52.035381900 | |
消费者2......接收到simple.queue的消息为:hello,Spring Amqp __ 44---2023-10-11T10:16:52.248226300 | |
消费者2......接收到simple.queue的消息为:hello,Spring Amqp __ 46---2023-10-11T10:16:52.462320400 | |
消费者2......接收到simple.queue的消息为:hello,Spring Amqp __ 48---2023-10-11T10:16:52.677121500 |
消费者 1 很快就结束了,而消费者 2 却花了很长很长的时间。我们认为的快的多消费点,慢的少消费点而事实却是平均分配给了两个消费者,消费者 1 那拿的是所有的奇数,消费者 2 拿到的是所有的偶数。
这是因为 RabbitMQ 一个机制造成的,就是:消息预取机制
解释消息预取:
当有大量的消息到达队列时,队列中会把消息进行投递,consumer1 和 consumer2 会提前把消息拿过来这就是消息预取,不管能不能处理先拿过来再说
于是两个人就平均分配所有的消息一人分了 25 条,但是呢 consumer1 处理的快很快就搞定了,consumer2 处理的慢需要一段时间
# 可以对消息预取进行配置限制🎋
修改 application.yml 文件,设置 preFetch 这个值,可以控制预取消息的上限:
spring: | |
rabbitmq: | |
host: 192.168.249.128 # RabbitMQ 的 ip 地址 | |
port: 5672 # RabbitMQ 的端口号 | |
username: itcast # 用户名 | |
password: 123321 # 密码 | |
virtual-host: / # 虚拟主机 | |
listener: | |
simple: | |
prefetch: 1 # 每次只获取一条消息,处理完成才能获取下一个消息 |
设置完成后再进行测试:
消费者1接收到simple.queue的消息为:hello,Spring Amqp __ 0---2023-10-11T10:30:40.386440300
消费者2......接收到simple.queue的消息为:hello,Spring Amqp __ 1---2023-10-11T10:30:40.398703100
消费者1接收到simple.queue的消息为:hello,Spring Amqp __ 2---2023-10-11T10:30:40.413527700
消费者1接收到simple.queue的消息为:hello,Spring Amqp __ 3---2023-10-11T10:30:40.444268700
消费者1接收到simple.queue的消息为:hello,Spring Amqp __ 4---2023-10-11T10:30:40.473866400
消费者1接收到simple.queue的消息为:hello,Spring Amqp __ 5---2023-10-11T10:30:40.504620300
消费者1接收到simple.queue的消息为:hello,Spring Amqp __ 6---2023-10-11T10:30:40.535400300
消费者1接收到simple.queue的消息为:hello,Spring Amqp __ 7---2023-10-11T10:30:40.566022200
消费者1接收到simple.queue的消息为:hello,Spring Amqp __ 8---2023-10-11T10:30:40.595970600
消费者2......接收到simple.queue的消息为:hello,Spring Amqp __ 9---2023-10-11T10:30:40.611076800
消费者1接收到simple.queue的消息为:hello,Spring Amqp __ 10---2023-10-11T10:30:40.626201300
消费者1接收到simple.queue的消息为:hello,Spring Amqp __ 11---2023-10-11T10:30:40.657505500
消费者1接收到simple.queue的消息为:hello,Spring Amqp __ 12---2023-10-11T10:30:40.688200
消费者1接收到simple.queue的消息为:hello,Spring Amqp __ 13---2023-10-11T10:30:40.717912700
消费者1接收到simple.queue的消息为:hello,Spring Amqp __ 14---2023-10-11T10:30:40.748533200
消费者1接收到simple.queue的消息为:hello,Spring Amqp __ 15---2023-10-11T10:30:40.778181500
消费者1接收到simple.queue的消息为:hello,Spring Amqp __ 16---2023-10-11T10:30:40.808905800
消费者2......接收到simple.queue的消息为:hello,Spring Amqp __ 17---2023-10-11T10:30:40.823251200
消费者1接收到simple.queue的消息为:hello,Spring Amqp __ 18---2023-10-11T10:30:40.837450100
消费者1接收到simple.queue的消息为:hello,Spring Amqp __ 19---2023-10-11T10:30:40.867629400
消费者1接收到simple.queue的消息为:hello,Spring Amqp __ 20---2023-10-11T10:30:40.897964100
消费者1接收到simple.queue的消息为:hello,Spring Amqp __ 21---2023-10-11T10:30:40.927968900
消费者1接收到simple.queue的消息为:hello,Spring Amqp __ 22---2023-10-11T10:30:40.959483800
消费者1接收到simple.queue的消息为:hello,Spring Amqp __ 23---2023-10-11T10:30:40.988862
消费者1接收到simple.queue的消息为:hello,Spring Amqp __ 24---2023-10-11T10:30:41.019388500
消费者2......接收到simple.queue的消息为:hello,Spring Amqp __ 25---2023-10-11T10:30:41.034540
消费者1接收到simple.queue的消息为:hello,Spring Amqp __ 26---2023-10-11T10:30:41.049536900
消费者1接收到simple.queue的消息为:hello,Spring Amqp __ 27---2023-10-11T10:30:41.079546800
消费者1接收到simple.queue的消息为:hello,Spring Amqp __ 28---2023-10-11T10:30:41.110340600
消费者1接收到simple.queue的消息为:hello,Spring Amqp __ 29---2023-10-11T10:30:41.141704800
消费者1接收到simple.queue的消息为:hello,Spring Amqp __ 30---2023-10-11T10:30:41.171164300
消费者1接收到simple.queue的消息为:hello,Spring Amqp __ 31---2023-10-11T10:30:41.201884700
消费者1接收到simple.queue的消息为:hello,Spring Amqp __ 32---2023-10-11T10:30:41.231497200
消费者2......接收到simple.queue的消息为:hello,Spring Amqp __ 33---2023-10-11T10:30:41.246620400
消费者1接收到simple.queue的消息为:hello,Spring Amqp __ 34---2023-10-11T10:30:41.262814300
消费者1接收到simple.queue的消息为:hello,Spring Amqp __ 35---2023-10-11T10:30:41.293344400
消费者1接收到simple.queue的消息为:hello,Spring Amqp __ 36---2023-10-11T10:30:41.322739
消费者1接收到simple.queue的消息为:hello,Spring Amqp __ 37---2023-10-11T10:30:41.352387700
消费者1接收到simple.queue的消息为:hello,Spring Amqp __ 38---2023-10-11T10:30:41.382386800
消费者1接收到simple.queue的消息为:hello,Spring Amqp __ 39---2023-10-11T10:30:41.412727200
消费者1接收到simple.queue的消息为:hello,Spring Amqp __ 40---2023-10-11T10:30:41.443659
消费者2......接收到simple.queue的消息为:hello,Spring Amqp __ 41---2023-10-11T10:30:41.458969
消费者1接收到simple.queue的消息为:hello,Spring Amqp __ 42---2023-10-11T10:30:41.475290100
消费者1接收到simple.queue的消息为:hello,Spring Amqp __ 43---2023-10-11T10:30:41.504816800
消费者1接收到simple.queue的消息为:hello,Spring Amqp __ 44---2023-10-11T10:30:41.535720400
消费者1接收到simple.queue的消息为:hello,Spring Amqp __ 45---2023-10-11T10:30:41.565967900
消费者1接收到simple.queue的消息为:hello,Spring Amqp __ 46---2023-10-11T10:30:41.596477300
消费者1接收到simple.queue的消息为:hello,Spring Amqp __ 47---2023-10-11T10:30:41.625940900
消费者1接收到simple.queue的消息为:hello,Spring Amqp __ 48---2023-10-11T10:30:41.658033
消费者2......接收到simple.queue的消息为:hello,Spring Amqp __ 49---2023-10-11T10:30:41.674047
这时消费者打印的消息特快就结束了,快的呢多消费,慢的呢就慢慢来消费。起到能者多劳的功能
总结:
- 多个消费者绑定到一个队列,同一条消息只会被一个消费者处理
- 通过设置 prefetch 来控制消费者预取的消息数量
# 8.1.7、发布 (publish),订阅 (subscribe)🌲
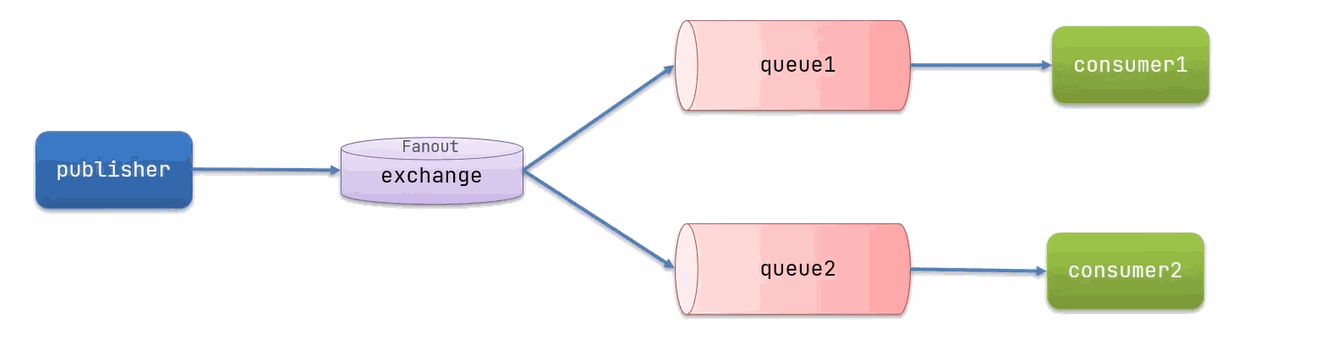
发布订阅模式与之前案例的区别就是允许将同一消息发送给多个消费者。实现方式是加入了 exchange (交换机)
上面学习了 RabbitMQ 的两个案例一个是简单队列案例另一个是 WorkQueue 案例,这两个案例有一个共同的特点就是,所发出的消息只可能被一个消费者消费。因为一旦消费完就会从队列中删除而这一特点就无法满足一个需求比如以前说的 支付服务发布的消息要被,订单服务,仓储服务,短信服务。这三个服务各自去完成自己的业务,也就是说发布的这条用户支付成功的消息要被三个服务都接收到。
这时就需要用到这章的知识了
<center> 模型结构 </center>
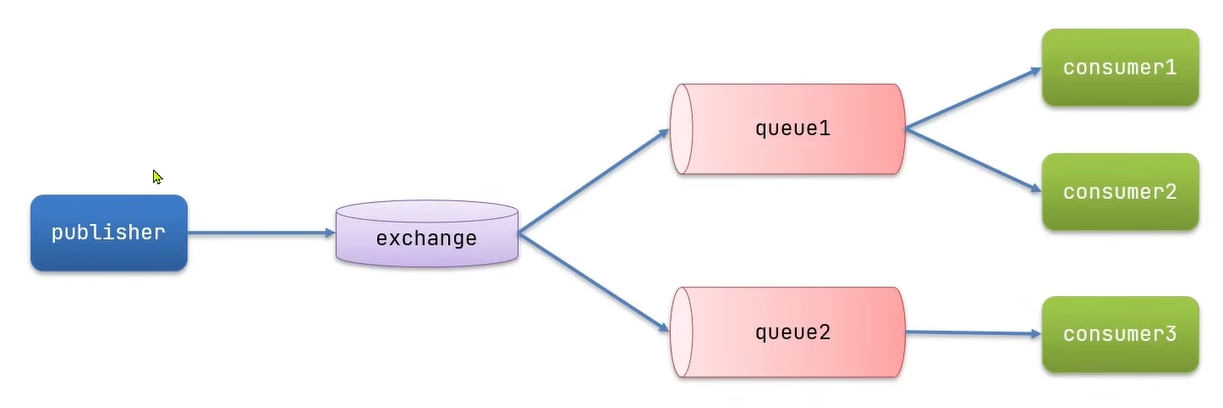
常见 exchange 类型包括:
- Fanout:广播
- Direct:路由
- Topic:话题
<font color='red'> 注意 </font>:exchange 负责消息路由,而不是存储,路由失败则消息丢失
# 8.1.7.1、发布订阅 - Fanout Exchange🌴
Fanout Exchange 会将接收到的消息路由到每一个跟其绑定的 queue
就像混社会的社会人一样,后面两个 consumer 跟着 publisher 混,只要跟着 publisher 混那什么钱啊什么的都不用发愁
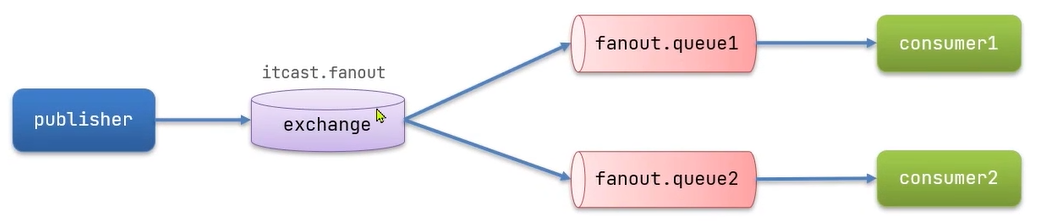
# 8.1.7.2、利用 SpringAMQP 演示 FanoutExchange 的使用🌴
实现思路如下:
1、在 consumer 服务中,利用代码声明队列,交换机,并将两者绑定
2、在 consumer 服务中,编写两个消费者方法,分别监听 fanout.queue1 和 fanout.queue2
3、在 publisher 中编写测试方法,向 itcast.fanout 发送消息
步骤:
1、在 consumer 服务声明 Exchange,Queue,Binding
SpringAMQP 提供了声明交换机,队列,绑定关系的 API,例如:
在 consumer 服务创建一个配置类,添加 @Configuration 注解,并声明 FanoutExchange,Queue 和绑定关系对象 Binding,代码如下:
import org.springframework.amqp.core.Binding; | |
import org.springframework.amqp.core.BindingBuilder; | |
import org.springframework.amqp.core.FanoutExchange; | |
import org.springframework.amqp.core.Queue; | |
import org.springframework.context.annotation.Bean; | |
import org.springframework.context.annotation.Configuration; | |
/** | |
* @author Dkx | |
* @version 1.0 | |
* @2023/10/1111:17 | |
* @function | |
* @comment | |
*/ | |
@Configuration | |
public class FanoutConfig { | |
// itcast.fanout | |
@Bean | |
public FanoutExchange fanoutExchange() | |
{ | |
return new FanoutExchange("itcast.fanout"); | |
} | |
// fanout.queue1 | |
@Bean | |
public Queue fanoutQueue1() | |
{ | |
return new Queue("fanout.queue1"); | |
} | |
// 绑定队列 1 到交换机 | |
@Bean | |
public Binding fanoutBinding(Queue fanoutQueue1, FanoutExchange fanoutExchange) | |
{ | |
return BindingBuilder.bind(fanoutQueue1).to(fanoutExchange); | |
} | |
// fanout.queue2 | |
@Bean | |
public Queue fanoutQueue2() | |
{ | |
return new Queue("fanout.queue2"); | |
} | |
// 绑定队列 2 到交换机 | |
@Bean | |
public Binding fanoutBinding1(Queue fanoutQueue2, FanoutExchange fanoutExchange) | |
{ | |
return BindingBuilder.bind(fanoutQueue2).to(fanoutExchange); | |
} | |
} |
2、在 consumer 服务声明两个消费者
在 consumer 服务的 SpringRabbitListener 类中,添加两个方法,分别监听 fanout.queue1 和 fanout.queue2
import org.springframework.amqp.rabbit.annotation.RabbitListener; | |
import org.springframework.stereotype.Component; | |
/** | |
* @author Dkx | |
* @version 1.0 | |
* @2023/10/119:34 | |
* @function | |
* @comment | |
*/ | |
@Component | |
public class SpringRabbitListener { | |
@RabbitListener(queues = "fanout.queue1") | |
public void listenerFanoutQueue1(String msg) | |
{ | |
System.out.println("消费者接收到fanout.queue1的消息为:" + msg); | |
} | |
@RabbitListener(queues = "fanout.queue2") | |
public void listenerFanoutQueue2(String msg) | |
{ | |
System.out.println("消费者接收到fanout.queue2的消息为:" + msg); | |
} | |
} |
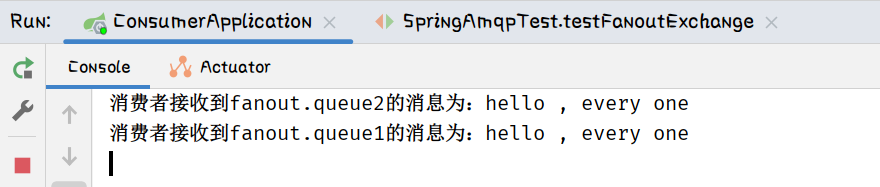
3、在 publisher 服务发送消息到 FanoutExchange
在 publisher 服务的 SpringAmqpTest 类中添加测试方法:
@Test | |
public void testFanoutExchange() | |
{ | |
// 交换机名称 | |
String exchangeName = "itcast.fanout"; | |
// 消息 | |
String message = "hello , every one"; | |
// 发送消息,参数分别是:交互机名称,Routingkey (暂时为空),消息 | |
rabbitTemplate.convertAndSend(exchangeName, "", message); | |
} |
启动消费者的启动类,然后启动发布者的 test 函数进行测试
总结:
交换机的作用是什么?
- 接收 publisher 发送的消息
- 将消息按照路由规则路由到与之绑定的队列
- 不能缓存消息,路由失败,消息丢失
- FanoutExchange 的会将消息路由到每个绑定的队列
声明队列,交换机,绑定关系的 Bean 是什么?
- Queue
- FanoutExchange
- Binding
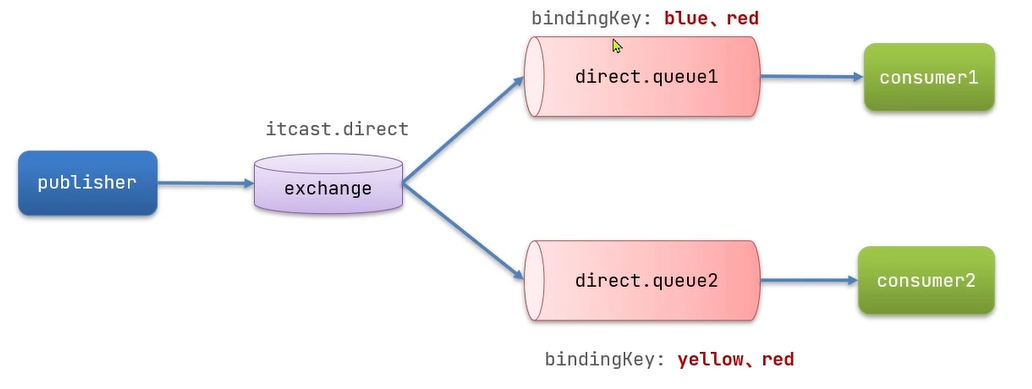
# 8.1.8、发布订阅 - DirectExchange🌲
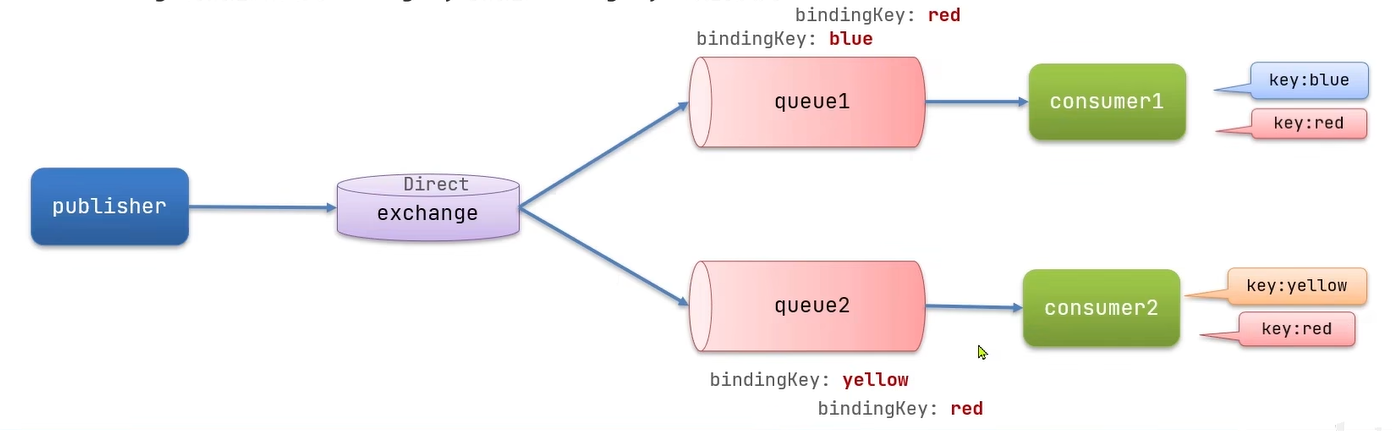
DirectExchange 会将接收的消息根据规则路由到指定的 Queue,因此称为路由模式 (routers)。
规则:
- 每一个 Queue 都与 Exchange 设置一个 BindingKey,将来利用暗号进行通信,可以有多个 Key
- 发布者发送消息时,指定消息的 RoutingKey
- Exchange 将消息路由到 BindingKey 与消息 RoutingKey 一致的队列
# 8.1.8.1、利用 SpringAMQP 演示 DirectExchange 的使用🌴
实现思路如下:
1、利用 @RabbitListener 声明 Exchange,Queue,RoutingKey
2、在 consumer 服务中,编写两个消费者方法,分别监听 direct.queue1 和 direct.queue2
3、在 publisher 中编写测试方法,向 itcast.direct 发送消息
步骤:
1、利用 @RabbitListener 声明 Exchange,Queue,RoutingKey
2、在 consumer 服务中,编写两个消费者方法,分别监听 direct.queue1 和 direct.queue2
@RabbitListener(bindings = @QueueBinding( | |
// 声明队列 | |
value = @Queue(name = "direct.queue1"), | |
// 声明交换机 | |
exchange = @Exchange(name = "itcast.direct", type = ExchangeTypes.DIRECT), | |
// 绑定 key | |
key = {"red", "blue"} | |
)) | |
public void listenDirectQueue1(String msg) | |
{ | |
System.out.printf("消费者接收到direct.queue1的消息:[" + msg + "]"); | |
} | |
@RabbitListener(bindings = @QueueBinding( | |
// 声明队列 | |
value = @Queue(name = "direct.queue1"), | |
// 声明交换机 | |
exchange = @Exchange(name = "itcast.direct", type = ExchangeTypes.DIRECT), | |
// 绑定 key | |
key = {"red", "yellow"} | |
)) | |
public void listenDirectQueue2(String msg) | |
{ | |
System.out.printf("消费者接收到direct.queue2的消息:[" + msg + "]"); | |
} |
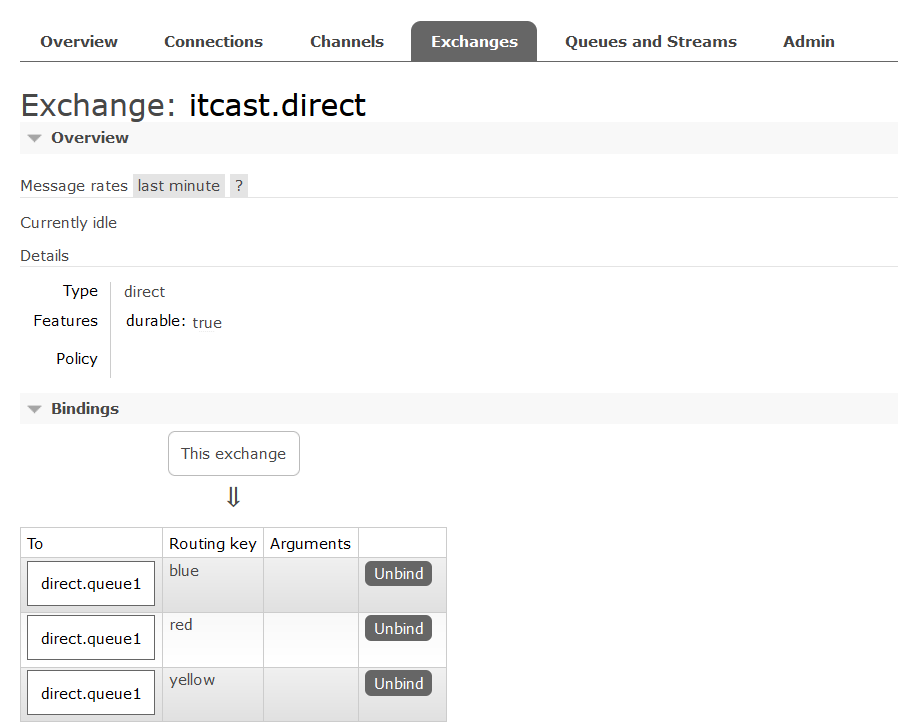
启动服务看下 rabbitmq-ui 管理页面
3、在 publisher 中编写测试方法,向 itcast.direct 发送消息
@Test | |
public void testDirectExchange() | |
{ | |
// 交换机名称 | |
String exchangeName = "itcast.direct"; | |
// 消息 | |
String message = "hello , blue"; | |
// 发送消息,将消息发送给 key 为 blue 的 Queue | |
rabbitTemplate.convertAndSend(exchangeName, "blue", message); | |
} | |
//------------------ 打印结果 ------------------ | |
消费者接收到direct.queue1的消息:[hello , blue] |
将绑定的 key 改为 yellow 呢,记得将发送消息改为 “hello yellow”
// 发送消息,将消息发送给 key 为 blue 的 Queue | |
rabbitTemplate.convertAndSend(exchangeName, "yellow", message); | |
//---------------- 打印结果 ---------------- | |
消费者接收到direct.queue2的消息:[hello , yellow] |
将绑定的 key 改为 red 呢,记得将发送消息改为 “hello red”
// 发送消息,将消息发送给 key 为 blue 的 Queue | |
rabbitTemplate.convertAndSend(exchangeName, "red", message); | |
消费者接收到direct.queue2的消息:[hello , red]消费者接收到direct.queue1的消息:[hello , red] |
总结:
描述下 Direct 交换机与 Fanout 交换机的差异?
- Fanout 交换机将消息路由给每一个与之绑定的队列
- Direct 交换机根据 RoutingKey 判断路由给哪个队列
- 如果多个队列具有相同的 RoutingKey,则与 Fanout 功能类似
基于 @RabbitListener 注解声明队列和交换机有哪些常见注解?
- @Queue
- Exchange
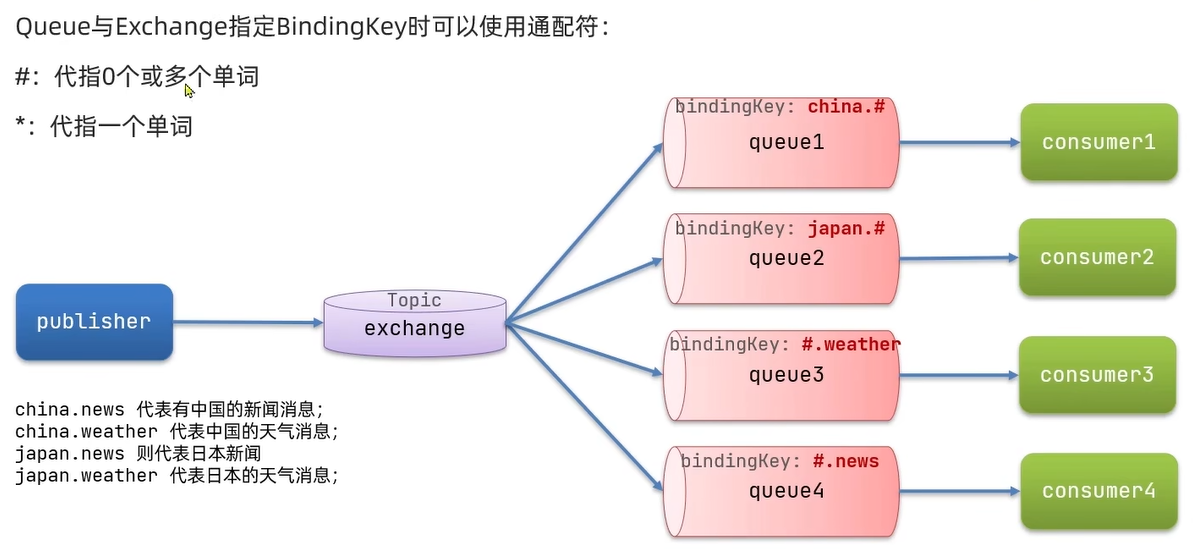
# 8.1.9、发布订阅 - TopicExchange🌲
TopicExchange 与 DirectExchange 类似,区别在于 routingKey 必须是多个单词的列表,并且以 。 分割。
Queue 与 Exchange 指定 BindingKey 时可以使用通配符:
# :代指 0 个或多个单词
* :代指一个单词
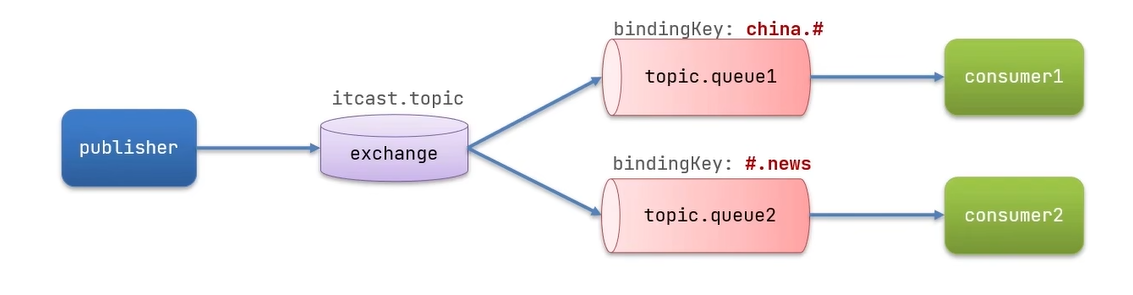
# 8.1.9.1、利用 SpringAMQP 演示 TopicExchange 的使用🌴
实现思路如下:
1、利用 @RabbitListener 声明 Exchange,Queue,RoutingKey
2、在 consumer 服务中,编写两个消费者方法,分别监听 topic.queue1 和 topic.queue2
3、在 publisher 中编写测试方法,向 itcast.topic 发送消息
步骤:
1、利用 @RabbitListener 声明 Exchange,Queue,RoutingKey
2、在 consumer 服务中,编写两个消费者方法,分别监听 topic.queue1 和 topic.queue2
import org.springframework.amqp.core.ExchangeTypes; | |
import org.springframework.amqp.rabbit.annotation.Exchange; | |
import org.springframework.amqp.rabbit.annotation.Queue; | |
import org.springframework.amqp.rabbit.annotation.QueueBinding; | |
import org.springframework.amqp.rabbit.annotation.RabbitListener; | |
import org.springframework.stereotype.Component; | |
/** | |
* @author Dkx | |
* @version 1.0 | |
* @2023/10/119:34 | |
* @function | |
* @comment | |
*/ | |
@Component | |
public class SpringRabbitListener { | |
@RabbitListener(bindings = @QueueBinding( | |
value = @Queue(name = "topic.queue1"), | |
exchange = @Exchange(name = "itcast.topic", type = ExchangeTypes.TOPIC), | |
key = "china.#" | |
)) | |
public void listenTopicQueue1(String msg) | |
{ | |
System.out.println("消费者接收到topic.queue1的消息:[" + msg + "]"); | |
} | |
@RabbitListener(bindings = @QueueBinding( | |
value = @Queue(name = "topic.queue2"), | |
exchange = @Exchange(name = "itcast.topic", type = ExchangeTypes.TOPIC), | |
key = "#.news" | |
)) | |
public void listenTopicQueue2(String msg) | |
{ | |
System.out.println("消费者接收到topic.queue2的消息:[" + msg + "]"); | |
} | |
} |
3、在 publisher 中编写测试方法,向 itcast.topic 发送消息
@Test | |
public void testSendTopicExchange() | |
{ | |
String exchangeName = "itcast.topic"; | |
String message = "郭明然上市了不要888不要999只要9.9就能带回家"; | |
rabbitTemplate.convertAndSend(exchangeName, "china.news", message); | |
} | |
//-------------------------- 打印结果 -------------------------- | |
消费者接收到topic.queue2的消息:[郭明然上市了不要888不要999只要9.9就能带回家] | |
消费者接收到topic.queue1的消息:[郭明然上市了不要888不要999只要9.9就能带回家] |
总结:
描述下 Direct 交换机与 Topic 交换机的差异?
- Topic 交换机支持通配符,不支持多个 key
- bindingKey:通配符,routingkey:多个单词
- #:0 个或多个
- *:一个
# 8.1.10、测试发送 Object 类型消息🌲
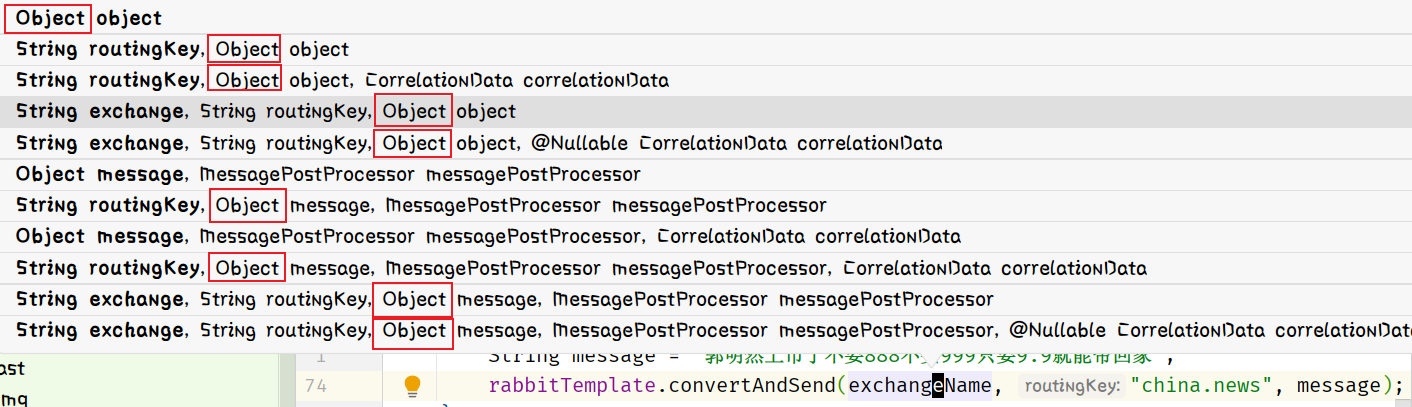
说明:在 SpringAMQP 的发送方法中,接收消息的类型是 Object,也就是说我们可以发送任意对象类型的消息,SpringAMQP 会帮我们序列化为字节后发送
可以看到函数参数都是 Object 类型的,那么就表示可以传递任意类型的 java 对象进去了吗?
创建一个队列
我们在 consumer 中利用 @Bean 声明一个队列:
import org.springframework.amqp.core.Queue; | |
import org.springframework.context.annotation.Bean; | |
import org.springframework.context.annotation.Configuration; | |
/** | |
* @author Dkx | |
* @version 1.0 | |
* @2023/10/1111:17 | |
* @function | |
* @comment | |
*/ | |
@Configuration | |
public class FanoutConfig { | |
@Bean | |
public Queue objectQueue() | |
{ | |
return new Queue("object.queue"); | |
} | |
} |
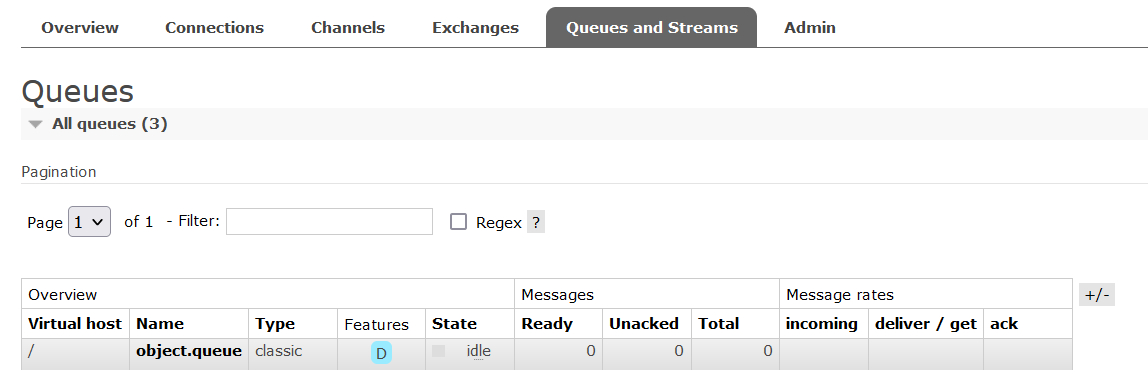
查看 rabbitmq 的 ui 管理页面
在 publisher 中发送消息以测试:
@Test | |
public void testSendObjectQueue() | |
{ | |
Map<String, Object> map = new HashMap<>(); | |
map.put("name", "刘桑"); | |
map.put("age", 18); | |
rabbitTemplate.convertAndSend("object.queue", map); | |
} |
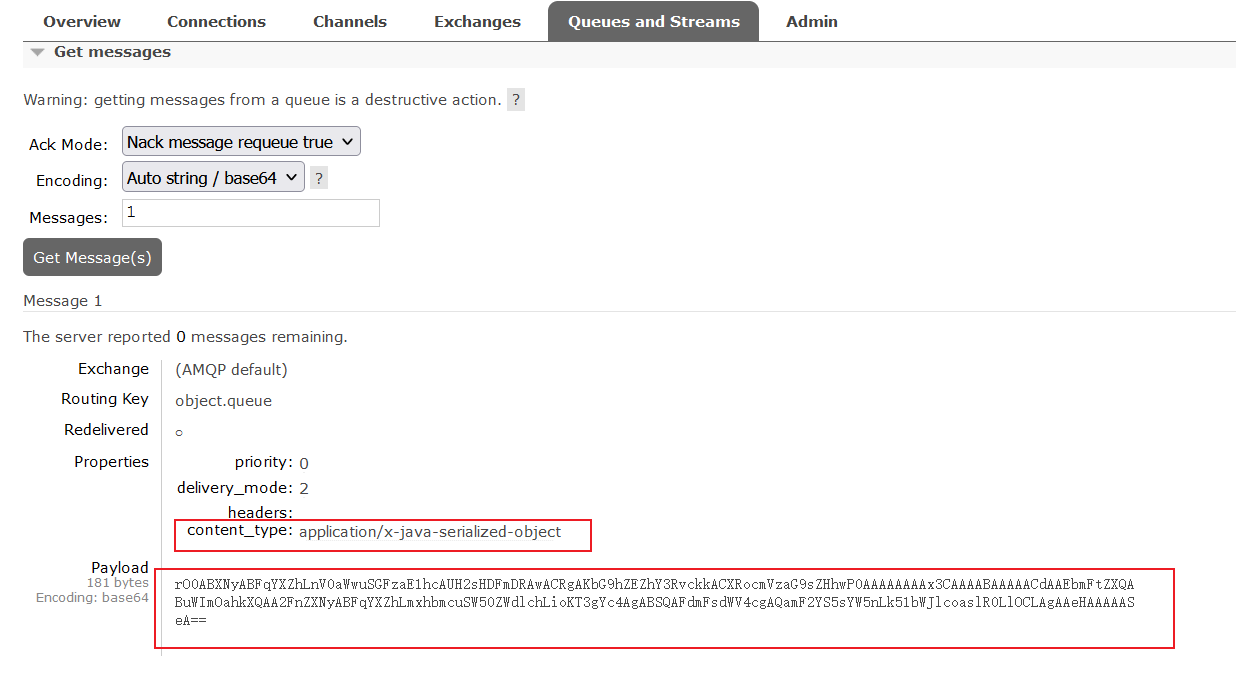
查看消息发送的详细信息
# 8.1.10.1、消息转换器🌴
Spring 在对消息对象的处理是由 org.springframework.amqp.support.converter.MessageConverter 来处理的。而默认实现是 SimpleMessageConverter,基于 JDK 的 ObjectOutputStream 完成序列化。
如果要修改只需要定义一个 MessageConverter 类型的 Bean 即可。推荐用 JSON 方式序列化,步骤如下:
1、我们在 publisher 服务引入依赖
<dependency> | |
<groupId>com.fasterxml.jackson.core</groupId> | |
<artifactId>jackson-databind</artifactId> | |
</dependency> |
2、我们在 publisher 服务启动类中声明 MessageConverter
import org.springframework.amqp.support.converter.Jackson2JsonMessageConverter; | |
import org.springframework.amqp.support.converter.MessageConverter; | |
import org.springframework.boot.SpringApplication; | |
import org.springframework.boot.autoconfigure.SpringBootApplication; | |
import org.springframework.context.annotation.Bean; | |
@SpringBootApplication | |
public class PublisherApplication { | |
public static void main(String[] args) { | |
SpringApplication.run(PublisherApplication.class); | |
} | |
@Bean | |
public MessageConverter messageConverter() | |
{ | |
return new Jackson2JsonMessageConverter(); | |
} | |
} |
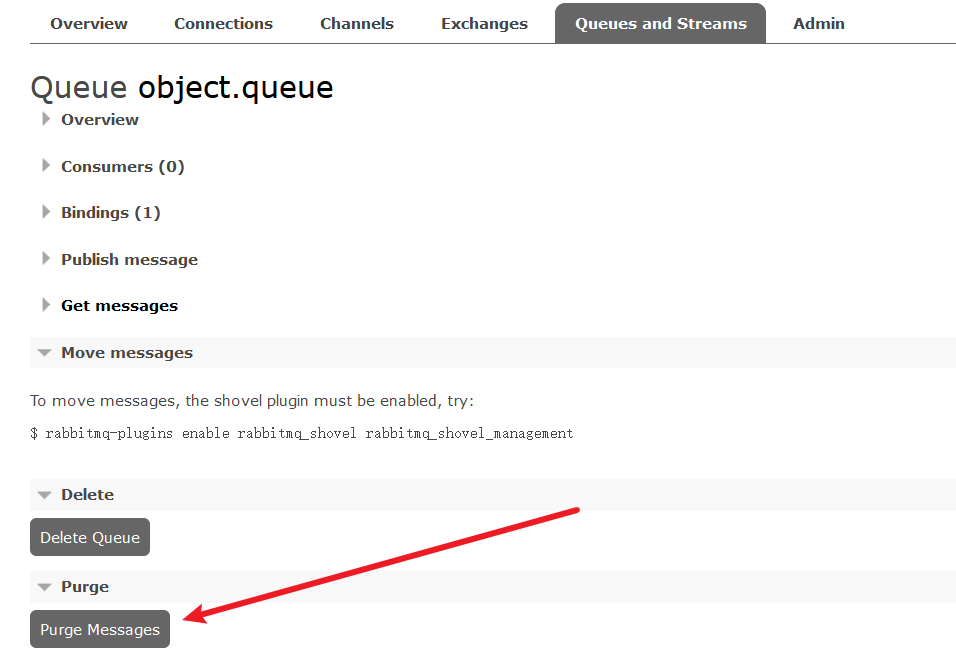
清空之前的队列中的消息
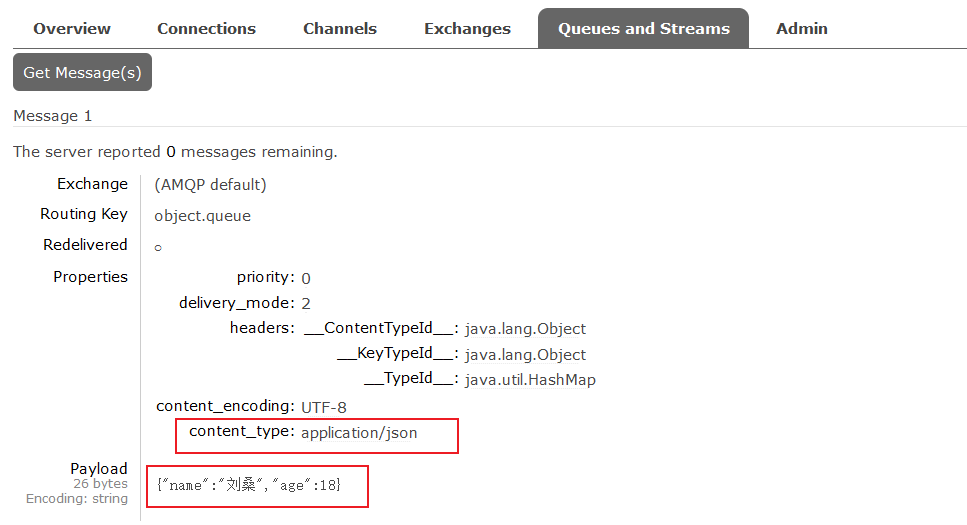
再次运行测试函数,然后查看 RabbitMQ 中的消息详细情况

消息发送的时候把对象序列化为 JSON,接收时反过来反序列化为对象
3、消费者接受消息
我们需要再消费者里面也加上 MessageConverter 进行反序列化。否则取消息就会报错
import org.springframework.amqp.support.converter.Jackson2JsonMessageConverter; | |
import org.springframework.amqp.support.converter.MessageConverter; | |
import org.springframework.context.annotation.Bean; | |
import org.springframework.context.annotation.Configuration; | |
/** | |
* @author Dkx | |
* @version 1.0 | |
* @2023/10/1117:31 | |
* @function | |
* @comment | |
*/ | |
@Configuration | |
public class RabbitMQConfig { | |
@Bean | |
public MessageConverter messageConverter() | |
{ | |
return new Jackson2JsonMessageConverter(); | |
} | |
} |
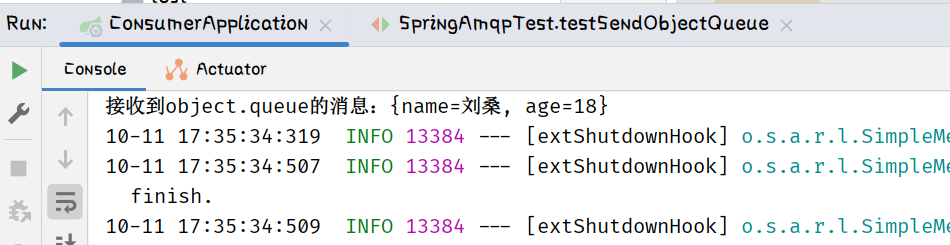
启动消费者启动类,启动生产者的测试函数查看结果:
总结:
SpringAMQP 中消息的序列化和反序列化是怎么实现的?
- 利用 MessageConverter 实现的,默认是 JDK 的序列化
- 注意发送与接收方必须使用相同的 MessageConverter