# 树结构实际应用
# 堆排序
堆排序基本介绍
- 堆排序是利用堆这种数据结构而设计的一种排序算法,堆排序是一种选择排序,它的最坏,最好,平均时间复杂度均为 O (nlogn),它也是不稳定排序。
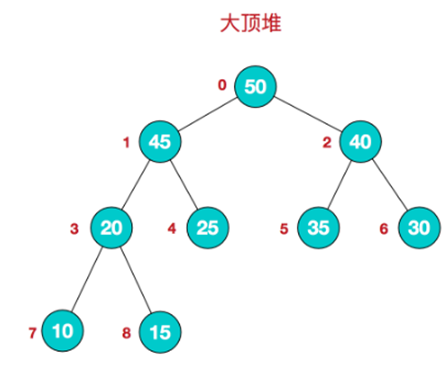
- 堆是具有以下性质的完全二叉树:每个结点的值都大于或等于其左右孩子结点的值,称为大顶堆
- <strong style="color:red"> 注意 </strong>: 没有要求结点的左孩子的值和右孩子的值的大小关系。
- 每个结点的值都小于或等于其左右孩子结点的值,称为小顶堆
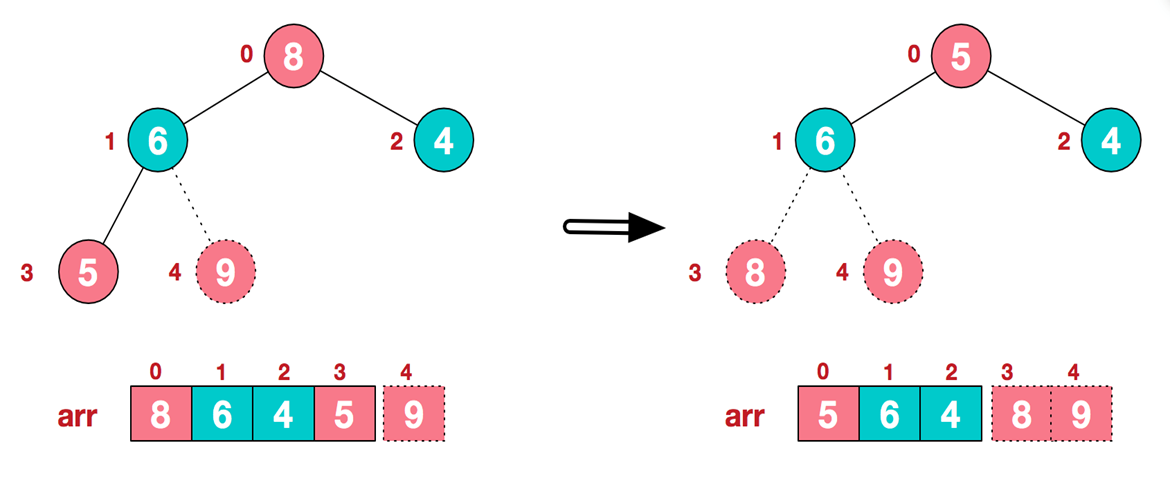
# 大顶堆举例说明
我们对堆中的结点按层进行编号,映射到数组中就是下面这个样子:

大顶堆特点: arr[i] >= arr[2\*i+1] && arr[i] >= arr[2\*i+2]
- i 对应第几个节点,i 从 0 开始编号
# 小顶堆举例说明
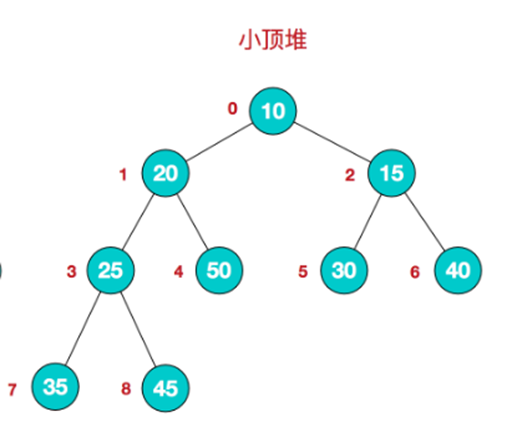
小顶堆: arr[i] <= arr[2\*i+1] && arr[i] <= arr[2\*i+2]
- i 对应第几个节点,i 从 0 开始编号
- 一般升序采用大顶堆,降序采用小顶堆
堆排序基本思想
- 将待排序序列构造成一个大顶堆
- 此时,整个序列的最大值就是堆顶的根节点。
- 将其与末尾元素进行交换,此时末尾就为最大值。
- 然后将剩余 n-1 个元素重新构造成一个堆,这样会得到 n 个元素的次小值 <font style="color:red"> 第二小的值 </font>。如此反复执行,便能得到一个有序序列了。
可以看到在构建大顶堆的过程中,元素的个数逐渐减少,最后就得到一个有序序列了.
堆排序步骤图解说明
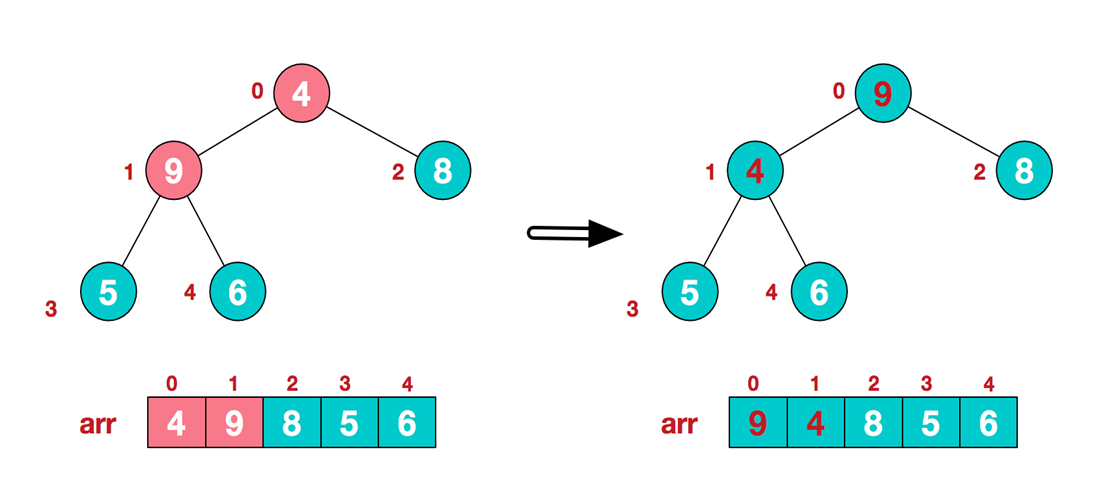
步骤一 构造初始堆。将给定无序序列构造成一个大顶堆(一般升序采用大顶堆,降序采用小顶堆)。
- 假设给定无序序列结构如下
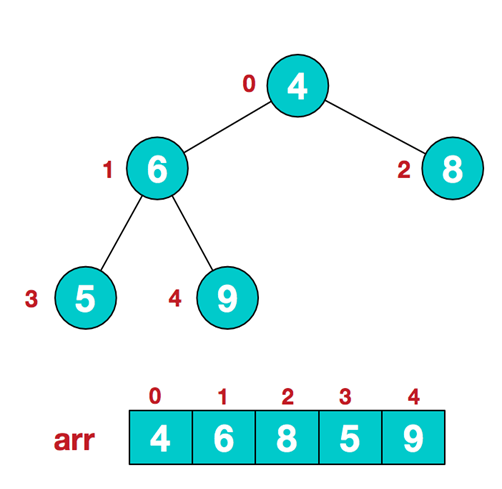
- 此时我们从最后一个非叶子结点开始(叶结点自然不用调整,第一个非叶子结点
arr.length/2-1=5/2-1=1,也就是下面的 6 结点),从左至右,从下至上进行调整。
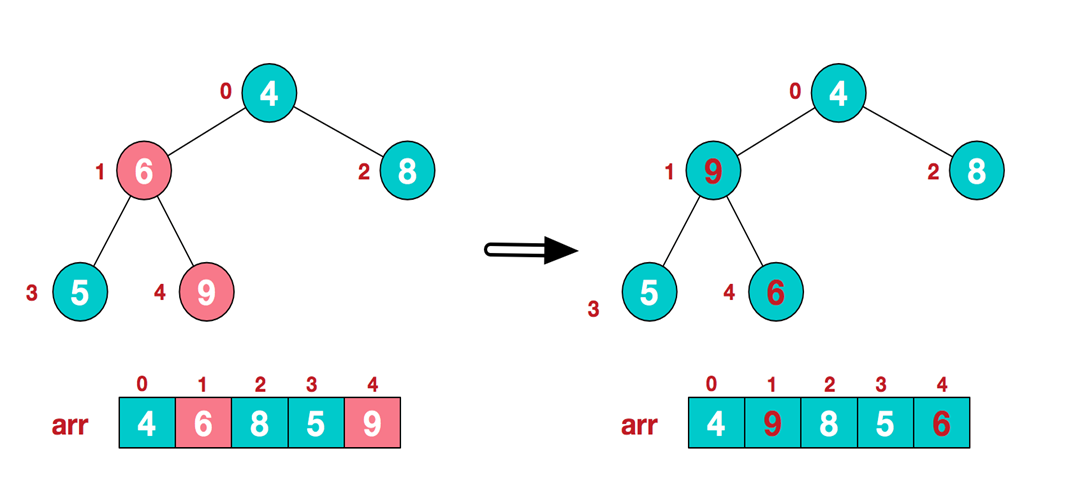
- 找到第二个非叶节点 4,由于 [4,9,8] 中 9 元素最大,4 和 9 交换。
- 这时,交换导致了子根 [4,5,6] 结构混乱,继续调整,[4,5,6] 中 6 最大,交换 4 和 6。
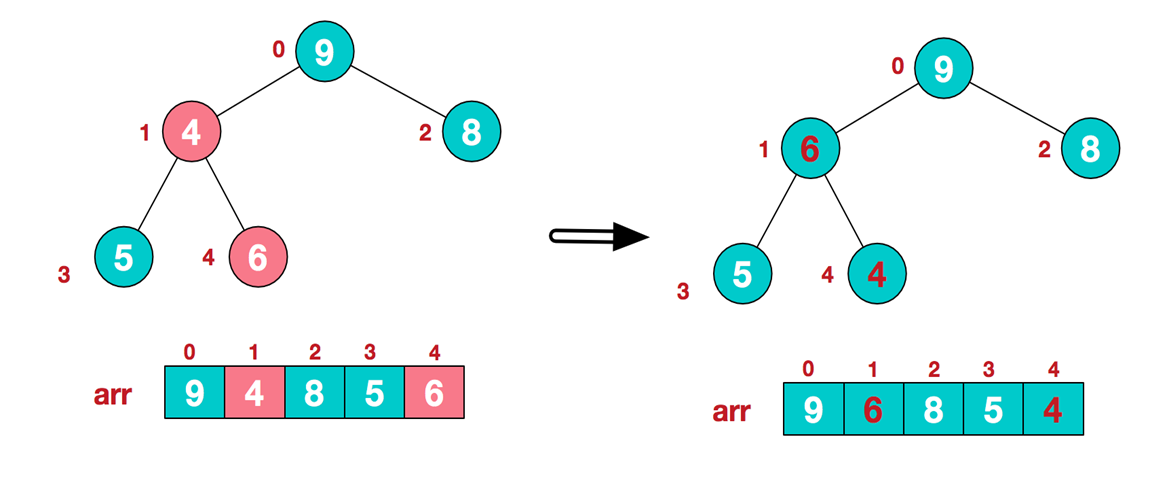
此时,我们就将一个无序序列构造成了一个大顶堆。
步骤二 将堆顶元素与末尾元素进行交换,使末尾元素最大。然后继续调整堆,再将堆顶元素与末尾元素交换,得到第二大元素。如此反复进行交换、重建、交换。
- 将堆顶元素 9 和末尾元素 4 进行交换
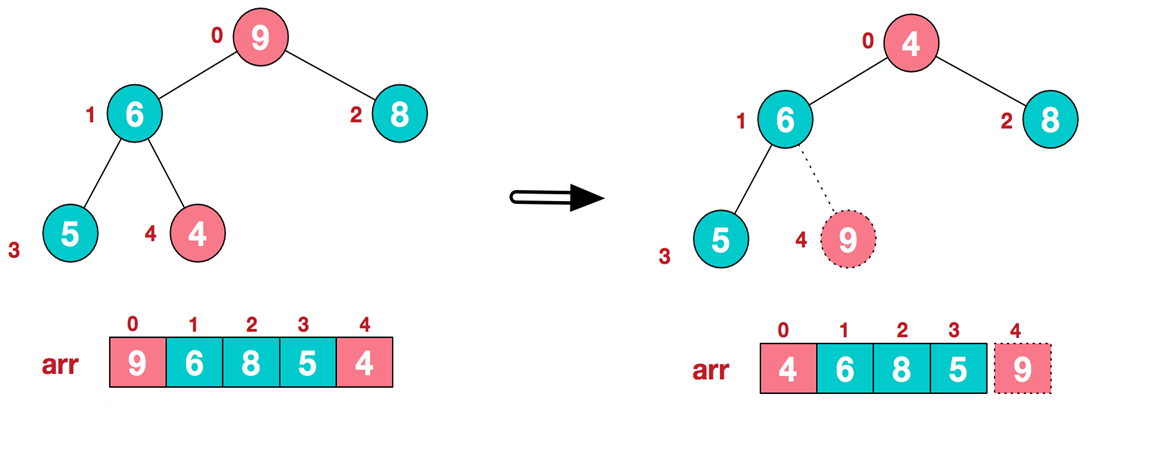
- 重新调整结构,使其继续满足堆定义
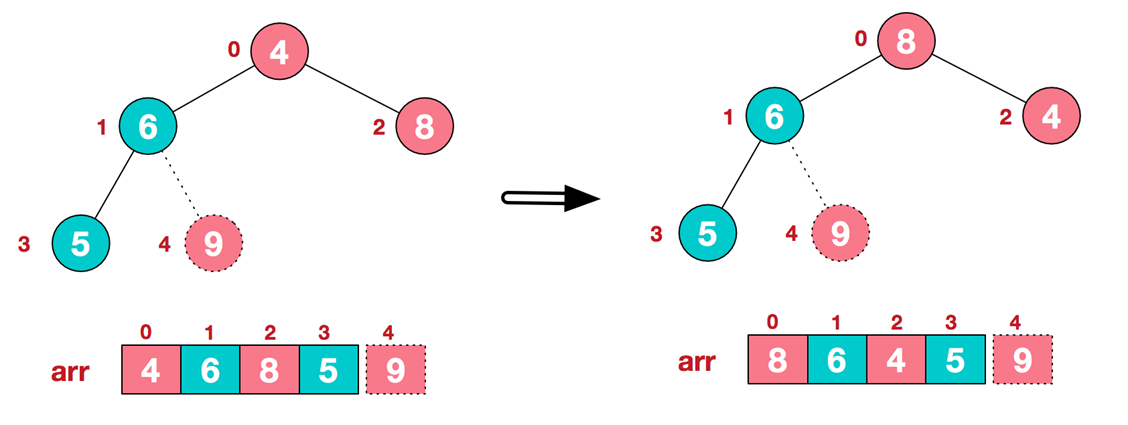
- 再将堆顶元素 8 与末尾元素 5 进行交换,得到第二大元素 8.
- 后续过程,继续进行调整,交换,如此反复进行,最终使得整个序列有序

再简单总结下堆排序的基本思路:
- 将无序序列构建成一个堆,根据升序降序需求选择大顶堆或小顶堆;
- 将堆顶元素与末尾元素交换,将最大元素 "沉" 到数组末端;
- 重新调整结构,使其满足堆定义,然后继续交换堆顶元素与当前末尾元素,反复执行调整 + 交换步骤,直到整个序列有序。
要求:给你一个数组 {4,6,8,5,9} , 要求使用堆排序法,将数组升序排序。
代码实现:
/** | |
* @author 窦凯欣 | |
* @version 1.0 | |
* @2023/7/416:10 | |
* @comment | |
*/ | |
public class HeapSort { | |
public static void main(String[] args) { | |
int[] arr = {4,6,8,5,9}; | |
heapSort(arr); | |
} | |
// 堆排序方法 | |
public static void heapSort(int[] arr){ | |
int temp = 0; | |
// adjustHeap(arr,1,arr.length); | |
// System.out.println ("第一次"+ Arrays.toString (arr));//4, 9, 8, 5, 6 | |
// adjustHeap(arr,0,arr.length); | |
// System.out.println ("第二次"+Arrays.toString (arr));//9,6,8,5,4 | |
// 将无序序列构建成一个堆,根据升序降序需求选择大顶堆或小顶堆 | |
for(int i = arr.length / 2 - 1;i >= 0;i --){ | |
adjustHeap(arr,i,arr.length); | |
} | |
/** | |
* 2. 将堆顶元素与末尾元素交换,将最大元素 "沉" 到数组末端 | |
* 3. 重新调整结构,使其满足堆定义,然后继续交换堆顶元素与当前末尾元素,反复执行调整 + 交换步骤,直到 | |
* 整个序列有序 | |
*/ | |
for(int j = arr.length - 1;j > 0;j --){ | |
temp = arr[j]; | |
arr[j] = arr[0]; | |
arr[0] = temp; | |
adjustHeap(arr,0,j); | |
} | |
System.out.println(Arrays.toString(arr)); | |
} | |
/** | |
* 将一个数组 (二叉树),调整成一个大顶堆 | |
* 功能:完成将以 i 对应的非叶子结点的树调整成大顶堆 | |
* 举例:int [] arr = {4,6,8,5,9}; => i = 1 => adjustHeap => 得到 {4,9,8,5,6} | |
* 如果我们再次调用 adjustHeap 传入的是 i = 0 => 得到 {4,9,8,5,6} => {9,6,8,5,4} | |
* @param arr 待调整的数组 | |
* @param i 数组中的下标 | |
* @param length 大小 | |
*/ | |
public static void adjustHeap(int[] arr,int i,int length){ | |
// 先取出当前元素的值,保存在临时变量 | |
int temp = arr[i]; | |
/** | |
* 开始调整 | |
* 说明: | |
* 1.k = i * 2 + 1 k 是 i 节点的左子节点 | |
*/ | |
for(int k = i * 2 + 1;k < length;k = k * 2 + 1){ | |
// 说明 左子节点的值小于右子节点的值 | |
if(k + 1 < length && arr[k] < arr[k + 1]){ | |
//k 指向右子节点 | |
k ++; | |
} | |
// 如果子节点大于父节点 | |
if(arr[k] > temp){ | |
// 把较大的值赋值给当前节点 | |
arr[i] = arr[k]; | |
//i 指向 k, 继续循环比较 | |
i = k; | |
}else{ | |
break; | |
} | |
} | |
// 当 for 循环结束后,我们已经将 i 为父节点的树的最大值,放在了 最顶 (局部) | |
// 将 temp 值放到调整后的位置 | |
arr[i] = temp; | |
} | |
} |
# 赫夫曼树
基本介绍
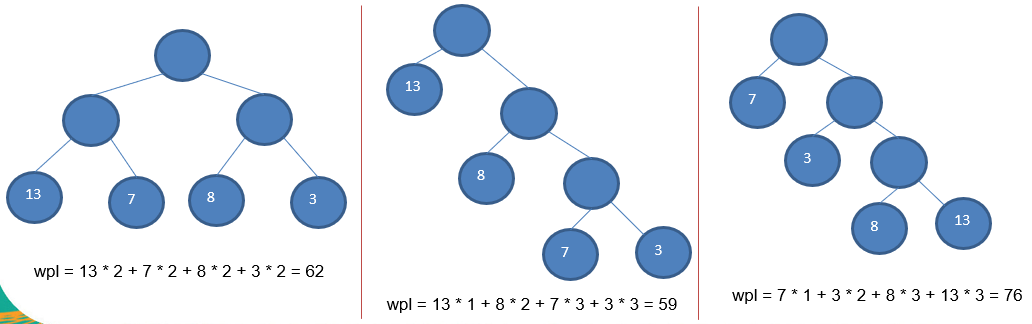
- 给定 n 个权值作为 n 个 叶子结点 ,构造一颗二叉树,若该树的带权路径长度 (wpl) 达到最小,称这样的二叉树为最优二叉树,也称为赫夫曼树 (HuffmanTree),还有的书翻译为霍夫曼树。
- 赫夫曼树是带权路径长度最短的树,权值较大的节点离根较近。
赫夫曼树几个重要概念和举例说明
- 路径和长度:在一颗树中,从一个节点往下可以达到的孩子或孙子节点之间的通路,称为路径。通路中分支的数目称为路径长度。若规定根节点的层数为 1,则从根节点到第 L 层节点的路径长度为 L-1。
- 节点的权及带权路径长度:若将树中节点赋给一个有着某种含义的数值,则这个数值称为该节点的权。节点的带权路径长度为:从根节点到该节点之间的路径长度与该节点的权的乘积。
- 树的带权路径长度:树的带权路径长度规定为所有 叶子结点 的带权路径长度之和,记为 WPL (weighted path length),权值越大的节点离根节点越近的二叉树才是最优二叉树。
- WPL 最小的就是赫夫曼树 下图中 - 中间的就是赫夫曼树
赫夫曼树创建思路图解
给你一个数列 {13,7,8,3,29,6,1} ,要求转成一颗赫夫曼树
思路分析示意图:
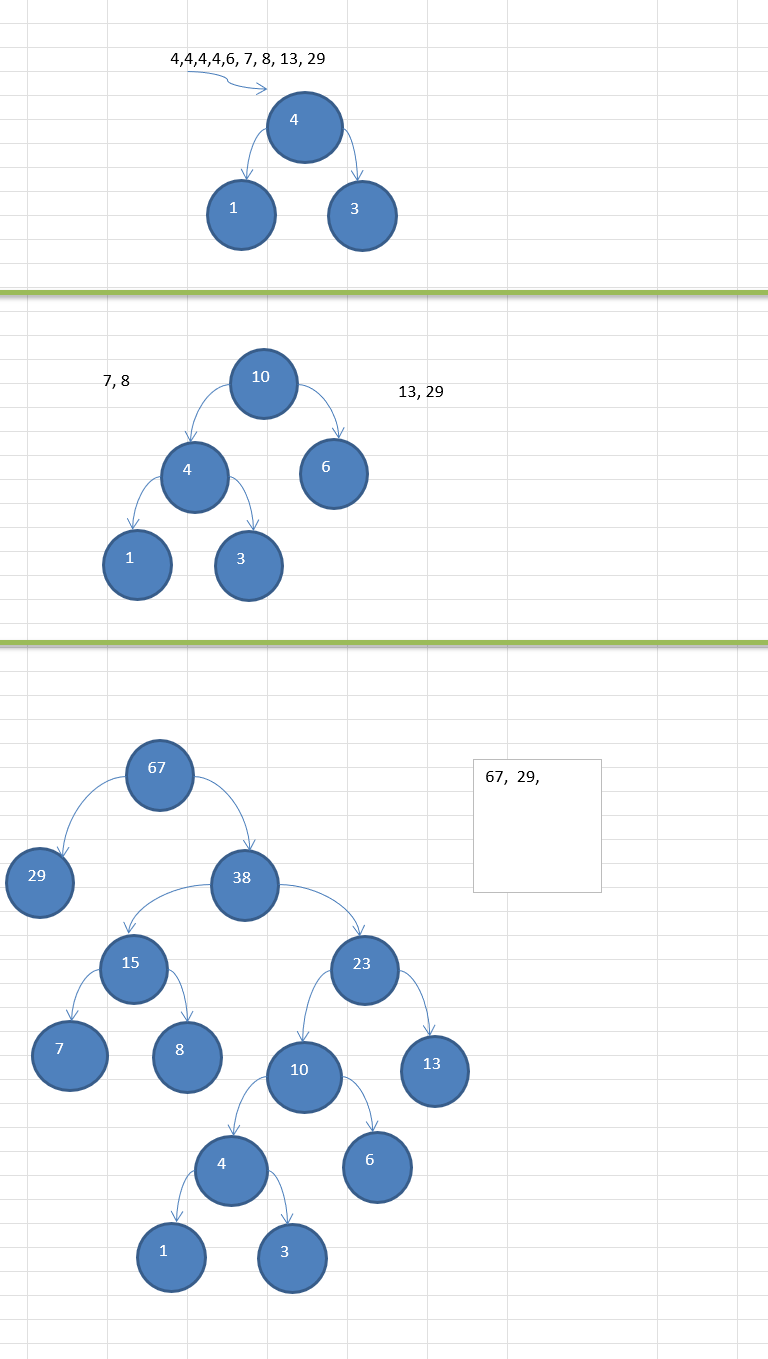
构成赫夫曼树的步骤:
- 从小到大进行排序,将每一个数据,每个数据都是一个节点,每个节点可以看成是一颗最简单的二叉树
- 取出根节点权值最小的两颗二叉树
- 组成一颗新的二叉树,该新的二叉树的根节点的权值是前两棵二叉树根节点权值的和
- 再将这棵新的二叉树,以根节点的权值大小再次排序,不断重复 1-2-3-4 的步骤,直到数列中,所有的数据都被处理,就得到一颗赫夫曼树
代码实现:
/** | |
* @author 窦凯欣 | |
* @version 1.0 | |
* @2023/7/519:01 | |
* @comment | |
*/ | |
public class HuffmanTree { | |
public static void main(String[] args) { | |
int[] arr = {13,7,8,3,29,6,1}; | |
Node huffmanTree = createHuffmanTree(arr); | |
preOrder(huffmanTree); | |
} | |
public static void preOrder(Node root){ | |
if(root != null){ | |
root.preOrder(); | |
}else{ | |
System.out.println("赫夫曼二叉树数据为空"); | |
} | |
} | |
/** | |
* 创建赫夫曼树方法 | |
* @param arr | |
*/ | |
public static Node createHuffmanTree(int[] arr){ | |
/** | |
* 1. 遍历 arr 数组 | |
* 2. 将 arr 的每个元素构成一个 Node | |
* 3. 将 Node 放入到 ArrayList 中 | |
*/ | |
List<Node> list = new ArrayList<>(); | |
for(int value:arr){ | |
list.add(new Node(value)); | |
} | |
while(list.size() > 1){ | |
// 排序从小打大 | |
Collections.sort(list); | |
// 取出节点权值最小的两棵二叉树 | |
//(1) 取出权值最小的节点 (二叉树) | |
Node leftNode = list.get(0); | |
//(2) 取出第二小的节点 (二叉树) | |
Node rightNode = list.get(1); | |
//(3) 构建成一棵新的二叉树 | |
Node parent = new Node(leftNode.value + rightNode.value); | |
parent.left = leftNode; | |
parent.right = rightNode; | |
//(4) 从 ArrayList 删除处理过的二叉树 | |
list.remove(leftNode); | |
list.remove(rightNode); | |
//(5) 将 parent 加入到 list | |
list.add(parent); | |
} | |
// 返回赫夫曼树的 root 节点 | |
return list.get(0); | |
} | |
} | |
// 创建节点类 | |
class Node implements Comparable<Node>{ | |
/** | |
* value: 节点权值 | |
* left: 指向左子节点 | |
* right: 指向右子节点 | |
*/ | |
int value; | |
Node left; | |
Node right; | |
public Node (int value) { | |
this.value = value; | |
} | |
// 前序遍历 | |
public void preOrder(){ | |
System.out.println(this); | |
if(this.left != null){ | |
this.left.preOrder(); | |
} | |
if(this.right != null){ | |
this.right.preOrder(); | |
} | |
} | |
@Override | |
public String toString() { | |
return "Node{" + | |
"value=" + value + | |
'}'; | |
} | |
@Override | |
public int compareTo(Node o) { | |
return this.value - o.value; | |
} | |
} |
# 赫夫曼编码
基本介绍:
- 赫夫曼编码也翻译为 哈夫曼编码 (HuffmanCoding) ,又称霍夫曼编码,是一种编码方式,属于一种程序算法
- 赫夫曼编码是赫夫曼树在电讯通信中的经典的应用之一。
- 赫夫曼编码广泛地用于数据文件压缩,其压缩率通常在 20% ~ 90% 之间
- 赫夫曼编码是可变字长编码 (VLC) 的一种,Huffman 与 1952 年提出一种编码方法,称之为最佳编码
原理剖析:
通信领域中信息的处理方式 1- 定长编码
i like like like java do you like a java // 共 40 个字符 (包括空格)
// 对应 Ascii 码
105 32 108 105 107 101 32 108 105 107 101 32 108 105 107 101 32 106 97 118 97 32 100 111 32 121 111 117 32 108 105 107 101 32 97 32 106 97 118 97
// 对应的二进制
01101001 00100000 01101100 01101001 01101011 01100101 00100000 01101100 01101001 01101011 01100101 00100000 01101100 01101001 01101011 01100101 00100000 01101010 01100001 01110110 01100001 00100000 01100100 01101111 00100000 01111001 01101111 01110101 00100000 01101100 01101001 01101011 01100101 00100000 01100001 00100000 01101010 01100001 01110110 01100001
按照二进制来传递信息,总的长度是 359 (包括空格)
通信领域中信息的处理方式 2 - 变长编码
i like like like java do you like a java // 共 40 个字符 (包括空格)
d:1 y:1 u:1 j:2 v:2 o:2 l:4 k:4 e:4 i:5 a:5 :9 // 各个字符对应的个数
0= , 1=a, 10=i, 11=e, 100=k, 101=l, 110=o, 111=v, 1000=j, 1001=u, 1010=y, 1011=d
说明:按照各个字符出现的次数进行编码,原则是出现次数越多的,则编码越小,比如 空格出现了 9 次, 编码为 0 , 其它依次类推.
按照上面给各个字符规定的编码,则我们在传输 "i like like like java do you like a java" 数据时,编码就是
10010110100...・字符的编码都不能是其他字符编码的前缀,符合此要求的编码叫做前缀编码, 即不能匹配到重复的编码 (这个在赫夫曼编码中,我们还要进行举例说明,不捉急)
通信领域中信息的处理方式 3 - 赫夫曼编码
d:1 y:1 u:1 j:2 v:2 o:2 l:4 k:4 e:4 i:5 a:5 :9 // 各个字符对应的个数
按照上面字符出现的次数构建一颗赫夫曼树,次数作为权值.(图后)
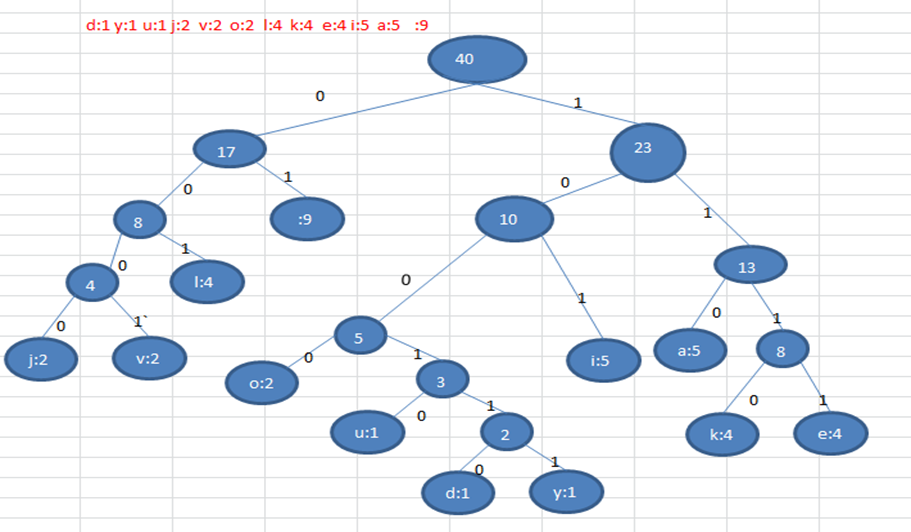
// 根据赫夫曼树,给各个字符
// 规定编码 , 向左的路径为 0
// 向右的路径为 1 , 编码如下:
o: 1000 u: 10010 d: 100110 y: 100111 i: 101
a : 110 k: 1110 e: 1111 j: 0000 v: 0001
l: 001 : 01
按照上面的赫夫曼编码,我们的 "i like like like java do you like a java" 字符串对应的编码为 (注意这里我们使用的无损压缩)
1010100110111101111010011011110111101001101111011110100001100001110011001111000011001111000100100100110111101111011100100001100001110
长度为 : 133
说明:
- 原来长度是 359 , 压缩了 (359-133) / 359 = 62.9%
- 此编码满足前缀编码,即字符的编码都不能是其他字符编码的前缀。不会造成匹配的多义性
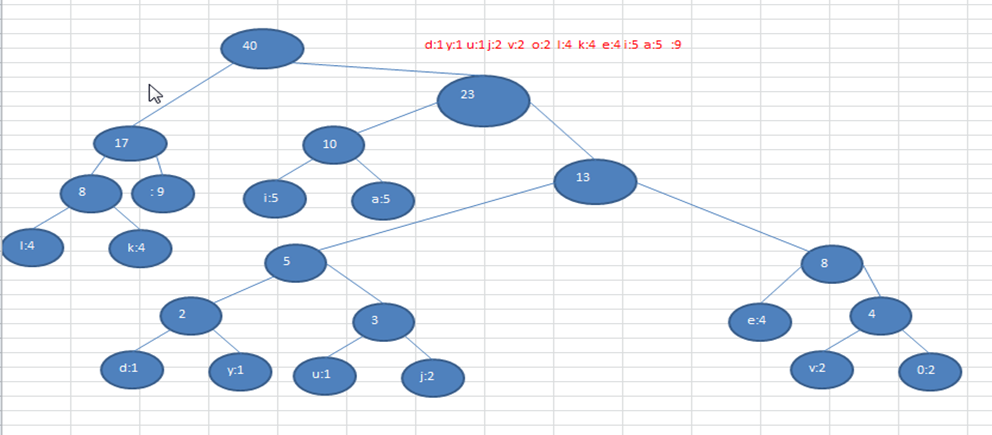
注意:, 这个赫夫曼树根据排序方法不同,也可能不太一样,这样对应的赫夫曼编码也不完全一样,但是 wpl 是一样的,都是最小的,比如:如果我们让每次生成的新的二叉树总是排在权值相同的二叉树的最后一个,则生成的二叉树为:
# 最佳实践 - 数据压缩 (创建赫夫曼树)
将给出的一段文本,比如 "i like like like java do you like a java" , 根据前面的讲的赫夫曼编码原理,对其进行数据压缩处理 ,形式如 "1010100110111101111010011011110111101001101111011110100001100001110011001111000011001111000100100100110111101111011100100001100001110"
步骤 1:根据赫夫曼编码压缩数据的原理,需要创建 "i like like like java do you like a java" 对应的赫夫曼树.
思路:前面已经分析过了,而且我们已然讲过了构建赫夫曼树的具体实现。
代码实现:
package com.atguigu.huffmancode; | |
import java.util.ArrayList; | |
import java.util.Collections; | |
import java.util.HashMap; | |
import java.util.List; | |
import java.util.Map; | |
public class HuffmanCode { | |
public static void main(String[] args) { | |
String content="i like like like java do you like a java"; | |
// 转成 byte 数组 | |
byte[] bytes = content.getBytes(); | |
// 进行赫夫曼编码压缩 | |
huffmanZip(bytes); | |
} | |
private static byte[] huffmanZip(byte[] bytes) { | |
// 先统计每一个 byte 出现的次数,并放入一个集合中 | |
List<Node> nodes = getNodes(bytes); | |
// 创建一颗赫夫曼树 | |
Node root = createHuffmanTree(nodes); | |
// 测试一下 赫夫曼树 是否创建成功! | |
// 输出 root 的 值 | |
System.out.println(root + " " + root.left + " " + root.right); | |
return null; | |
} | |
/** | |
* | |
* @param bytes byte 数组,就是内容字符串对应的 byte 数组 | |
* @return List<Node> 形式如 {Node {'i', 3}, Node {'a', 5}...} | |
*/ | |
private static List<Node> getNodes(byte[] bytes) { | |
List<Node> nodes = new ArrayList<>(); | |
// 存储每一个 byte 出现了多少次。 | |
Map<Byte, Integer> counts = new HashMap<>(); | |
// 统计每一个 byte 出现的次数 | |
for(byte b:bytes) { | |
Integer count = counts.get(b); | |
if(count==null) { | |
counts.put(b, 1); | |
}else { | |
counts.put(b, count+1); | |
} | |
} | |
// 把每一个键值对转为一个 node 对象,并加入到 nodes 集合 | |
for(Map.Entry<Byte, Integer> entry:counts.entrySet()) { | |
nodes.add(new Node(entry.getKey(), entry.getValue())); | |
} | |
return nodes; | |
} | |
/** | |
* 创建赫夫曼树 | |
* @param nodes 传入的是一个 node 集合 | |
* @return 返回赫夫曼树的根节点 | |
*/ | |
private static Node createHuffmanTree(List<Node> nodes) { | |
// 循环处理, | |
while (nodes.size() > 1) { // 保证可以 get (0) 和 get (1) | |
// 排序 | |
// 说明 | |
// 1. 需要 nodes 集合存放的对象实现 Comparable 接口 | |
Collections.sort(nodes); | |
// 取出来权值最小的两个二叉树 | |
Node left = nodes.get(0); | |
// 取出最权值次小的二叉树,作为新的二叉树的右子树 | |
Node right = nodes.get(1); | |
// 创建一颗新的二叉树 , 新的节点 data 没有,权值为两颗子树权值和 | |
Node parent = new Node(null, left.weight + right.weight); | |
// 把之前取出来的两颗二叉树设置为新创建的二叉树的子树 | |
parent.left = left; | |
parent.right = right; | |
// 把取出来的两个二叉树移除 | |
nodes.remove(left); | |
nodes.remove(right); | |
// 放入原来的二叉树集合中 | |
nodes.add(parent); | |
} | |
// 返回的节点就是赫夫曼树的根节点. | |
return nodes.get(0); | |
} | |
} | |
// 实现 Comparable<Node> 接口是让 Node 对象可以进行排序 | |
class Node implements Comparable<Node> { | |
Byte data; // 数据本身,char 本质就是 Byte | |
int weight; // 可以理解成权值,即字符出现的次数 | |
Node left; | |
Node right; | |
public Node(Byte data, int weight) { | |
this.data = data; | |
this.weight = weight; | |
} | |
@Override | |
public int compareTo(Node node) { | |
// 这样写是从小到大排序 | |
return this.weight - node.weight; | |
} | |
@Override | |
public String toString() { | |
return "Node [data=" + data + ", weight=" + weight + "]"; | |
} | |
// 前序遍历 | |
public void preOrder() { | |
System.out.println(this);// 先输出父节点 | |
if (this.left != null) { | |
this.left.preOrder(); | |
} | |
if (this.right != null) { | |
this.right.preOrder(); | |
} | |
} | |
} |
# 最佳实践 - 数据压缩 (生成赫夫曼编码和赫夫曼编码后的数据)
我们已经生成了 赫夫曼树,下面我们继续完成任务
- 生成赫夫曼树对应的赫夫曼编码,如下表: =01 a=100 d=11000 u=11001 e=1110 v=11011 i=101 y=11010 j=0010 k=1111 l=000 o=0011
- 使用赫夫曼编码来生成赫夫曼编码数据,即按照上面的赫夫曼编码,将 "i like like like java do you like a java" 字符串生成对应的编码数据,形式如下.
1010100010111111110010001011111111001000101111111100100101001101110001110000011011101000111100101000101111111100110001001010011011100
思路:前面已经分析过了,而且我们讲过了生成赫夫曼编码的具体实现。
代码实现:
package com.atguigu.huffmancode; | |
import java.util.ArrayList; | |
import java.util.Arrays; | |
import java.util.Collections; | |
import java.util.HashMap; | |
import java.util.List; | |
import java.util.Map; | |
import java.util.Set; | |
public class HuffmanCode { | |
public static void main(String[] args) { | |
String content="i like like like java do you like a java"; | |
// 转成 byte 数组 | |
byte[] bytes = content.getBytes(); | |
// 进行赫夫曼编码压缩 | |
byte[] huffmanBytes = huffmanZip(bytes); | |
} | |
/** | |
* 将 content 进程赫夫曼编码,返回的就是 按 赫夫曼编码后的 byte 数组 | |
* 比如: "i like like like java do you like a java" => | |
* 101010011011110111101001101111011110100.. 但是 是按照 byte 数组来存放的,每 8 位 放入到一个 byte 中! | |
* 比如:huffmanBytes [0] = -41 (10101001) huffmanBytes [1] = -61 (10111101) ... | |
* @param bytes | |
* @return | |
*/ | |
private static byte[] huffmanZip(byte[] bytes) { | |
// 先统计每一个 byte 出现的次数,并放入一个集合中 | |
List<Node> nodes = getNodes(bytes); | |
// 创建一颗赫夫曼树 | |
Node root = createHuffmanTree(nodes); | |
// 测试一下 赫夫曼树 是否创建成功! | |
// 输出 root 的 值 | |
//System.out.println(root + " " + root.left + " " + root.right); | |
// 创建一个赫夫曼编码表 | |
Map<Byte, String> huffmanCodes = getCodes(root); | |
// 测试一把,看看 赫夫曼编码表 是否正确 | |
//32=01, 97=100, 100=11000, 117=11001, 101=1110, 118=11011, 105=101, 121=11010, 106=0010, 107=1111, 108=000, 111=0011 | |
//System.out.println(huffmanCodes); | |
// 遍历一把 | |
Set<Byte> keySet = huffmanCodes.keySet(); | |
for(Byte key: keySet) { | |
System.out.print((char)key.intValue() + "=" + huffmanCodes.get(key) + " "); | |
} | |
// 对 bytes 进行哈夫曼编码,返回的是 一个 byte 数组 | |
//"i like like like java do you like a java" | |
// 对应的 是 "1010100010111111110.." | |
//huffmanBytes[0] = 10101000 = -88 | |
//huffmanBytes[1] = 10111111 = -65 | |
byte[] huffmanBytes = zip(bytes,huffmanCodes); | |
// 测试一个 | |
System.out.println("\n" + Arrays.toString(huffmanBytes)); | |
return huffmanBytes; | |
} | |
// 某个叶子节点存储路径 | |
static StringBuilder stringBuilder = new StringBuilder(); | |
// 存储赫夫曼编码 | |
static Map<Byte, String> huffmanCodes = new HashMap<>(); | |
/** | |
* 传入赫夫曼树的根节点,返回对应的赫夫曼编码 Map<Byte, String> | |
* 即形式如 (和生成的赫夫曼树有关系): | |
* o: 1000 u: 10010 d: 100110 y: 100111 i: 101 | |
a: 110 k: 1110 e: 1111 j: 0000 v: 0001 | |
l: 001 : 01 | |
* @param tree | |
* @return | |
*/ | |
private static Map<Byte, String> getCodes(Node root) { | |
if(root==null) { | |
return null; | |
} | |
// 处理 root 的左子树 | |
getCodes(root.left,"0",stringBuilder); | |
// 处理 root 的右子树 | |
getCodes(root.right,"1",stringBuilder); | |
return huffmanCodes; | |
} | |
/** | |
* 该方法会 node 节点的所有叶子节点的赫夫曼编码,并存放在 huffmanCodes 集合中 | |
* 其形式如:{32=01, 97=100, 100=11000, 117=11001, 101=1110, 118=11011, 105=101, 121=11010, 106=0010, 107=1111, 108=000, 111=0011} | |
* @param node | |
* @param code | |
* @param stringBuilder | |
*/ | |
private static void getCodes(Node node, String code, StringBuilder stringBuilder) { | |
StringBuilder stringBuilder2 = new StringBuilder(stringBuilder); | |
stringBuilder2.append(code); | |
if(node != null) { | |
if (node.data == null) { | |
getCodes(node.left, "0", stringBuilder2); | |
getCodes(node.right, "1", stringBuilder2); | |
} else { | |
huffmanCodes.put(node.data, stringBuilder2.toString()); | |
} | |
} | |
} | |
/** | |
* | |
* @param bytes 传入的 "i like .." 对应的字节数组,和 哈夫曼编码表 | |
* @param huffCodes 返回哈夫曼编码后的 byte [] | |
* @return | |
*/ | |
private static byte[] zip(byte[] bytes, Map<Byte, String> huffmanCodes) { | |
StringBuilder stringBuilder = new StringBuilder(); | |
// 把需要压缩的 byte 数组处理成一个二进制的字符串 | |
//stringBuilder 就是 形式如 "10101001101111011110..." | |
for(byte b:bytes) { | |
stringBuilder.append(huffmanCodes.get(b)); | |
} | |
System.out.println("stringBuilder(就是哈夫曼编码后的串)=" + stringBuilder); | |
// 定义就是需要多少个 byte 来存储,这样就可以定义 byte [] 的大小了 | |
// 也可以一句话 len = (stringBuilder.length ()+7) / 8 | |
int len; | |
if (stringBuilder.length() % 8 == 0) { | |
len = stringBuilder.length() / 8; | |
} else { | |
len = stringBuilder.length() / 8 + 1; | |
} | |
// 用于存储压缩后的 byte | |
byte[] by = new byte[len]; | |
// 记录新 byte 的位置 | |
int index = 0; | |
for(int i=0;i<stringBuilder.length();i+=8) { | |
String strByte; | |
if(i+8>stringBuilder.length()) { | |
strByte = stringBuilder.substring(i); | |
}else { | |
strByte = stringBuilder.substring(i, i+8); | |
} | |
byte byt = (byte)Integer.parseInt(strByte, 2); | |
by[index]=byt; | |
index++; | |
} | |
return by; | |
} | |
/** | |
* | |
* @param bytes byte 数组,就是内容字符串对应的 byte 数组 | |
* @return List<Node> 形式如 {Node {'i', 3}, Node {'a', 5}...} | |
*/ | |
private static List<Node> getNodes(byte[] bytes) { | |
List<Node> nodes = new ArrayList<>(); | |
// 存储每一个 byte 出现了多少次。 | |
Map<Byte, Integer> counts = new HashMap<>(); | |
// 统计每一个 byte 出现的次数 | |
for(byte b:bytes) { | |
Integer count = counts.get(b); | |
if(count==null) { | |
counts.put(b, 1); | |
}else { | |
counts.put(b, count+1); | |
} | |
} | |
// 把每一个键值对转为一个 node 对象,并加入到 nodes 集合 | |
for(Map.Entry<Byte, Integer> entry:counts.entrySet()) { | |
nodes.add(new Node(entry.getKey(), entry.getValue())); | |
} | |
return nodes; | |
} | |
/** | |
* 创建赫夫曼树 | |
* @param nodes 传入的是一个 node 集合 | |
* @return 返回赫夫曼树的根节点 | |
*/ | |
private static Node createHuffmanTree(List<Node> nodes) { | |
// 循环处理, | |
while (nodes.size() > 1) { // 保证可以 get (0) 和 get (1) | |
// 排序 | |
// 说明 | |
// 1. 需要 nodes 集合存放的对象实现 Comparable 接口 | |
Collections.sort(nodes); | |
// 取出来权值最小的两个二叉树 | |
Node left = nodes.get(0); | |
// 取出最权值次小的二叉树,作为新的二叉树的右子树 | |
Node right = nodes.get(1); | |
// 创建一颗新的二叉树 , 新的节点 data 没有,权值为两颗子树权值和 | |
Node parent = new Node(null, left.weight + right.weight); | |
// 把之前取出来的两颗二叉树设置为新创建的二叉树的子树 | |
parent.left = left; | |
parent.right = right; | |
// 把取出来的两个二叉树移除 | |
nodes.remove(left); | |
nodes.remove(right); | |
// 放入原来的二叉树集合中 | |
nodes.add(parent); | |
} | |
// 返回的节点就是赫夫曼树的根节点. | |
return nodes.get(0); | |
} | |
} | |
// 实现 Comparable<Node> 接口是让 Node 对象可以进行排序 | |
class Node implements Comparable<Node> { | |
Byte data; // 数据本身,char 本质就是 Byte | |
int weight; // 可以理解成权值,即字符出现的次数 | |
Node left; | |
Node right; | |
public Node(Byte data, int weight) { | |
this.data = data; | |
this.weight = weight; | |
} | |
@Override | |
public int compareTo(Node node) { | |
// 这样写是从小到大排序 | |
return this.weight - node.weight; | |
} | |
@Override | |
public String toString() { | |
return "Node [data=" + data + ", weight=" + weight + "]"; | |
} | |
// 前序遍历 | |
public void preOrder() { | |
System.out.println(this);// 先输出父节点 | |
if (this.left != null) { | |
this.left.preOrder(); | |
} | |
if (this.right != null) { | |
this.right.preOrder(); | |
} | |
} | |
} |
# 最佳实践 - 数据解压 (使用赫夫曼编码解码)
使用赫夫曼编码来解码数据,具体要求是
- 前面我们得到了赫夫曼编码和对应的编码 byte [] , 即:[-88, -65, -56, -65, -56, -65, -55, 77
, -57, 6, -24, -14, -117, -4, -60, -90, 28] - 现在要求使用赫夫曼编码, 进行解码,又
重新得到原来的字符串 "i like like likejava do you like a java"
思路:解码过程,就是编码的一个逆向操作。
代码实现:
/** | |
* @author 窦凯欣 | |
* @version 1.0 | |
* @2023/7/521:26 | |
* @comment | |
*/ | |
@SuppressWarnings("all") | |
public class HuffmanTreeCode { | |
public static void main(String[] args) { | |
String content = "i like like like java do you like a java"; | |
byte[] contentBytes = content.getBytes(); | |
System.out.println(contentBytes.length);//40 | |
byte[] huffmanCodeBytes = huffmanZip(contentBytes); | |
System.out.println("压缩后的结果是:" + Arrays.toString(huffmanCodeBytes)); | |
byte[] sourceBytes = decode(huffmanCodes, huffmanCodeBytes); | |
System.out.println("原来的字符串" + new String(sourceBytes)); | |
// 分步过程 | |
/* | |
List<Node01> list = getNodes (contentBytes); | |
System.out.println (list); | |
System.out.println ("---------------- 赫夫曼树 ----------------"); | |
Node01 huffmanTree = createHuffmanTree (list); | |
System.out.println ("前序遍历"); | |
preOrder (huffmanTree); | |
// 测试是否生成了对应的赫夫曼编码 | |
Map<Byte, String> codes = getCodes (huffmanTree); | |
System.out.println ("生成的赫夫曼编码表:"+codes); | |
byte [] huffmanCodeBytes = zip (contentBytes,huffmanCodes); | |
System.out.println ("huffmanCodeBytes:"+Arrays.toString (huffmanCodeBytes)); | |
*/ | |
} | |
/** | |
* 编写一个方法,完成对压缩数据的解码 | |
* | |
* @param huffmanCodes 赫夫曼编码表 map | |
* @param huffmanBytes 赫夫曼编码得到的字节数组 | |
* @return 就是原来的字符串对应的数组 | |
*/ | |
private static byte[] decode(Map<Byte, String> huffmanCodes, byte[] huffmanBytes) { | |
StringBuilder stringBuilder = new StringBuilder(); | |
for (int i = 0; i < huffmanBytes.length; i++) { | |
byte b = huffmanBytes[i]; | |
boolean flag = (i == huffmanBytes.length - 1); | |
stringBuilder.append(byteToBitString(!flag, b)); | |
} | |
// System.out.println ("赫夫曼字节数组对应的二进制字符串:"+stringBuilder.toString ()); | |
// 把字符串按照指定的赫夫曼编码进行解码 | |
// 把赫夫曼编码表进行调换,因为反向查询 a -> 100 100 -> a | |
Map<String, Byte> map = new HashMap<>(); | |
for (Map.Entry<Byte, String> entry : huffmanCodes.entrySet()) { | |
map.put(entry.getValue(), entry.getKey()); | |
} | |
// 创建集合,存放 byte | |
List<Byte> list = new ArrayList<>(); | |
for (int i = 0; i < stringBuilder.length(); ) { | |
int count = 1;// 小的计数器 | |
boolean flag = true; | |
Byte b = null; | |
while (flag) { | |
// 先取出一个 '1','0' | |
String key = stringBuilder.substring(i, i + count);//i 不动,让 count 移动 匹配字符 | |
b = map.get(key); | |
if (b == null) {//b == null 说明没有匹配到 | |
count++; | |
} else {// 说明 匹配到了 | |
flag = false; | |
} | |
} | |
list.add(b); | |
i += count;//i 直接移动到 count 位置 | |
} | |
// 当 for 循环结束后 list 中就存放了所有的字符 i like like like java do you like a java | |
// 把 list 中 的数据放入 byte 数组并返回 | |
byte[] b = new byte[list.size()]; | |
for (int i = 0; i < b.length; i++) { | |
b[i] = list.get(i); | |
} | |
return b; | |
} | |
/** | |
* 将一个 byte 转成一个二进制的字符串 | |
* | |
* @param flag 标志是否需要补高位如果是 true,需要,false,不需要 | |
* @param b 传入的 byte | |
* @return b 对应的二进制的字符串 (注意是按补码返回) | |
*/ | |
private static String byteToBitString(boolean flag, byte b) { | |
// 使用变量保存 b, 将 b 转换成 int | |
int temp = b; | |
// 判断是正数则需要补高位 | |
if (flag) { | |
temp |= 256; | |
// 说明:按位与 256 1 0000 0000 | 0000 0001 => 1 0000 0001 | |
} | |
// 返回的是 temp 对应的二进制的补码 | |
String str = Integer.toBinaryString(temp); | |
if (flag) { | |
return str.substring(str.length() - 8); | |
} else { | |
return str; | |
} | |
} | |
// 使用一个方法,将前面的方法封装起来,便于我们的调用 | |
/** | |
* @param bytes 原始的字符串对应的字节数组 | |
* @return 是经过赫夫曼编码处理后的字节数组(压缩后的数组) | |
*/ | |
private static byte[] huffmanZip(byte[] bytes) { | |
List<Node01> nodes = getNodes(bytes); | |
// 根据 nodes 创建的赫夫曼树 | |
Node01 huffmanTreeRoot = createHuffmanTree(nodes); | |
// 对应的赫夫曼编码 (根据 赫夫曼树) | |
Map<Byte, String> huffmanCodes = getCodes(huffmanTreeRoot); | |
// 根据生成的赫夫曼编码,压缩得到压缩后的赫夫曼编码字节数组 | |
byte[] huffmanCodeBytes = zip(bytes, huffmanCodes); | |
return huffmanCodeBytes; | |
} | |
// 编写一个方法,将字符串对应的 byte [] 数组,通过生成的赫夫曼编码表,返回一个赫夫曼编码 压缩后的 byte [] | |
/** | |
* @param bytes 这时原始的字符串对应的 byte [] | |
* @param huffmanCodes 生成的赫夫曼编码 map | |
* @return 返回赫夫曼编码处理后的 byte [] | |
* 举例: String content = "i like like like java do you like a java"; =》 byte [] contentBytes = content.getBytes (); | |
* 返回的是 字符串 "1010100010111111110010001011111111001000101111111100100101001101110001110000011011101000111100101000101111111100110001001010011011100" | |
* => 对应的 byte [] huffmanCodeBytes ,即 8 位对应一个 byte, 放入到 huffmanCodeBytes | |
* huffmanCodeBytes [0] = 10101000 (补码) => byte [推导 10101000=> 10101000 - 1 => 10100111 (反码)=> 11011000= -88 ] | |
* huffmanCodeBytes [1] = -88 | |
*/ | |
private static byte[] zip(byte[] bytes, Map<Byte, String> huffmanCodes) { | |
//1. 利用 huffmanCodes 将 bytes 转成 赫夫曼编码对应的字符串 | |
StringBuilder stringBuilder = new StringBuilder(); | |
// 遍历 bytes 数组 | |
for (byte b : bytes) { | |
stringBuilder.append(huffmanCodes.get(b)); | |
} | |
//System.out.println ("测试 stringBuilder~~~=" + stringBuilder.toString ()); | |
// 将 "1010100010111111110..." 转成 byte [] | |
// 统计返回 byte [] huffmanCodeBytes 长度 | |
// 一句话 int len = (stringBuilder.length () + 7) / 8; | |
int len; | |
if (stringBuilder.length() % 8 == 0) { | |
len = stringBuilder.length() / 8; | |
} else { | |
len = stringBuilder.length() / 8 + 1; | |
} | |
// 创建 存储压缩后的 byte 数组 | |
byte[] huffmanCodeBytes = new byte[len]; | |
int index = 0;// 记录是第几个 byte | |
for (int i = 0; i < stringBuilder.length(); i += 8) { // 因为是每 8 位对应一个 byte, 所以步长 +8 | |
String strByte; | |
if (i + 8 > stringBuilder.length()) {// 不够 8 位 | |
strByte = stringBuilder.substring(i); | |
} else { | |
strByte = stringBuilder.substring(i, i + 8); | |
} | |
// 将 strByte 转成一个 byte, 放入到 huffmanCodeBytes | |
huffmanCodeBytes[index] = (byte) Integer.parseInt(strByte, 2); | |
index++; | |
} | |
return huffmanCodeBytes; | |
} | |
// 生成赫夫曼树对应的赫夫曼编码 | |
// 思路: | |
//1. 将赫夫曼编码表存放在 Map<Byte,String> 形式 | |
//{32=01, 97=100, 100=11000, 117=11001, 101=1110, 118=11011, 105=101, 121=11010, 106=0010, 107=1111, 108=000, 111=0011} 等等 [形式] | |
static Map<Byte, String> huffmanCodes = new HashMap<>(); | |
//2. 在生成赫夫曼编码表时,需要去拼接路径,定义一个 StringBuilder,存储某个叶子节点的路径 | |
static StringBuilder stringBuilder = new StringBuilder(); | |
private static Map<Byte, String> getCodes(Node01 root) { | |
if (root == null) { | |
return null; | |
} | |
// 处理 root 的左子树 | |
getCodes(root.left, "0", stringBuilder); | |
// 处理 root 的右子树 | |
getCodes(root.right, "1", stringBuilder); | |
return huffmanCodes; | |
} | |
/** | |
* 功能:将传入的 Node 节点的所有叶子节点的赫夫曼编码存放到,并放入到 huffmanCodes 集合 | |
* | |
* @param node 传入节点 | |
* @param code 路径:左子节点是 0,右子节点是 1 | |
* @param stringBuilder 用于拼接路径 | |
*/ | |
private static void getCodes(Node01 node, String code, StringBuilder stringBuilder) { | |
StringBuilder stringBuilder2 = new StringBuilder(stringBuilder); | |
// 将 code,加入到 stringBuilder2 中 | |
stringBuilder2.append(code); | |
if (node != null) { | |
// 判断当前 node, 是叶子节点还是非叶子节点 | |
if (node.data == null) { | |
// 非叶子节点 | |
// 递归处理 | |
// 向左递归 | |
getCodes(node.left, "0", stringBuilder2); | |
// 向右递归 | |
getCodes(node.right, "1", stringBuilder2); | |
} else { | |
// 说明是叶子节点 | |
// 表示找到了某个叶子节点的最后 | |
huffmanCodes.put(node.data, stringBuilder2.toString()); | |
} | |
} | |
} | |
// 前序遍历 | |
private static void preOrder(Node01 root) { | |
if (root != null) { | |
root.preOrder(); | |
} else { | |
System.out.println("赫夫曼树为空"); | |
} | |
} | |
/** | |
* @param bytes bytes 接受字节数组 | |
* @return 返回的就是 List 形式 | |
*/ | |
private static List<Node01> getNodes(byte[] bytes) { | |
//1. 创建一个 ArrayList | |
List<Node01> list = new ArrayList<>(); | |
// 遍历 list,统计每一个 byte 出现的次数 -> map [key,value] | |
Map<Byte, Integer> map = new HashMap<>(); | |
for (byte b : bytes) { | |
Integer count = map.get(b); | |
//Map 还没有这个字符数据,第一次则执行如下 | |
if (count == null) { | |
map.put(b, 1); | |
} else {// 已经存在了执行如下 | |
map.put(b, count + 1); | |
} | |
} | |
// 把每一个键值对转成一个 Node 对象,并加入 list 集合 | |
// 遍历 map | |
for (Map.Entry<Byte, Integer> entry : map.entrySet()) { | |
list.add(new Node01(entry.getKey(), entry.getValue())); | |
} | |
return list; | |
} | |
// 通过 List 创建赫夫曼树 | |
private static Node01 createHuffmanTree(List<Node01> list) { | |
while (list.size() > 1) { | |
// 排序,从小到大 | |
Collections.sort(list); | |
// 取出第一棵最小的二叉树 | |
Node01 leftNode = list.get(0); | |
// 取出第二棵最小的二叉树 | |
Node01 rightNode = list.get(1); | |
// 创建一颗新的二叉树,它的根节点 没有 data,只有权值 | |
Node01 parent = new Node01(null, leftNode.weight + rightNode.weight); | |
parent.left = leftNode; | |
parent.right = rightNode; | |
// 将处理过的两颗二叉树从 list 中移除 | |
list.remove(leftNode); | |
list.remove(rightNode); | |
// 将新的二叉树加入到 list 集合中 | |
list.add(parent); | |
} | |
return list.get(0); | |
} | |
} | |
@SuppressWarnings("all") | |
class Node01 implements Comparable<Node01> { | |
Byte data; | |
int weight; | |
Node01 left; | |
Node01 right; | |
public Node01(Byte data, int weight) { | |
this.data = data; | |
this.weight = weight; | |
} | |
@Override | |
public int compareTo(Node01 o) { | |
return this.weight - o.weight; | |
} | |
public void preOrder() { | |
System.out.println(this); | |
if (this.left != null) { | |
this.left.preOrder(); | |
} | |
if (this.right != null) { | |
this.right.preOrder(); | |
} | |
} | |
@Override | |
public String toString() { | |
return "Node[data = " + data + " , weight = " + weight + "]"; | |
} | |
} |
# 最佳实践 - 文件压缩
我们学习了通过赫夫曼编码对一个字符串进行编码和解码,下面我们来完成对文件的压缩和解压, 具体要求:给你一个图片文件,要求对其进行无损压缩,看看压缩效果如何。
思路:读取文件 -> 得到赫夫曼编码表 -> 完成压缩
代码实现:
/** | |
* 编写方法,将一个文件进行压缩 | |
* @param srcFile 你传入的希望压缩的文件的全路径 | |
* @param dstFile 我们压缩后将压缩文件放到哪个目录 | |
*/ | |
private static void zipFile(String srcFile,String dstFile){ | |
// 创建输出流 | |
OutputStream os = null; | |
ObjectOutputStream oos = null; | |
// 创建文件的输入流 | |
FileInputStream is = null; | |
try{ | |
// 创建文件的输入流 | |
is = new FileInputStream(srcFile); | |
// 创建一个和源文件大小一样的 byte [] | |
byte[] b = new byte[is.available()]; | |
// 读取文件 | |
is.read(b); | |
// 获取到文件对应的赫夫曼编码表 | |
// 直接对原文件进行压缩 | |
byte[] huffmanBytes = huffmanZip(b); | |
// 创建文件的输出流,存放压缩文件 | |
os = new FileOutputStream(dstFile); | |
// 创建一个和文件输出流关联的 ObjectOutputStream | |
oos = new ObjectOutputStream(os); | |
// 把赫夫曼编码后的字节数组写入压缩文件 | |
oos.writeObject(huffmanBytes); | |
// 以对象流形式写入赫夫曼编码,为了解压 (恢复源文件) 时使用 | |
// 注意:一定要把赫夫曼编码,写入压缩文件 | |
oos.writeObject(huffmanCodes); | |
}catch(IOException e){ | |
System.out.println(e.getMessage()); | |
}finally{ | |
// 关闭流,释放资源 | |
try{ | |
if(is != null){ | |
is.close(); | |
os.close(); | |
oos.close(); | |
} | |
}catch(IOException e){ | |
System.out.println(e.getMessage()); | |
} | |
} | |
} |
完整代码:
/** | |
* @author 窦凯欣 | |
* @version 1.0 | |
* @2023/7/521:26 | |
* @comment | |
*/ | |
@SuppressWarnings("all") | |
public class HuffmanTreeCode { | |
public static void main(String[] args) { | |
// 测试压缩文件 | |
String srcFile = "E://src.bmp"; | |
String dstFile = "E://dst.zip"; | |
zipFile(srcFile,dstFile); | |
System.out.println("压缩文件OK"); | |
} | |
/** | |
* 编写方法,将一个文件进行压缩 | |
* @param srcFile 你传入的希望压缩的文件的全路径 | |
* @param dstFile 我们压缩后将压缩文件放到哪个目录 | |
*/ | |
private static void zipFile(String srcFile,String dstFile){ | |
// 创建输出流 | |
OutputStream os = null; | |
ObjectOutputStream oos = null; | |
// 创建文件的输入流 | |
FileInputStream is = null; | |
try{ | |
// 创建文件的输入流 | |
is = new FileInputStream(srcFile); | |
// 创建一个和源文件大小一样的 byte [] | |
byte[] b = new byte[is.available()]; | |
// 读取文件 | |
is.read(b); | |
// 获取到文件对应的赫夫曼编码表 | |
// 直接对原文件进行压缩 | |
byte[] huffmanBytes = huffmanZip(b); | |
// 创建文件的输出流,存放压缩文件 | |
os = new FileOutputStream(dstFile); | |
// 创建一个和文件输出流关联的 ObjectOutputStream | |
oos = new ObjectOutputStream(os); | |
// 把赫夫曼编码后的字节数组写入压缩文件 | |
oos.writeObject(huffmanBytes); | |
// 以对象流形式写入赫夫曼编码,为了解压 (恢复源文件) 时使用 | |
// 注意:一定要把赫夫曼编码,写入压缩文件 | |
oos.writeObject(huffmanCodes); | |
}catch(IOException e){ | |
System.out.println(e.getMessage()); | |
}finally{ | |
// 关闭流,释放资源 | |
try{ | |
if(is != null){ | |
is.close(); | |
os.close(); | |
oos.close(); | |
} | |
}catch(IOException e){ | |
System.out.println(e.getMessage()); | |
} | |
} | |
} | |
/** | |
* 编写一个方法,完成对压缩数据的解码 | |
* | |
* @param huffmanCodes 赫夫曼编码表 map | |
* @param huffmanBytes 赫夫曼编码得到的字节数组 | |
* @return 就是原来的字符串对应的数组 | |
*/ | |
private static byte[] decode(Map<Byte, String> huffmanCodes, byte[] huffmanBytes) { | |
StringBuilder stringBuilder = new StringBuilder(); | |
for (int i = 0; i < huffmanBytes.length; i++) { | |
byte b = huffmanBytes[i]; | |
boolean flag = (i == huffmanBytes.length - 1); | |
stringBuilder.append(byteToBitString(!flag, b)); | |
} | |
// System.out.println ("赫夫曼字节数组对应的二进制字符串:"+stringBuilder.toString ()); | |
// 把字符串按照指定的赫夫曼编码进行解码 | |
// 把赫夫曼编码表进行调换,因为反向查询 a -> 100 100 -> a | |
Map<String, Byte> map = new HashMap<>(); | |
for (Map.Entry<Byte, String> entry : huffmanCodes.entrySet()) { | |
map.put(entry.getValue(), entry.getKey()); | |
} | |
// 创建集合,存放 byte | |
List<Byte> list = new ArrayList<>(); | |
for (int i = 0; i < stringBuilder.length(); ) { | |
int count = 1;// 小的计数器 | |
boolean flag = true; | |
Byte b = null; | |
while (flag) { | |
// 先取出一个 '1','0' | |
String key = stringBuilder.substring(i, i + count);//i 不动,让 count 移动 匹配字符 | |
b = map.get(key); | |
if (b == null) {//b == null 说明没有匹配到 | |
count++; | |
} else {// 说明 匹配到了 | |
flag = false; | |
} | |
} | |
list.add(b); | |
i += count;//i 直接移动到 count 位置 | |
} | |
// 当 for 循环结束后 list 中就存放了所有的字符 i like like like java do you like a java | |
// 把 list 中 的数据放入 byte 数组并返回 | |
byte[] b = new byte[list.size()]; | |
for (int i = 0; i < b.length; i++) { | |
b[i] = list.get(i); | |
} | |
return b; | |
} | |
/** | |
* 将一个 byte 转成一个二进制的字符串 | |
* | |
* @param flag 标志是否需要补高位如果是 true,需要,false,不需要 | |
* @param b 传入的 byte | |
* @return b 对应的二进制的字符串 (注意是按补码返回) | |
*/ | |
private static String byteToBitString(boolean flag, byte b) { | |
// 使用变量保存 b, 将 b 转换成 int | |
int temp = b; | |
// 判断是正数则需要补高位 | |
if (flag) { | |
temp |= 256; | |
// 说明:按位与 256 1 0000 0000 | 0000 0001 => 1 0000 0001 | |
} | |
// 返回的是 temp 对应的二进制的补码 | |
String str = Integer.toBinaryString(temp); | |
if (flag) { | |
return str.substring(str.length() - 8); | |
} else { | |
return str; | |
} | |
} | |
// 使用一个方法,将前面的方法封装起来,便于我们的调用 | |
/** | |
* @param bytes 原始的字符串对应的字节数组 | |
* @return 是经过赫夫曼编码处理后的字节数组(压缩后的数组) | |
*/ | |
private static byte[] huffmanZip(byte[] bytes) { | |
List<Node01> nodes = getNodes(bytes); | |
// 根据 nodes 创建的赫夫曼树 | |
Node01 huffmanTreeRoot = createHuffmanTree(nodes); | |
// 对应的赫夫曼编码 (根据 赫夫曼树) | |
Map<Byte, String> huffmanCodes = getCodes(huffmanTreeRoot); | |
// 根据生成的赫夫曼编码,压缩得到压缩后的赫夫曼编码字节数组 | |
byte[] huffmanCodeBytes = zip(bytes, huffmanCodes); | |
return huffmanCodeBytes; | |
} | |
// 编写一个方法,将字符串对应的 byte [] 数组,通过生成的赫夫曼编码表,返回一个赫夫曼编码 压缩后的 byte [] | |
/** | |
* @param bytes 这时原始的字符串对应的 byte [] | |
* @param huffmanCodes 生成的赫夫曼编码 map | |
* @return 返回赫夫曼编码处理后的 byte [] | |
* 举例: String content = "i like like like java do you like a java"; =》 byte [] contentBytes = content.getBytes (); | |
* 返回的是 字符串 "1010100010111111110010001011111111001000101111111100100101001101110001110000011011101000111100101000101111111100110001001010011011100" | |
* => 对应的 byte [] huffmanCodeBytes ,即 8 位对应一个 byte, 放入到 huffmanCodeBytes | |
* huffmanCodeBytes [0] = 10101000 (补码) => byte [推导 10101000=> 10101000 - 1 => 10100111 (反码)=> 11011000= -88 ] | |
* huffmanCodeBytes [1] = -88 | |
*/ | |
private static byte[] zip(byte[] bytes, Map<Byte, String> huffmanCodes) { | |
//1. 利用 huffmanCodes 将 bytes 转成 赫夫曼编码对应的字符串 | |
StringBuilder stringBuilder = new StringBuilder(); | |
// 遍历 bytes 数组 | |
for (byte b : bytes) { | |
stringBuilder.append(huffmanCodes.get(b)); | |
} | |
//System.out.println ("测试 stringBuilder~~~=" + stringBuilder.toString ()); | |
// 将 "1010100010111111110..." 转成 byte [] | |
// 统计返回 byte [] huffmanCodeBytes 长度 | |
// 一句话 int len = (stringBuilder.length () + 7) / 8; | |
int len; | |
if (stringBuilder.length() % 8 == 0) { | |
len = stringBuilder.length() / 8; | |
} else { | |
len = stringBuilder.length() / 8 + 1; | |
} | |
// 创建 存储压缩后的 byte 数组 | |
byte[] huffmanCodeBytes = new byte[len]; | |
int index = 0;// 记录是第几个 byte | |
for (int i = 0; i < stringBuilder.length(); i += 8) { // 因为是每 8 位对应一个 byte, 所以步长 +8 | |
String strByte; | |
if (i + 8 > stringBuilder.length()) {// 不够 8 位 | |
strByte = stringBuilder.substring(i); | |
} else { | |
strByte = stringBuilder.substring(i, i + 8); | |
} | |
// 将 strByte 转成一个 byte, 放入到 huffmanCodeBytes | |
huffmanCodeBytes[index] = (byte) Integer.parseInt(strByte, 2); | |
index++; | |
} | |
return huffmanCodeBytes; | |
} | |
// 生成赫夫曼树对应的赫夫曼编码 | |
// 思路: | |
//1. 将赫夫曼编码表存放在 Map<Byte,String> 形式 | |
//{32=01, 97=100, 100=11000, 117=11001, 101=1110, 118=11011, 105=101, 121=11010, 106=0010, 107=1111, 108=000, 111=0011} 等等 [形式] | |
static Map<Byte, String> huffmanCodes = new HashMap<>(); | |
//2. 在生成赫夫曼编码表时,需要去拼接路径,定义一个 StringBuilder,存储某个叶子节点的路径 | |
static StringBuilder stringBuilder = new StringBuilder(); | |
private static Map<Byte, String> getCodes(Node01 root) { | |
if (root == null) { | |
return null; | |
} | |
// 处理 root 的左子树 | |
getCodes(root.left, "0", stringBuilder); | |
// 处理 root 的右子树 | |
getCodes(root.right, "1", stringBuilder); | |
return huffmanCodes; | |
} | |
/** | |
* 功能:将传入的 Node 节点的所有叶子节点的赫夫曼编码存放到,并放入到 huffmanCodes 集合 | |
* | |
* @param node 传入节点 | |
* @param code 路径:左子节点是 0,右子节点是 1 | |
* @param stringBuilder 用于拼接路径 | |
*/ | |
private static void getCodes(Node01 node, String code, StringBuilder stringBuilder) { | |
StringBuilder stringBuilder2 = new StringBuilder(stringBuilder); | |
// 将 code,加入到 stringBuilder2 中 | |
stringBuilder2.append(code); | |
if (node != null) { | |
// 判断当前 node, 是叶子节点还是非叶子节点 | |
if (node.data == null) { | |
// 非叶子节点 | |
// 递归处理 | |
// 向左递归 | |
getCodes(node.left, "0", stringBuilder2); | |
// 向右递归 | |
getCodes(node.right, "1", stringBuilder2); | |
} else { | |
// 说明是叶子节点 | |
// 表示找到了某个叶子节点的最后 | |
huffmanCodes.put(node.data, stringBuilder2.toString()); | |
} | |
} | |
} | |
// 前序遍历 | |
private static void preOrder(Node01 root) { | |
if (root != null) { | |
root.preOrder(); | |
} else { | |
System.out.println("赫夫曼树为空"); | |
} | |
} | |
/** | |
* @param bytes bytes 接受字节数组 | |
* @return 返回的就是 List 形式 | |
*/ | |
private static List<Node01> getNodes(byte[] bytes) { | |
//1. 创建一个 ArrayList | |
List<Node01> list = new ArrayList<>(); | |
// 遍历 list,统计每一个 byte 出现的次数 -> map [key,value] | |
Map<Byte, Integer> map = new HashMap<>(); | |
for (byte b : bytes) { | |
Integer count = map.get(b); | |
//Map 还没有这个字符数据,第一次则执行如下 | |
if (count == null) { | |
map.put(b, 1); | |
} else {// 已经存在了执行如下 | |
map.put(b, count + 1); | |
} | |
} | |
// 把每一个键值对转成一个 Node 对象,并加入 list 集合 | |
// 遍历 map | |
for (Map.Entry<Byte, Integer> entry : map.entrySet()) { | |
list.add(new Node01(entry.getKey(), entry.getValue())); | |
} | |
return list; | |
} | |
// 通过 List 创建赫夫曼树 | |
private static Node01 createHuffmanTree(List<Node01> list) { | |
while (list.size() > 1) { | |
// 排序,从小到大 | |
Collections.sort(list); | |
// 取出第一棵最小的二叉树 | |
Node01 leftNode = list.get(0); | |
// 取出第二棵最小的二叉树 | |
Node01 rightNode = list.get(1); | |
// 创建一颗新的二叉树,它的根节点 没有 data,只有权值 | |
Node01 parent = new Node01(null, leftNode.weight + rightNode.weight); | |
parent.left = leftNode; | |
parent.right = rightNode; | |
// 将处理过的两颗二叉树从 list 中移除 | |
list.remove(leftNode); | |
list.remove(rightNode); | |
// 将新的二叉树加入到 list 集合中 | |
list.add(parent); | |
} | |
return list.get(0); | |
} | |
} | |
@SuppressWarnings("all") | |
class Node01 implements Comparable<Node01> { | |
Byte data; | |
int weight; | |
Node01 left; | |
Node01 right; | |
public Node01(Byte data, int weight) { | |
this.data = data; | |
this.weight = weight; | |
} | |
@Override | |
public int compareTo(Node01 o) { | |
return this.weight - o.weight; | |
} | |
public void preOrder() { | |
System.out.println(this); | |
if (this.left != null) { | |
this.left.preOrder(); | |
} | |
if (this.right != null) { | |
this.right.preOrder(); | |
} | |
} | |
@Override | |
public String toString() { | |
return "Node[data = " + data + " , weight = " + weight + "]"; | |
} | |
} |
# 最佳实践 —— 文件解压 (文件恢复)
具体要求:将前面压缩的文件,重新恢复成原来的文件。
思路:读取压缩文件 (数据和赫夫曼编码表) -> 完成解压 (文件恢复)
/** | |
* 完成对压缩文件的解压 | |
* @param zipFile 准备解压的文件 | |
* @param dstFile 将文件解压到哪个路径 | |
*/ | |
private static void unZipFile(String zipFile,String dstFile){ | |
InputStream is = null; | |
ObjectInputStream ois = null; | |
OutputStream os = null; | |
try{ | |
is = new FileInputStream(zipFile); | |
ois = new ObjectInputStream(is); | |
// 读取 byte 数组 huffmanBytes | |
byte[] huffmanBytes = (byte[]) ois.readObject(); | |
// 读取赫夫曼编码表 | |
Map<Byte,String> huffmanCodes = (Map<Byte,String>) ois.readObject(); | |
// 解码 | |
byte[] bytes = decode(huffmanCodes,huffmanBytes); | |
// 将 bytes, 数组写入到目标文件 | |
os = new FileOutputStream(dstFile); | |
// 写出数据到文件中 | |
os.write(bytes); | |
}catch(Exception e){ | |
System.out.println(e.getMessage()); | |
}finally{ | |
// 关闭流,释放资源 | |
try{ | |
if(os != null){ | |
os.close(); | |
} | |
if(ois != null){ | |
ois.close(); | |
} | |
if(is != null){ | |
is.close(); | |
} | |
}catch(Exception e){ | |
System.out.println(e.getMessage()); | |
} | |
} | |
} |
完整代码:
/** | |
* @author 窦凯欣 | |
* @version 1.0 | |
* @2023/7/521:26 | |
* @comment | |
*/ | |
@SuppressWarnings("all") | |
public class HuffmanTreeCode { | |
public static void main(String[] args) { | |
// 测试压缩文件 | |
/* | |
String srcFile = "E://src.bmp"; | |
String dstFile = "E://dst.zip"; | |
zipFile (srcFile,dstFile); | |
System.out.println ("压缩文件 OK"); | |
*/ | |
// 测试解压文件 | |
String zipFile = "E://dst.zip"; | |
String dstFile = "E://srcTwo.bmp"; | |
unZipFile(zipFile,dstFile); | |
System.out.println("解压完毕OK"); | |
} | |
/** | |
* 完成对压缩文件的解压 | |
* @param zipFile 准备解压的文件 | |
* @param dstFile 将文件解压到哪个路径 | |
*/ | |
private static void unZipFile(String zipFile,String dstFile){ | |
InputStream is = null; | |
ObjectInputStream ois = null; | |
OutputStream os = null; | |
try{ | |
is = new FileInputStream(zipFile); | |
ois = new ObjectInputStream(is); | |
// 读取 byte 数组 huffmanBytes | |
byte[] huffmanBytes = (byte[]) ois.readObject(); | |
// 读取赫夫曼编码表 | |
Map<Byte,String> huffmanCodes = (Map<Byte,String>) ois.readObject(); | |
// 解码 | |
byte[] bytes = decode(huffmanCodes,huffmanBytes); | |
// 将 bytes, 数组写入到目标文件 | |
os = new FileOutputStream(dstFile); | |
// 写出数据到文件中 | |
os.write(bytes); | |
}catch(Exception e){ | |
System.out.println(e.getMessage()); | |
}finally{ | |
// 关闭流,释放资源 | |
try{ | |
if(os != null){ | |
os.close(); | |
} | |
if(ois != null){ | |
ois.close(); | |
} | |
if(is != null){ | |
is.close(); | |
} | |
}catch(Exception e){ | |
System.out.println(e.getMessage()); | |
} | |
} | |
} | |
/** | |
* 编写方法,将一个文件进行压缩 | |
* @param srcFile 你传入的希望压缩的文件的全路径 | |
* @param dstFile 我们压缩后将压缩文件放到哪个目录 | |
*/ | |
private static void zipFile(String srcFile,String dstFile){ | |
// 创建输出流 | |
OutputStream os = null; | |
ObjectOutputStream oos = null; | |
// 创建文件的输入流 | |
FileInputStream is = null; | |
try{ | |
// 创建文件的输入流 | |
is = new FileInputStream(srcFile); | |
// 创建一个和源文件大小一样的 byte [] | |
byte[] b = new byte[is.available()]; | |
// 读取文件 | |
is.read(b); | |
// 获取到文件对应的赫夫曼编码表 | |
// 直接对原文件进行压缩 | |
byte[] huffmanBytes = huffmanZip(b); | |
// 创建文件的输出流,存放压缩文件 | |
os = new FileOutputStream(dstFile); | |
// 创建一个和文件输出流关联的 ObjectOutputStream | |
oos = new ObjectOutputStream(os); | |
// 把赫夫曼编码后的字节数组写入压缩文件 | |
oos.writeObject(huffmanBytes); | |
// 以对象流形式写入赫夫曼编码,为了解压 (恢复源文件) 时使用 | |
// 注意:一定要把赫夫曼编码,写入压缩文件 | |
oos.writeObject(huffmanCodes); | |
}catch(IOException e){ | |
System.out.println(e.getMessage()); | |
}finally{ | |
// 关闭流,释放资源 | |
try{ | |
if(is != null){ | |
is.close(); | |
os.close(); | |
oos.close(); | |
} | |
}catch(IOException e){ | |
System.out.println(e.getMessage()); | |
} | |
} | |
} | |
/** | |
* 编写一个方法,完成对压缩数据的解码 | |
* | |
* @param huffmanCodes 赫夫曼编码表 map | |
* @param huffmanBytes 赫夫曼编码得到的字节数组 | |
* @return 就是原来的字符串对应的数组 | |
*/ | |
private static byte[] decode(Map<Byte, String> huffmanCodes, byte[] huffmanBytes) { | |
StringBuilder stringBuilder = new StringBuilder(); | |
for (int i = 0; i < huffmanBytes.length; i++) { | |
byte b = huffmanBytes[i]; | |
boolean flag = (i == huffmanBytes.length - 1); | |
stringBuilder.append(byteToBitString(!flag, b)); | |
} | |
// System.out.println ("赫夫曼字节数组对应的二进制字符串:"+stringBuilder.toString ()); | |
// 把字符串按照指定的赫夫曼编码进行解码 | |
// 把赫夫曼编码表进行调换,因为反向查询 a -> 100 100 -> a | |
Map<String, Byte> map = new HashMap<>(); | |
for (Map.Entry<Byte, String> entry : huffmanCodes.entrySet()) { | |
map.put(entry.getValue(), entry.getKey()); | |
} | |
// 创建集合,存放 byte | |
List<Byte> list = new ArrayList<>(); | |
for (int i = 0; i < stringBuilder.length(); ) { | |
int count = 1;// 小的计数器 | |
boolean flag = true; | |
Byte b = null; | |
while (flag) { | |
// 先取出一个 '1','0' | |
String key = stringBuilder.substring(i, i + count);//i 不动,让 count 移动 匹配字符 | |
b = map.get(key); | |
if (b == null) {//b == null 说明没有匹配到 | |
count++; | |
} else {// 说明 匹配到了 | |
flag = false; | |
} | |
} | |
list.add(b); | |
i += count;//i 直接移动到 count 位置 | |
} | |
// 当 for 循环结束后 list 中就存放了所有的字符 i like like like java do you like a java | |
// 把 list 中 的数据放入 byte 数组并返回 | |
byte[] b = new byte[list.size()]; | |
for (int i = 0; i < b.length; i++) { | |
b[i] = list.get(i); | |
} | |
return b; | |
} | |
/** | |
* 将一个 byte 转成一个二进制的字符串 | |
* | |
* @param flag 标志是否需要补高位如果是 true,需要,false,不需要 | |
* @param b 传入的 byte | |
* @return b 对应的二进制的字符串 (注意是按补码返回) | |
*/ | |
private static String byteToBitString(boolean flag, byte b) { | |
// 使用变量保存 b, 将 b 转换成 int | |
int temp = b; | |
// 判断是正数则需要补高位 | |
if (flag) { | |
temp |= 256; | |
// 说明:按位与 256 1 0000 0000 | 0000 0001 => 1 0000 0001 | |
} | |
// 返回的是 temp 对应的二进制的补码 | |
String str = Integer.toBinaryString(temp); | |
if (flag) { | |
return str.substring(str.length() - 8); | |
} else { | |
return str; | |
} | |
} | |
// 使用一个方法,将前面的方法封装起来,便于我们的调用 | |
/** | |
* @param bytes 原始的字符串对应的字节数组 | |
* @return 是经过赫夫曼编码处理后的字节数组(压缩后的数组) | |
*/ | |
private static byte[] huffmanZip(byte[] bytes) { | |
List<Node01> nodes = getNodes(bytes); | |
// 根据 nodes 创建的赫夫曼树 | |
Node01 huffmanTreeRoot = createHuffmanTree(nodes); | |
// 对应的赫夫曼编码 (根据 赫夫曼树) | |
Map<Byte, String> huffmanCodes = getCodes(huffmanTreeRoot); | |
// 根据生成的赫夫曼编码,压缩得到压缩后的赫夫曼编码字节数组 | |
byte[] huffmanCodeBytes = zip(bytes, huffmanCodes); | |
return huffmanCodeBytes; | |
} | |
// 编写一个方法,将字符串对应的 byte [] 数组,通过生成的赫夫曼编码表,返回一个赫夫曼编码 压缩后的 byte [] | |
/** | |
* @param bytes 这时原始的字符串对应的 byte [] | |
* @param huffmanCodes 生成的赫夫曼编码 map | |
* @return 返回赫夫曼编码处理后的 byte [] | |
* 举例: String content = "i like like like java do you like a java"; =》 byte [] contentBytes = content.getBytes (); | |
* 返回的是 字符串 "1010100010111111110010001011111111001000101111111100100101001101110001110000011011101000111100101000101111111100110001001010011011100" | |
* => 对应的 byte [] huffmanCodeBytes ,即 8 位对应一个 byte, 放入到 huffmanCodeBytes | |
* huffmanCodeBytes [0] = 10101000 (补码) => byte [推导 10101000=> 10101000 - 1 => 10100111 (反码)=> 11011000= -88 ] | |
* huffmanCodeBytes [1] = -88 | |
*/ | |
private static byte[] zip(byte[] bytes, Map<Byte, String> huffmanCodes) { | |
//1. 利用 huffmanCodes 将 bytes 转成 赫夫曼编码对应的字符串 | |
StringBuilder stringBuilder = new StringBuilder(); | |
// 遍历 bytes 数组 | |
for (byte b : bytes) { | |
stringBuilder.append(huffmanCodes.get(b)); | |
} | |
//System.out.println ("测试 stringBuilder~~~=" + stringBuilder.toString ()); | |
// 将 "1010100010111111110..." 转成 byte [] | |
// 统计返回 byte [] huffmanCodeBytes 长度 | |
// 一句话 int len = (stringBuilder.length () + 7) / 8; | |
int len; | |
if (stringBuilder.length() % 8 == 0) { | |
len = stringBuilder.length() / 8; | |
} else { | |
len = stringBuilder.length() / 8 + 1; | |
} | |
// 创建 存储压缩后的 byte 数组 | |
byte[] huffmanCodeBytes = new byte[len]; | |
int index = 0;// 记录是第几个 byte | |
for (int i = 0; i < stringBuilder.length(); i += 8) { // 因为是每 8 位对应一个 byte, 所以步长 +8 | |
String strByte; | |
if (i + 8 > stringBuilder.length()) {// 不够 8 位 | |
strByte = stringBuilder.substring(i); | |
} else { | |
strByte = stringBuilder.substring(i, i + 8); | |
} | |
// 将 strByte 转成一个 byte, 放入到 huffmanCodeBytes | |
huffmanCodeBytes[index] = (byte) Integer.parseInt(strByte, 2); | |
index++; | |
} | |
return huffmanCodeBytes; | |
} | |
// 生成赫夫曼树对应的赫夫曼编码 | |
// 思路: | |
//1. 将赫夫曼编码表存放在 Map<Byte,String> 形式 | |
//{32=01, 97=100, 100=11000, 117=11001, 101=1110, 118=11011, 105=101, 121=11010, 106=0010, 107=1111, 108=000, 111=0011} 等等 [形式] | |
static Map<Byte, String> huffmanCodes = new HashMap<>(); | |
//2. 在生成赫夫曼编码表时,需要去拼接路径,定义一个 StringBuilder,存储某个叶子节点的路径 | |
static StringBuilder stringBuilder = new StringBuilder(); | |
private static Map<Byte, String> getCodes(Node01 root) { | |
if (root == null) { | |
return null; | |
} | |
// 处理 root 的左子树 | |
getCodes(root.left, "0", stringBuilder); | |
// 处理 root 的右子树 | |
getCodes(root.right, "1", stringBuilder); | |
return huffmanCodes; | |
} | |
/** | |
* 功能:将传入的 Node 节点的所有叶子节点的赫夫曼编码存放到,并放入到 huffmanCodes 集合 | |
* | |
* @param node 传入节点 | |
* @param code 路径:左子节点是 0,右子节点是 1 | |
* @param stringBuilder 用于拼接路径 | |
*/ | |
private static void getCodes(Node01 node, String code, StringBuilder stringBuilder) { | |
StringBuilder stringBuilder2 = new StringBuilder(stringBuilder); | |
// 将 code,加入到 stringBuilder2 中 | |
stringBuilder2.append(code); | |
if (node != null) { | |
// 判断当前 node, 是叶子节点还是非叶子节点 | |
if (node.data == null) { | |
// 非叶子节点 | |
// 递归处理 | |
// 向左递归 | |
getCodes(node.left, "0", stringBuilder2); | |
// 向右递归 | |
getCodes(node.right, "1", stringBuilder2); | |
} else { | |
// 说明是叶子节点 | |
// 表示找到了某个叶子节点的最后 | |
huffmanCodes.put(node.data, stringBuilder2.toString()); | |
} | |
} | |
} | |
// 前序遍历 | |
private static void preOrder(Node01 root) { | |
if (root != null) { | |
root.preOrder(); | |
} else { | |
System.out.println("赫夫曼树为空"); | |
} | |
} | |
/** | |
* @param bytes bytes 接受字节数组 | |
* @return 返回的就是 List 形式 | |
*/ | |
private static List<Node01> getNodes(byte[] bytes) { | |
//1. 创建一个 ArrayList | |
List<Node01> list = new ArrayList<>(); | |
// 遍历 list,统计每一个 byte 出现的次数 -> map [key,value] | |
Map<Byte, Integer> map = new HashMap<>(); | |
for (byte b : bytes) { | |
Integer count = map.get(b); | |
//Map 还没有这个字符数据,第一次则执行如下 | |
if (count == null) { | |
map.put(b, 1); | |
} else {// 已经存在了执行如下 | |
map.put(b, count + 1); | |
} | |
} | |
// 把每一个键值对转成一个 Node 对象,并加入 list 集合 | |
// 遍历 map | |
for (Map.Entry<Byte, Integer> entry : map.entrySet()) { | |
list.add(new Node01(entry.getKey(), entry.getValue())); | |
} | |
return list; | |
} | |
// 通过 List 创建赫夫曼树 | |
private static Node01 createHuffmanTree(List<Node01> list) { | |
while (list.size() > 1) { | |
// 排序,从小到大 | |
Collections.sort(list); | |
// 取出第一棵最小的二叉树 | |
Node01 leftNode = list.get(0); | |
// 取出第二棵最小的二叉树 | |
Node01 rightNode = list.get(1); | |
// 创建一颗新的二叉树,它的根节点 没有 data,只有权值 | |
Node01 parent = new Node01(null, leftNode.weight + rightNode.weight); | |
parent.left = leftNode; | |
parent.right = rightNode; | |
// 将处理过的两颗二叉树从 list 中移除 | |
list.remove(leftNode); | |
list.remove(rightNode); | |
// 将新的二叉树加入到 list 集合中 | |
list.add(parent); | |
} | |
return list.get(0); | |
} | |
} | |
@SuppressWarnings("all") | |
class Node01 implements Comparable<Node01> { | |
Byte data; | |
int weight; | |
Node01 left; | |
Node01 right; | |
public Node01(Byte data, int weight) { | |
this.data = data; | |
this.weight = weight; | |
} | |
@Override | |
public int compareTo(Node01 o) { | |
return this.weight - o.weight; | |
} | |
public void preOrder() { | |
System.out.println(this); | |
if (this.left != null) { | |
this.left.preOrder(); | |
} | |
if (this.right != null) { | |
this.right.preOrder(); | |
} | |
} | |
@Override | |
public String toString() { | |
return "Node[data = " + data + " , weight = " + weight + "]"; | |
} | |
} |
# 赫夫曼编码压缩文件注意事项
- 如果文件本身就是经过压缩处理的,那么使用赫夫曼编码再压缩效率不会有明显变化,比如视频,ppt,等等文件
- 赫夫曼编码是按字节来处理的,因此可以处理所有的文件 (二进制,文本文件)
- 如果一个文件中的内容,重复的数据不多,压缩效果也不会很明显
# 二叉排序树
先看一个需求
给你一个数列 {7,3,10,12,5,1,9} ,要求能够高效的完成对数据的查询和添加。
解决方案分析
数组未排序
- 优点:直接在数组尾添加,速度快。
- 缺点:查找速度慢
数组排序
- 优点:可以使用二分查找,查找速度快
- 缺点:为了保证数组有序在添加新数据时,找到插入位置后,后面的数据需要整体移动,速度慢
使用链式存储 —— 链表
不管链表是否有序,查找速度都慢,添加数据速度比数组快,不需要数据整体移动
二叉排序树介绍
二叉排序树:BST:(Binary Sort(Search)Tree),对于二叉排序树的任何一个非叶子结点,要求如下:
- 左子节点的值比当前节点当前节点指的父节点的值小。
- 右子节点的值比当前节点 ^^ 的值大。
特别说明:如果有相同的值,可以将该节点放在左子节点或右子节点。
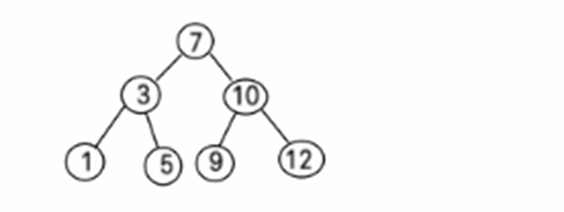
比如针对前面的数据 {7,3,10,12,5,1,9},对应的二叉排序树为:
- 从根节点开始,发现比 7 小,直接往左子树查找,相当于直接折半了。
- 比 3 小,再次折半
- 比 1 大,直接挂在 1 的有节点
# 二叉排序树创建和遍历
一个数组创建成对应的二叉排序树,并使用中序遍历二叉排序树,比如:数组为 Array {7,3,10,12,5,1,9} ,创建成对应的二叉排序树为:
代码实现:
/** | |
* @author 窦凯欣 | |
* @version 1.0 | |
* @2023/7/719:25 | |
* @comment | |
*/ | |
@SuppressWarnings("all") | |
public class BinarySortTree { | |
public static void main(String[] args) { | |
int[] arr = {7, 3, 10, 12, 5, 1, 9}; | |
BinarySort binarySort = new BinarySort(); | |
for (int i = 0; i < arr.length; i++) { | |
binarySort.add(new Node(arr[i])); | |
} | |
System.out.println("------------中序遍历二叉排序树------------"); | |
binarySort.infixOrder(); | |
} | |
} | |
@SuppressWarnings("all") | |
class BinarySort { | |
private Node root; | |
public void add(Node node) { | |
// 判断 root 根节点如果为 null 则将传入的当前赋值为根节点 | |
if (root == null) { | |
root = node; | |
} else { | |
// 调用 add 方法添加传入的节点 | |
root.add(node); | |
} | |
} | |
public void infixOrder() { | |
// 如果根节点不为 null 则开始中序遍历二叉排序树 | |
if (root != null) { | |
root.infixOrder(); | |
} else { | |
System.out.println("二叉排序树为空"); | |
} | |
} | |
} | |
@SuppressWarnings("all") | |
class Node { | |
int value; | |
Node left; | |
Node right; | |
public Node(int value) { | |
this.value = value; | |
} | |
// 添加传入节点 | |
public void add(Node node) { | |
// 判断传入的节点是否为空 | |
if (node == null) { | |
return; | |
} | |
// 判断传入的节点的值是否小于当前节点的值 | |
if (node.value < this.value) { | |
// 判断当前节点的左子节点是否为空 | |
if (this.left == null) { | |
// 为空则将传入的节点赋值到左子节点中 | |
this.left = node; | |
} else { | |
// 向左递归 | |
this.left.add(node); | |
} | |
} else { | |
// 判断当前节点的右子节点是否为空 | |
if (this.right == null) { | |
// 为空将传入的节点赋值到当前节点的右子节点中 | |
this.right = node; | |
} else { | |
// 向右递归 | |
this.right.add(node); | |
} | |
} | |
} | |
// 二叉排序树中序遍历 | |
public void infixOrder() { | |
// 左 | |
if (this.left != null) { | |
this.left.infixOrder(); | |
} | |
// 中 | |
System.out.println(this); | |
// 右 | |
if (this.right != null) { | |
this.right.infixOrder(); | |
} | |
} | |
@Override | |
public String toString() { | |
return "Node{" + | |
"value=" + value + | |
'}'; | |
} | |
} |
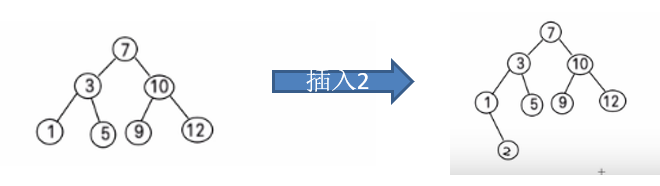
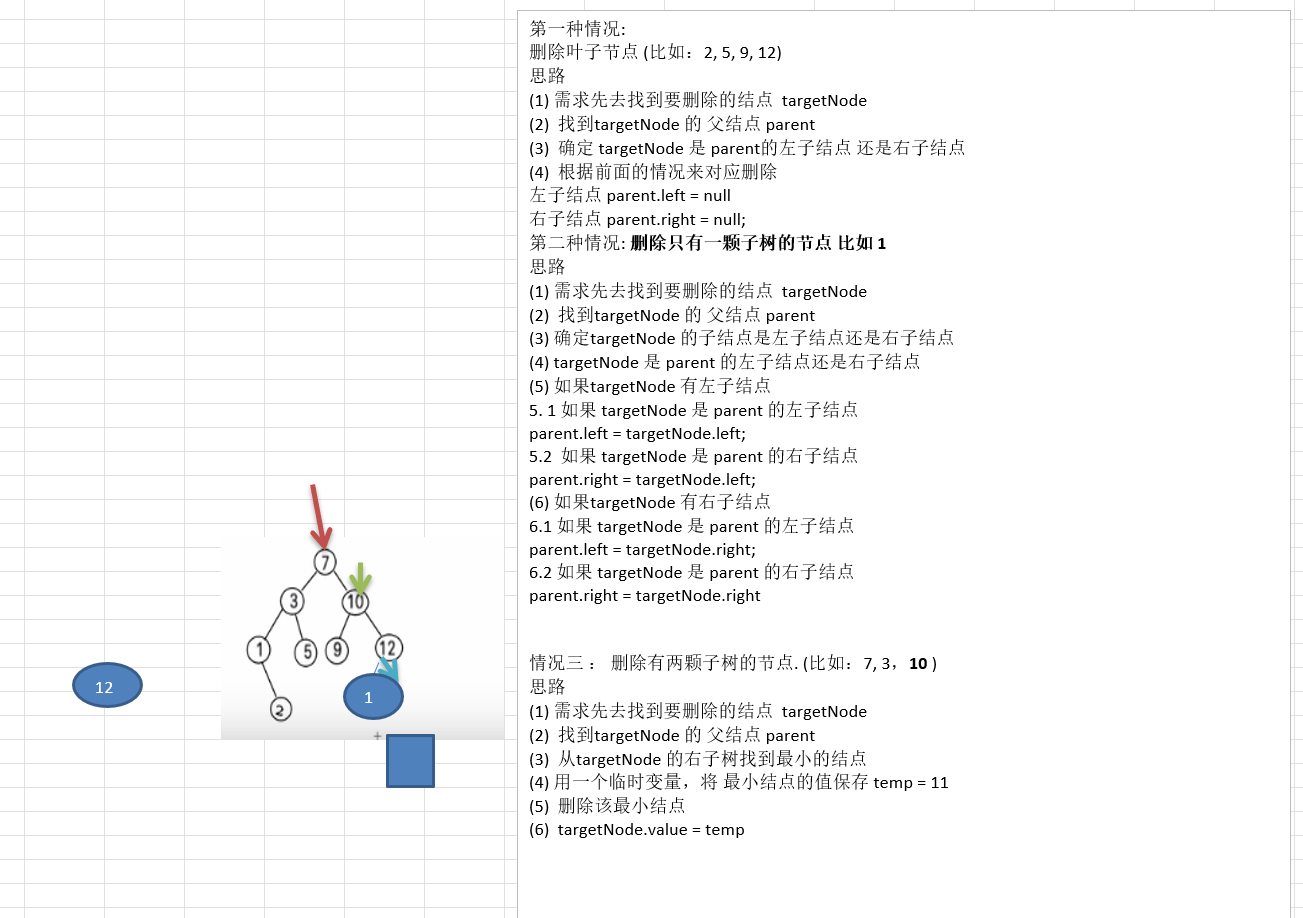
# 二叉排序树的删除
二叉排序树的删除情况比较复杂,有下面三种情况需要考虑
- 删除叶子节点 (比如:2,5,9,12)
- 删除只有一颗子树的节点 (比如:1)
- 删除有两颗子树的节点 (比如:7,3,10)
示意图

# 删除叶子节点
删除的节点是叶子节点,即该节点下没有左右子节点。
思路分析
第一种情况:
删除叶子节点 (比如:2, 5, 9, 12)
思路
(1) 需求先去找到要删除的结点  targetNode
(2)  找到targetNode 的 父结点 parent
(3)  确定 targetNode 是 parent的左子结点 还是右子结点
(4)  根据前面的情况来对应删除
左子结点 parent.left = null
右子结点 parent.right = null;
代码实现
/** | |
* @author 窦凯欣 | |
* @version 1.0 | |
* @2023/7/719:25 | |
* @comment | |
*/ | |
@SuppressWarnings("all") | |
public class BinarySortTree { | |
public static void main(String[] args) { | |
int[] arr = {7, 3, 10, 12, 5, 1, 9}; | |
BinarySort binarySort = new BinarySort(); | |
for (int i = 0; i < arr.length; i++) { | |
binarySort.add(new Node(arr[i])); | |
} | |
System.out.println("------------中序遍历二叉排序树------------"); | |
binarySort.infixOrder(); | |
// 测试删除叶子节点 | |
binarySort.delNode(10);// 因为有子节点 所以删除无效 | |
System.out.println("------------删除节点后------------"); | |
binarySort.infixOrder(); | |
binarySort.delNode(1);// 因为没有子节点 所以删除成功 | |
System.out.println("------------删除节点后------------"); | |
binarySort.infixOrder(); | |
} | |
} | |
@SuppressWarnings("all") | |
class BinarySort { | |
private Node root; | |
public void add(Node node) { | |
// 判断 root 根节点如果为 null 则将传入的当前赋值为根节点 | |
if (root == null) { | |
root = node; | |
} else { | |
// 调用 add 方法添加传入的节点 | |
root.add(node); | |
} | |
} | |
public void infixOrder() { | |
// 如果根节点不为 null 则开始中序遍历二叉排序树 | |
if (root != null) { | |
root.infixOrder(); | |
} else { | |
System.out.println("二叉排序树为空"); | |
} | |
} | |
/** | |
* 查找要删除的节点 | |
* @param value | |
* @return | |
*/ | |
public Node search(int value) { | |
if (root == null) | |
return null; | |
else | |
return root.search(value); | |
} | |
/** | |
* 查找要删除的节点的父节点 | |
* @param value | |
* @return | |
*/ | |
public Node searchParent(int value){ | |
if(root == null) | |
return null; | |
else | |
return root.searchParent(value); | |
} | |
/** | |
* 删除节点 | |
* @param value | |
*/ | |
public void delNode(int value){ | |
if(root == null) | |
return; | |
else{ | |
//1. 需求先去找到要删除的节点,targetNode | |
Node targetNode = search(value); | |
// 如果没有找到要删除的节点 | |
if(targetNode == null) | |
return; | |
// 如果我们发现当前这个二叉排序树只有一个节点则删除即可 | |
if(root.left == null && root.right == null) | |
root = null; | |
// 去查找 targetNode 的父节点 | |
Node parent = searchParent(value); | |
// 如果删除的节点是叶子节点 | |
if(targetNode.left == null && targetNode.right == null){ | |
// 判断 targetNode 节点是父节点的左子节点还是右子节点 | |
if(parent.left != null && parent.left.value == value)// 是左子节点 | |
parent.left = null; | |
if(parent.right != null && parent.right.value == value)// 是右子节点 | |
parent.right = null; | |
} | |
} | |
} | |
} | |
@SuppressWarnings("all") | |
class Node { | |
int value; | |
Node left; | |
Node right; | |
public Node(int value) { | |
this.value = value; | |
} | |
/** | |
* 查找要删除的节点 | |
* | |
* @param value 希望删除的节点的值 [目标值] | |
* @return 找到返回节点,否则返回 null | |
*/ | |
public Node search(int value) { | |
if (value == this.value) { | |
return this; | |
} else if (value < this.value) { | |
if (this.left == null) | |
return null; | |
return this.left.search(value); | |
} else { | |
if (this.right == null) | |
return null; | |
return this.right.search(value); | |
} | |
} | |
/** | |
* 查找要删除节点的父节点 | |
* | |
* @param value 要查找的节点值 | |
* @return 返回要删除节点的父节点,否则返回 null | |
*/ | |
public Node searchParent(int value) { | |
// 如果当前节点就是要删除的节点的父节点则返回当前节点 | |
if (this.left != null && this.left.value == value || | |
this.right != null && this.right.value == value) | |
return this; | |
else { | |
// 如果查找的值小于当前节点的值,并且当前节点的左子节点不为空 | |
if (value < this.value && this.left != null) | |
// 向左子树递归查找 | |
return this.left.searchParent(value); | |
else if (value >= this.value && this.right != null) | |
// 向右子树递归查找 | |
return this.right.searchParent(value); | |
else | |
// 没有找到父节点 | |
return null; | |
} | |
} | |
// 添加传入节点 | |
public void add(Node node) { | |
// 判断传入的节点是否为空 | |
if (node == null) { | |
return; | |
} | |
// 判断传入的节点的值是否小于当前节点的值 | |
if (node.value < this.value) { | |
// 判断当前节点的左子节点是否为空 | |
if (this.left == null) { | |
// 为空则将传入的节点赋值到左子节点中 | |
this.left = node; | |
} else { | |
// 向左递归 | |
this.left.add(node); | |
} | |
} else { | |
// 判断当前节点的右子节点是否为空 | |
if (this.right == null) { | |
// 为空将传入的节点赋值到当前节点的右子节点中 | |
this.right = node; | |
} else { | |
// 向右递归 | |
this.right.add(node); | |
} | |
} | |
} | |
// 二叉排序树中序遍历 | |
public void infixOrder() { | |
// 左 | |
if (this.left != null) { | |
this.left.infixOrder(); | |
} | |
// 中 | |
System.out.println(this); | |
// 右 | |
if (this.right != null) { | |
this.right.infixOrder(); | |
} | |
} | |
@Override | |
public String toString() { | |
return "Node{" + | |
"value=" + value + | |
'}'; | |
} | |
} |
# 删除节点有一个子节点
删除的节点有一个子节点,该节点有左子节点或者右子节点。比如这里的 1
思路分析:
第二种情况: 删除只有一颗子树的节点 比如 1
思路
(1) 需求先去找到要删除的结点  targetNode
(2)  找到targetNode 的 父结点 parent
(3) 确定targetNode 的子结点是左子结点还是右子结点
(4) targetNode 是 parent 的左子结点还是右子结点
(5) 如果targetNode 有左子结点
5. 1 如果 targetNode 是 parent 的左子结点
parent.left = targetNode.left;
5.2  如果 targetNode 是 parent 的右子结点
parent.right = targetNode.left;
(6) 如果targetNode 有右子结点
6.1 如果 targetNode 是 parent 的左子结点
parent.left = targetNode.right;
6.2 如果 targetNode 是 parent 的右子结点
parent.right = targetNode.right

代码实现:
/** | |
* @author 窦凯欣 | |
* @version 1.0 | |
* @2023/7/719:25 | |
* @comment | |
*/ | |
@SuppressWarnings("all") | |
public class BinarySortTree { | |
public static void main(String[] args) { | |
int[] arr = {7, 3, 10, 12, 5, 1, 9}; | |
BinarySort binarySort = new BinarySort(); | |
for (int i = 0; i < arr.length; i++) { | |
binarySort.add(new Node(arr[i])); | |
} | |
System.out.println("------------中序遍历二叉排序树------------"); | |
binarySort.infixOrder(); | |
// 测试删除叶子节点 | |
binarySort.delNode(1);// 因为有子节点 所以删除无效 | |
System.out.println("------------删除节点后------------"); | |
binarySort.infixOrder(); | |
} | |
} | |
@SuppressWarnings("all") | |
class BinarySort { | |
private Node root; | |
public void add(Node node) { | |
// 判断 root 根节点如果为 null 则将传入的当前赋值为根节点 | |
if (root == null) { | |
root = node; | |
} else { | |
// 调用 add 方法添加传入的节点 | |
root.add(node); | |
} | |
} | |
public void infixOrder() { | |
// 如果根节点不为 null 则开始中序遍历二叉排序树 | |
if (root != null) { | |
root.infixOrder(); | |
} else { | |
System.out.println("二叉排序树为空"); | |
} | |
} | |
/** | |
* 查找要删除的节点 | |
* @param value | |
* @return | |
*/ | |
public Node search(int value) { | |
if (root == null) | |
return null; | |
else | |
return root.search(value); | |
} | |
/** | |
* 查找要删除的节点的父节点 | |
* @param value | |
* @return | |
*/ | |
public Node searchParent(int value){ | |
if(root == null) | |
return null; | |
else | |
return root.searchParent(value); | |
} | |
/** | |
* 删除节点 | |
* @param value | |
*/ | |
public void delNode(int value){ | |
if(root == null) | |
return; | |
else{ | |
//1. 需求先去找到要删除的节点,targetNode | |
Node targetNode = search(value); | |
// 如果没有找到要删除的节点 | |
if(targetNode == null) | |
return; | |
// 如果我们发现当前这个二叉排序树只有一个节点则删除即可 | |
if(root.left == null && root.right == null) | |
root = null; | |
// 去查找 targetNode 的父节点 | |
Node parent = searchParent(value); | |
// 如果删除的节点是叶子节点 | |
if(targetNode.left == null && targetNode.right == null){ | |
// 判断 targetNode 节点是父节点的左子节点还是右子节点 | |
if(parent.left != null && parent.left.value == value)// 是左子节点 | |
parent.left = null; | |
if(parent.right != null && parent.right.value == value)// 是右子节点 | |
parent.right = null; | |
}else // 删除只有一个叶子节点的子树节点 | |
if(targetNode.left != null)// 如果要删除的节点有左节点 | |
if(parent != null) | |
if(parent.left.value == value)// 如果 targetNode 是 parent 的左子节点 | |
parent.left = targetNode.left; | |
else | |
parent.right = targetNode.left; | |
else | |
root = targetNode.left; | |
else// 如果要删除的节点有右子节点 | |
if(parent != null) | |
// 如果 targetNode 是 parent 的左子节点 | |
if(parent.left.value == value) | |
parent.left = targetNode.right; | |
else// 如果 targetNode 是 parent 的右子节点 | |
parent.right = targetNode.right; | |
else | |
root = targetNode.left; | |
} | |
} | |
} | |
@SuppressWarnings("all") | |
class Node { | |
int value; | |
Node left; | |
Node right; | |
public Node(int value) { | |
this.value = value; | |
} | |
/** | |
* 查找要删除的节点 | |
* | |
* @param value 希望删除的节点的值 [目标值] | |
* @return 找到返回节点,否则返回 null | |
*/ | |
public Node search(int value) { | |
if (value == this.value) { | |
return this; | |
} else if (value < this.value) { | |
if (this.left == null) | |
return null; | |
return this.left.search(value); | |
} else { | |
if (this.right == null) | |
return null; | |
return this.right.search(value); | |
} | |
} | |
/** | |
* 查找要删除节点的父节点 | |
* | |
* @param value 要查找的节点值 | |
* @return 返回要删除节点的父节点,否则返回 null | |
*/ | |
public Node searchParent(int value) { | |
// 如果当前节点就是要删除的节点的父节点则返回当前节点 | |
if (this.left != null && this.left.value == value || | |
this.right != null && this.right.value == value) | |
return this; | |
else { | |
// 如果查找的值小于当前节点的值,并且当前节点的左子节点不为空 | |
if (value < this.value && this.left != null) | |
// 向左子树递归查找 | |
return this.left.searchParent(value); | |
else if (value >= this.value && this.right != null) | |
// 向右子树递归查找 | |
return this.right.searchParent(value); | |
else | |
// 没有找到父节点 | |
return null; | |
} | |
} | |
// 添加传入节点 | |
public void add(Node node) { | |
// 判断传入的节点是否为空 | |
if (node == null) { | |
return; | |
} | |
// 判断传入的节点的值是否小于当前节点的值 | |
if (node.value < this.value) { | |
// 判断当前节点的左子节点是否为空 | |
if (this.left == null) { | |
// 为空则将传入的节点赋值到左子节点中 | |
this.left = node; | |
} else { | |
// 向左递归 | |
this.left.add(node); | |
} | |
} else { | |
// 判断当前节点的右子节点是否为空 | |
if (this.right == null) { | |
// 为空将传入的节点赋值到当前节点的右子节点中 | |
this.right = node; | |
} else { | |
// 向右递归 | |
this.right.add(node); | |
} | |
} | |
} | |
// 二叉排序树中序遍历 | |
public void infixOrder() { | |
// 左 | |
if (this.left != null) { | |
this.left.infixOrder(); | |
} | |
// 中 | |
System.out.println(this); | |
// 右 | |
if (this.right != null) { | |
this.right.infixOrder(); | |
} | |
} | |
@Override | |
public String toString() { | |
return "Node{" + | |
"value=" + value + | |
'}'; | |
} | |
} |
# 删除节点有两个子节点
删除的节点有两个子节点,即该节点有左子节点和右子节点。比如 7,3,10

思路分析:
情况三 : 删除有两颗子树的节点. (比如:7, 3,10 )
思路
(1) 需求先去找到要删除的结点  targetNode
(2)  找到targetNode 的 父结点 parent
(3)  从targetNode 的右子树找到最小的结点
(4) 用一个临时变量,将 最小结点的值保存 temp = 11
(5)  删除该最小结点
(6)  targetNode.value = temp

代码实现:
/** | |
* @author 窦凯欣 | |
* @version 1.0 | |
* @2023/7/719:25 | |
* @comment | |
*/ | |
@SuppressWarnings("all") | |
public class BinarySortTree { | |
public static void main(String[] args) { | |
int[] arr = {7, 3, 10, 12, 5, 1, 9}; | |
BinarySort binarySort = new BinarySort(); | |
for (int i = 0; i < arr.length; i++) { | |
binarySort.add(new Node(arr[i])); | |
} | |
System.out.println("------------中序遍历二叉排序树------------"); | |
binarySort.infixOrder(); | |
// 测试删除叶子节点 | |
binarySort.delNode(1);// 因为有子节点 所以删除无效 | |
System.out.println("------------删除节点后------------"); | |
binarySort.infixOrder(); | |
binarySort.delNode(10);// 因为有子节点 所以删除无效 | |
System.out.println("------------删除节点后------------"); | |
binarySort.infixOrder(); | |
} | |
} | |
@SuppressWarnings("all") | |
class BinarySort { | |
private Node root; | |
public void add(Node node) { | |
// 判断 root 根节点如果为 null 则将传入的当前赋值为根节点 | |
if (root == null) { | |
root = node; | |
} else { | |
// 调用 add 方法添加传入的节点 | |
root.add(node); | |
} | |
} | |
public void infixOrder() { | |
// 如果根节点不为 null 则开始中序遍历二叉排序树 | |
if (root != null) { | |
root.infixOrder(); | |
} else { | |
System.out.println("二叉排序树为空"); | |
} | |
} | |
/** | |
* 查找要删除的节点 | |
* @param value | |
* @return | |
*/ | |
public Node search(int value) { | |
if (root == null) | |
return null; | |
else | |
return root.search(value); | |
} | |
/** | |
* 查找要删除的节点的父节点 | |
* @param value | |
* @return | |
*/ | |
public Node searchParent(int value){ | |
if(root == null) | |
return null; | |
else | |
return root.searchParent(value); | |
} | |
/** | |
* 删除节点 | |
* @param value | |
*/ | |
public void delNode(int value){ | |
if(root == null) | |
return; | |
else{ | |
//1. 需求先去找到要删除的节点,targetNode | |
Node targetNode = search(value); | |
// 如果没有找到要删除的节点 | |
if(targetNode == null) | |
return; | |
// 如果我们发现当前这个二叉排序树只有一个节点则删除即可 | |
if(root.left == null && root.right == null) | |
root = null; | |
// 去查找 targetNode 的父节点 | |
Node parent = searchParent(value); | |
// 如果删除的节点是叶子节点 | |
if(targetNode.left == null && targetNode.right == null){ | |
// 判断 targetNode 节点是父节点的左子节点还是右子节点 | |
if(parent.left != null && parent.left.value == value)// 是左子节点 | |
parent.left = null; | |
if(parent.right != null && parent.right.value == value)// 是右子节点 | |
parent.right = null; | |
}else if(targetNode.left != null && targetNode.right != null){// 删除有两个叶子节点的子树 | |
int min = delRightTreeMin(targetNode.right); | |
targetNode.value = min; | |
}else // 删除只有一个叶子节点的子树节点 | |
if(targetNode.left != null)// 如果要删除的节点有左节点 | |
if(parent != null) | |
if(parent.left.value == value)// 如果 targetNode 是 parent 的左子节点 | |
parent.left = targetNode.left; | |
else | |
parent.right = targetNode.left; | |
else | |
root = targetNode.left; | |
else// 如果要删除的节点有右子节点 | |
if(parent != null) | |
// 如果 targetNode 是 parent 的左子节点 | |
if(parent.left.value == value) | |
parent.left = targetNode.right; | |
else// 如果 targetNode 是 parent 的右子节点 | |
parent.right = targetNode.right; | |
else | |
root = targetNode.left; | |
} | |
} | |
/** | |
* 1. 返回 以 Node 为根节点的二叉排序树的最小节点的值 | |
* 2. 删除 node,为根节点的二叉排序树的最小节点 | |
* @param node 传入的节点 (当做二叉排序树的根节点) | |
* @return 返回的以 node 为根节点的二叉排序树的最小节点的值 | |
*/ | |
public int delRightTreeMin(Node node){ | |
Node target = node; | |
// 循环左子节点到最底下就是最小值 | |
while(target.left != null) | |
target = target.left; | |
// 这时 target 就只指向了最小节点 | |
// 删除最小节点 | |
delNode(target.value); | |
return target.value; | |
} | |
} | |
@SuppressWarnings("all") | |
class Node { | |
int value; | |
Node left; | |
Node right; | |
public Node(int value) { | |
this.value = value; | |
} | |
/** | |
* 查找要删除的节点 | |
* | |
* @param value 希望删除的节点的值 [目标值] | |
* @return 找到返回节点,否则返回 null | |
*/ | |
public Node search(int value) { | |
if (value == this.value) { | |
return this; | |
} else if (value < this.value) { | |
if (this.left == null) | |
return null; | |
return this.left.search(value); | |
} else { | |
if (this.right == null) | |
return null; | |
return this.right.search(value); | |
} | |
} | |
/** | |
* 查找要删除节点的父节点 | |
* | |
* @param value 要查找的节点值 | |
* @return 返回要删除节点的父节点,否则返回 null | |
*/ | |
public Node searchParent(int value) { | |
// 如果当前节点就是要删除的节点的父节点则返回当前节点 | |
if (this.left != null && this.left.value == value || | |
this.right != null && this.right.value == value) | |
return this; | |
else { | |
// 如果查找的值小于当前节点的值,并且当前节点的左子节点不为空 | |
if (value < this.value && this.left != null) | |
// 向左子树递归查找 | |
return this.left.searchParent(value); | |
else if (value >= this.value && this.right != null) | |
// 向右子树递归查找 | |
return this.right.searchParent(value); | |
else | |
// 没有找到父节点 | |
return null; | |
} | |
} | |
// 添加传入节点 | |
public void add(Node node) { | |
// 判断传入的节点是否为空 | |
if (node == null) { | |
return; | |
} | |
// 判断传入的节点的值是否小于当前节点的值 | |
if (node.value < this.value) { | |
// 判断当前节点的左子节点是否为空 | |
if (this.left == null) { | |
// 为空则将传入的节点赋值到左子节点中 | |
this.left = node; | |
} else { | |
// 向左递归 | |
this.left.add(node); | |
} | |
} else { | |
// 判断当前节点的右子节点是否为空 | |
if (this.right == null) { | |
// 为空将传入的节点赋值到当前节点的右子节点中 | |
this.right = node; | |
} else { | |
// 向右递归 | |
this.right.add(node); | |
} | |
} | |
} | |
// 二叉排序树中序遍历 | |
public void infixOrder() { | |
// 左 | |
if (this.left != null) { | |
this.left.infixOrder(); | |
} | |
// 中 | |
System.out.println(this); | |
// 右 | |
if (this.right != null) { | |
this.right.infixOrder(); | |
} | |
} | |
@Override | |
public String toString() { | |
return "Node{" + | |
"value=" + value + | |
'}'; | |
} | |
} |
# 平衡二叉树 (AVL 树)
看一个案例 (说明二叉排序树可能的问题)
给你一个数列 {1,2,3,4,5,6},要求创建一颗二叉排序树 (BST),并分析问题所在。
左边 BST 存在的问题分析:
- 左子树全部为空,从形式上看,更像一个单链表。
- 插入速度没有影响。
- 查询速度明显降低 (因为需要依次比较),不能发挥 BST 的优势,因为每次还需要比较左子树,其查询速度比单链表还慢
- 解决方案 —— 平衡二叉树 (AVL)
基本介绍
- 平衡二叉树也叫平衡二叉搜索树 (Self-balancing binary search tree) 又被称为 AVL 树,可以保证查询效率较高
- 具有以下特点:它是一颗空树或它的左右两个子树的高度差 <strong style="color:red"> 只看高度不能看左右节点 </strong> 的绝对值不超过 1 并且左右两个子树都是一颗平衡二叉树。平衡二叉树的常用实现方法有红黑树,AVL<strong style="color:red"> 指定是算法而不是树 </strong>,替罪羊树,Treap,伸展树等。
- 举例说明,看看下面哪些是 AVL 树,为什么?
图一 图二 图三
分析:
图一:左子树高度:2,右子树高度:1 。差值:1
图二:左子树高度:2,右子树高度:2 。差值:0
图三:左子树高度:3,右子树高度:1 。差值:2
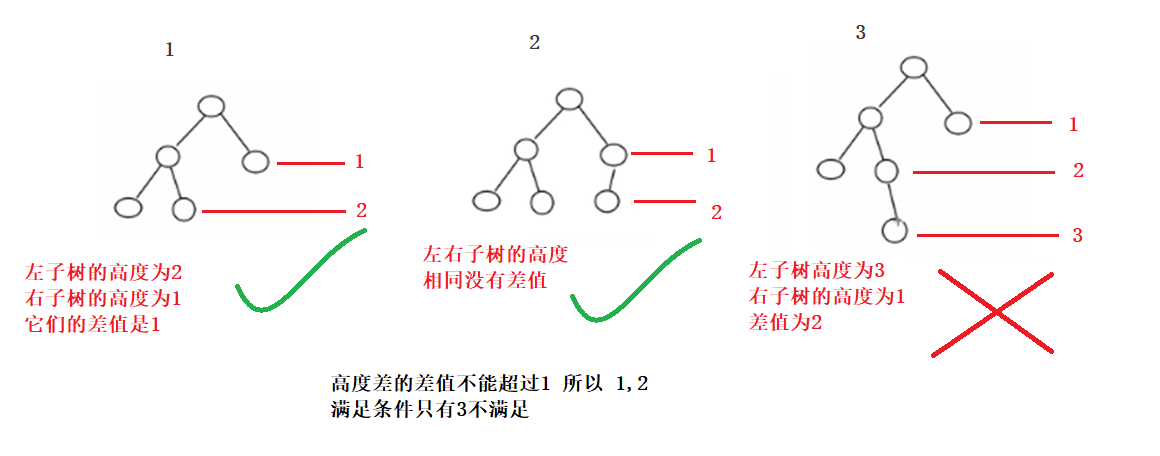
# 单旋转 (左旋转)
如果是左旋转就属于是单旋转
要求:给你一个数列,创建出对应的平衡二叉树,数列
左旋转的目的:降低右子树的高度
思路分析 (示意图)
下图红线部分是调整流程。
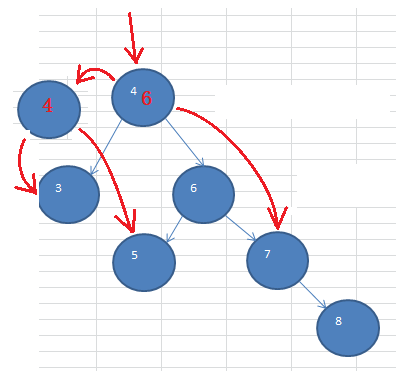
按照规则调整完成之后,形成了下面这样一棵树
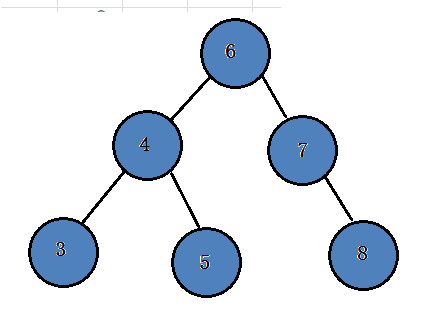
完整流程如下图所示:
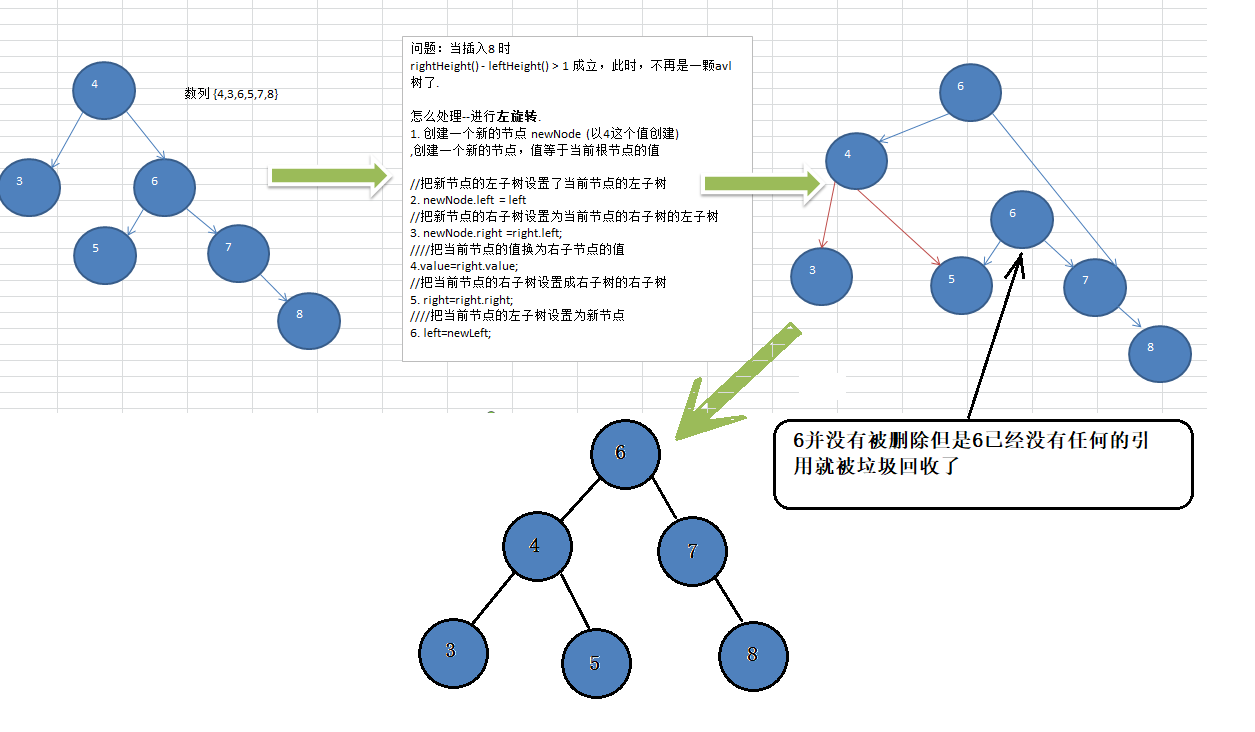
插入 8 时,发现左右子树高度相差大于 1,则进行左旋转;
- 创建一个新的节点
newNode,值等于当前 根节点 的值 (以 4 创建) - 把新节点的 左子树 设置为当前节点的 左子树
newNode.left = left; |
- 把新节点的 右子树 设置为当前节点 右子树的左子树
newNode.right = right.left; |
- 把 当前节点 的值换为 右子节点 的值
value = right.value; |
- 把 当前节点 的右子树设置为 右子树的右子树
right = right.right; |
- 把 当前节点 的左子树设置为新节点
left = newNode; |
<strong style="color:red"> 注 </strong>:图左边是调整期,右边是调整后。注意调整期的 6 那个节点,调整之后,没有节点指向它了。也就是说,遍历的时候它是不可达的。那么将会自动的被垃圾回收掉。
# 树高度计算
前面说过,平衡二叉树是为了解决二叉排序树中可能出现的查找效率问题,那么基本上的代码都可以在之前的二叉排序树上进行优化。那么下面只给出当前主题相关的代码,最后放出一份完整的代码。
树的高度计算,我们需要得到 3 个高度:
- 这棵树的整体高度
- 左子树的高度
- 右子树的高度
/** | |
* @author 窦凯欣 | |
* @version 1.0 | |
* @2023/7/1015:49 | |
* @comment | |
*/ | |
@SuppressWarnings("all") | |
public class AVLTreeDemo { | |
public static void main(String[] args) { | |
AVLTree tree = new AVLTree(); | |
int[] arr = {4, 3, 6, 5, 7, 8}; | |
for (int i = 0; i < arr.length; i++) | |
tree.add(new Node(arr[i])); | |
tree.infixOrder(); | |
System.out.printf("树高度:%d\n", tree.root.height());//4 | |
System.out.printf("左树高度:%d\n", tree.root.leftHeight());//1 | |
System.out.printf("右数高度:%d\n", tree.root.rightHeight());//3 | |
} | |
} | |
class AVLTree { | |
public Node root; | |
/** | |
* @return 获取 root 节点 | |
*/ | |
public Node getRoot() { | |
return root; | |
} | |
/** | |
* 添加节点 | |
* | |
* @param node 传入要添加的节点 | |
*/ | |
public void add(Node node) { | |
if (root == null) | |
root = node; | |
else | |
root.add(node); | |
} | |
/** | |
* 中序遍历排序二叉树 | |
*/ | |
public void infixOrder() { | |
if (root == null) | |
return; | |
else | |
root.infixOrder(); | |
} | |
} | |
@SuppressWarnings("all") | |
class Node { | |
// 节点的值 | |
public int value; | |
// 左子节点 | |
public Node left; | |
// 右子节点 | |
public Node right; | |
// 构造器初始化节点的值 | |
public Node(int value) { | |
this.value = value; | |
} | |
// 返回左子树的高度 | |
public int leftHeight() { | |
if (left == null) | |
return 0; | |
else | |
return left.height(); | |
} | |
// 返回右子树的高度 | |
public int rightHeight() { | |
if (right == null) | |
return 0; | |
else | |
return right.height(); | |
} | |
// 返回当前节点的高度,以当前节点为跟节点的树的高度 | |
public int height() { | |
/** | |
* 这里使用了递归:返回了左右子树,最高的那一个数值。 | |
* 递归原理: 第一个开始统计的时候,一定是一个叶子节点。 | |
* 根据这个逻辑:叶子节点的 Math.max (0,0) = 0 | |
* 因为当前节点算一层,所以 +1; | |
* 返回到上一层的时候,至少是这样:Math.max (1,0) = 1 | |
* 然后把自己本身的层 + 1. 以此类推,返回到根节点的时候,就拿到了从包含根节点的树的高度 | |
*/ | |
//+1;因为本身节点也要算上 | |
return Math.max(left == null ? 0 : left.height(), | |
right == null ? 0 : right.height()) + 1; | |
} | |
/** | |
* 添加节点 | |
* | |
* @param node 传入要添加的节点进行添加 | |
*/ | |
public void add(Node node) { | |
if (node == null) | |
return; | |
if (node.value < this.value) | |
if (this.left == null) | |
this.left = node; | |
else | |
this.left.add(node); | |
else if (this.right == null) | |
this.right = node; | |
else | |
this.right.add(node); | |
} | |
/** | |
* 中序遍历排序二叉树 | |
*/ | |
public void infixOrder() { | |
if (this.left != null) | |
this.left.infixOrder(); | |
System.out.println(this); | |
if (this.right != null) | |
this.right.infixOrder(); | |
} | |
@Override | |
public String toString() { | |
return "Node{" + | |
"value=" + value + | |
'}'; | |
} | |
} |
# 旋转
说下旋转的时机:也就是什么时候采取做旋转的操作
当然是:当 右子树高度 - 左子树高度 > 1 时,才执行左旋转。
这里就得到一些信息:
每次添加完一个节点后,就需要检查树的高度
满足 右子树高度 - 左子树高度 > 1,那么一定满足下面的条件:
左子树高度为 1
右子树高度为 3
也就是符合以下这张图:
![image-20230711110051128]()
也就是有如上的信息逻辑,在实现旋转的时候,只要按照思路分析写就可以了,不需要进行边界判断了。
代码实现:
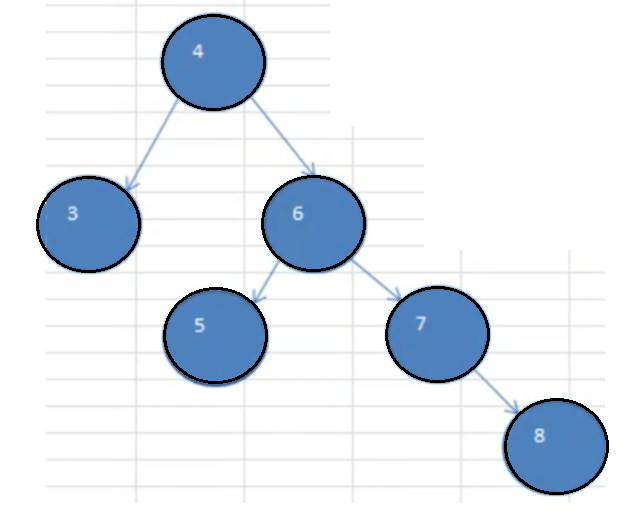
/** | |
* @author 窦凯欣 | |
* @version 1.0 | |
* @2023/7/1015:49 | |
* @comment | |
*/ | |
@SuppressWarnings("all") | |
public class AVLTreeDemo { | |
public static void main(String[] args) { | |
AVLTree tree = new AVLTree(); | |
int[] arr = {4, 3, 6, 5, 7, 8}; | |
for (int i = 0; i < arr.length; i++) | |
tree.add(new Node(arr[i])); | |
tree.infixOrder(); | |
System.out.printf("树高度:%d\n", tree.root.height());//3 | |
System.out.printf("左树高度:%d\n", tree.root.leftHeight());//2 | |
System.out.printf("右数高度:%d\n", tree.root.rightHeight());//2 | |
System.out.println("当前Root节点为: "+tree.getRoot());//6 | |
} | |
} | |
class AVLTree { | |
public Node root; | |
/** | |
* @return 获取 root 节点 | |
*/ | |
public Node getRoot() { | |
return root; | |
} | |
/** | |
* 添加节点 | |
* | |
* @param node 传入要添加的节点 | |
*/ | |
public void add(Node node) { | |
if (root == null) | |
root = node; | |
else | |
root.add(node); | |
} | |
/** | |
* 中序遍历排序二叉树 | |
*/ | |
public void infixOrder() { | |
if (root == null) | |
return; | |
else | |
root.infixOrder(); | |
} | |
} | |
@SuppressWarnings("all") | |
class Node { | |
// 节点的值 | |
public int value; | |
// 左子节点 | |
public Node left; | |
// 右子节点 | |
public Node right; | |
// 构造器初始化节点的值 | |
public Node(int value) { | |
this.value = value; | |
} | |
// 返回左子树的高度 | |
public int leftHeight() { | |
if (left == null) | |
return 0; | |
else | |
return left.height(); | |
} | |
// 返回右子树的高度 | |
public int rightHeight() { | |
if (right == null) | |
return 0; | |
else | |
return right.height(); | |
} | |
// 返回当前节点的高度,以当前节点为跟节点的树的高度 | |
public int height() { | |
/** | |
* 这里使用了递归:返回了左右子树,最高的那一个数值。 | |
* 递归原理: 第一个开始统计的时候,一定是一个叶子节点。 | |
* 根据这个逻辑:叶子节点的 Math.max (0,0) = 0 | |
* 因为当前节点算一层,所以 +1; | |
* 返回到上一层的时候,至少是这样:Math.max (1,0) = 1 | |
* 然后把自己本身的层 + 1. 以此类推,返回到根节点的时候,就拿到了从包含根节点的树的高度 | |
*/ | |
//+1;因为本身节点也要算上 | |
return Math.max(left == null ? 0 : left.height(), | |
right == null ? 0 : right.height()) + 1; | |
} | |
/** | |
* 创建左旋转方法 | |
*/ | |
public void leftRotate() { | |
//1. 创建一个新的节点 newNode (以 4 这个值创建), 创建一个新的节点,值等于当前根节点的值 | |
Node newNode = new Node(value); | |
//2. 把新节点的左子树设置为当前节点的左子树 | |
newNode.left = this.left; | |
//3. 把新节点的右子树设置为当前节点的右子树的左子树 | |
newNode.right = this.right.left; | |
//4. 把当前节点的值换为右子节点的值 | |
this.value = this.right.value; | |
//5. 把当前节点的右子树设置为右子树的右子树 | |
this.right = this.right.right; | |
//6. 把当前节点的左子树设置为新节点 | |
this.left = newNode; | |
} | |
/** | |
* 添加节点 | |
* | |
* @param node 传入要添加的节点进行添加 | |
*/ | |
public void add(Node node) { | |
if (node == null) | |
return; | |
if (node.value < this.value) | |
if (this.left == null) | |
this.left = node; | |
else | |
this.left.add(node); | |
else if (this.right == null) | |
this.right = node; | |
else | |
this.right.add(node); | |
/** | |
* 旋转的时候有以下规则 | |
* 没添加一个节点后:检查树的高度是否平衡 | |
* 如果右子树高度 - 左子树高度 > 1 ,则左旋转 | |
* 也就是说:每次旋转的层只涉及到 4 层 (对照笔记上的图示理解) | |
*/ | |
if (rightHeight() - leftHeight() > 1) | |
leftRotate(); | |
} | |
/** | |
* 中序遍历排序二叉树 | |
*/ | |
public void infixOrder() { | |
if (this.left != null) | |
this.left.infixOrder(); | |
System.out.println(this); | |
if (this.right != null) | |
this.right.infixOrder(); | |
} | |
@Override | |
public String toString() { | |
return "Node{" + | |
"value=" + value + | |
'}'; | |
} | |
} |
运行结果:
Node{value=3}
Node{value=4}
Node{value=5}
Node{value=6}
Node{value=7}
Node{value=8}
树高度:3
左树高度:2
右数高度:2
当前Root节点为: Node{value=6}
看完代码之后,它的旋转其实就是,将 root 节点,往下沉到了 root.right 节点下面。
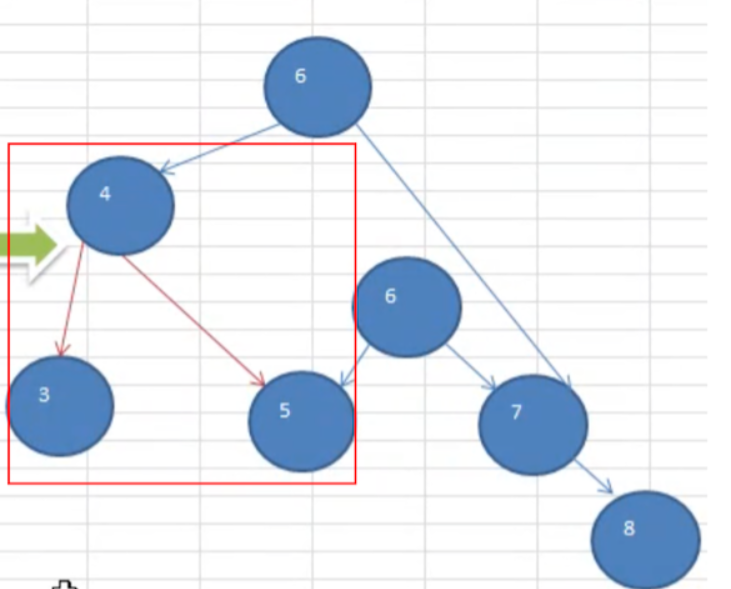
看着上图,是否有想过,貌似根本就可以不用前面讲解的 6 个步骤来旋转:
- 不用创建新节点
- 直接将 node 节点下沉
- 更改 node 的 right 节点为 right.left
- 更改 right.left = node
其实就已经完成了旋转。但是你仔细想一想,旋转逻辑是写在 node 里面的,avlTree 中的引用如何改变?除非把旋转逻辑移动到 avlTree 中去,就可以省略掉新节点的步骤来完成。
# 右旋转
- 左旋转:右 - 左 > 1 ,把右边的往左边旋转一层
- 右旋转:左 - 右 > 1 ,把左边的往右边旋转一层
它们是反着来得思路如下:
- 创建一个新的节点 newNode,值等于当前 根节点 的值 (以 10 创建)
- 把新节点的 右子树 设置为当前节点的 右子树
newNode.right = this.right; |
- 把新节点的 左子树 设置为当前节点的 左子树的右子树
newNode.left = this.left.right; |
- 把 当前节点 的值换为 左子节点 的值
this.value = this.left.value; |
- 把 当前节点 的左子树设置为 左子树的左子树
this.left = this.left.left; |
- 把 当前节点 的右子树设置为新节点
this.right = newNode; |
上述步骤就是对应下图的描述:查看图示更清楚
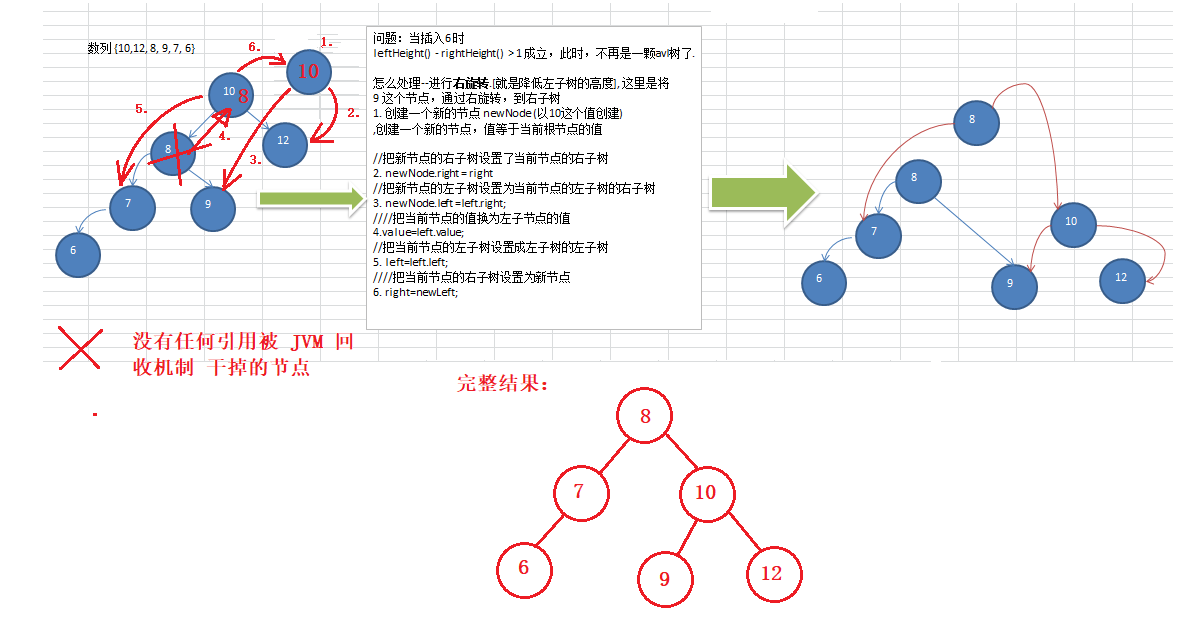
代码实现:
/** | |
* @author 窦凯欣 | |
* @version 1.0 | |
* @2023/7/1015:49 | |
* @comment | |
*/ | |
@SuppressWarnings("all") | |
public class AVLTreeDemo { | |
public static void main(String[] args) { | |
AVLTree tree = new AVLTree(); | |
// int[] arr = {4, 3, 6, 5, 7, 8}; | |
int[] arr = {10, 12, 8, 9, 7, 6}; | |
for (int i = 0; i < arr.length; i++) | |
tree.add(new Node(arr[i])); | |
tree.infixOrder(); | |
System.out.printf("树高度:%d\n", tree.root.height());//3 | |
System.out.printf("左树高度:%d\n", tree.root.leftHeight());//2 | |
System.out.printf("右数高度:%d\n", tree.root.rightHeight());//2 | |
System.out.println("当前Root节点为: "+tree.getRoot());//8 | |
} | |
} | |
class AVLTree { | |
public Node root; | |
/** | |
* @return 获取 root 节点 | |
*/ | |
public Node getRoot() { | |
return root; | |
} | |
/** | |
* 添加节点 | |
* | |
* @param node 传入要添加的节点 | |
*/ | |
public void add(Node node) { | |
if (root == null) | |
root = node; | |
else | |
root.add(node); | |
} | |
/** | |
* 中序遍历排序二叉树 | |
*/ | |
public void infixOrder() { | |
if (root == null) | |
return; | |
else | |
root.infixOrder(); | |
} | |
} | |
@SuppressWarnings("all") | |
class Node { | |
// 节点的值 | |
public int value; | |
// 左子节点 | |
public Node left; | |
// 右子节点 | |
public Node right; | |
// 构造器初始化节点的值 | |
public Node(int value) { | |
this.value = value; | |
} | |
// 返回左子树的高度 | |
public int leftHeight() { | |
if (left == null) | |
return 0; | |
else | |
return left.height(); | |
} | |
// 返回右子树的高度 | |
public int rightHeight() { | |
if (right == null) | |
return 0; | |
else | |
return right.height(); | |
} | |
// 返回当前节点的高度,以当前节点为跟节点的树的高度 | |
public int height() { | |
/** | |
* 这里使用了递归:返回了左右子树,最高的那一个数值。 | |
* 递归原理: 第一个开始统计的时候,一定是一个叶子节点。 | |
* 根据这个逻辑:叶子节点的 Math.max (0,0) = 0 | |
* 因为当前节点算一层,所以 +1; | |
* 返回到上一层的时候,至少是这样:Math.max (1,0) = 1 | |
* 然后把自己本身的层 + 1. 以此类推,返回到根节点的时候,就拿到了从包含根节点的树的高度 | |
*/ | |
//+1;因为本身节点也要算上 | |
return Math.max(left == null ? 0 : left.height(), | |
right == null ? 0 : right.height()) + 1; | |
} | |
/** | |
* 创建右旋转方法 | |
*/ | |
public void rightRotate() { | |
//1. 创建一个新的节点 newNode (以 10 这个值创建) | |
Node newNode = new Node(value); | |
//2. 把新节点的右子树设置为当前节点的右子树 | |
newNode.right = this.right; | |
//3. 把新节点的左子树设置为当前节点的左子树的右子树 | |
newNode.left = this.left.right; | |
//4. 把当前节点的值换为左子树的值 | |
this.value = this.left.value; | |
//5. 把当前节点的左子树设置为左子树的左子树 | |
this.left = this.left.left; | |
//6. 把当前节点的右子树设置为新节点 | |
this.right = newNode; | |
} | |
/** | |
* 创建左旋转方法 | |
*/ | |
public void leftRotate() { | |
//1. 创建一个新的节点 newNode (以 4 这个值创建), 创建一个新的节点,值等于当前根节点的值 | |
Node newNode = new Node(value); | |
//2. 把新节点的左子树设置为当前节点的左子树 | |
newNode.left = this.left; | |
//3. 把新节点的右子树设置为当前节点的右子树的左子树 | |
newNode.right = this.right.left; | |
//4. 把当前节点的值换为右子节点的值 | |
this.value = this.right.value; | |
//5. 把当前节点的右子树设置为右子树的右子树 | |
this.right = this.right.right; | |
//6. 把当前节点的左子树设置为新节点 | |
this.left = newNode; | |
} | |
/** | |
* 添加节点 | |
* | |
* @param node 传入要添加的节点进行添加 | |
*/ | |
public void add(Node node) { | |
if (node == null) | |
return; | |
if (node.value < this.value) | |
if (this.left == null) | |
this.left = node; | |
else | |
this.left.add(node); | |
else if (this.right == null) | |
this.right = node; | |
else | |
this.right.add(node); | |
/** | |
* 旋转的时候有以下规则 | |
* 没添加一个节点后:检查树的高度是否平衡 | |
* 如果右子树高度 - 左子树高度 > 1 ,则左旋转 | |
* 也就是说:每次旋转的层只涉及到 4 层 (对照笔记上的图示理解) | |
*/ | |
if (rightHeight() - leftHeight() > 1) | |
leftRotate(); | |
if (leftHeight() - rightHeight() > 1) | |
rightRotate(); | |
} | |
/** | |
* 中序遍历排序二叉树 | |
*/ | |
public void infixOrder() { | |
if (this.left != null) | |
this.left.infixOrder(); | |
System.out.println(this); | |
if (this.right != null) | |
this.right.infixOrder(); | |
} | |
@Override | |
public String toString() { | |
return "Node{" + | |
"value=" + value + | |
'}'; | |
} | |
} |
结果:
Node{value=6}
Node{value=7}
Node{value=8}
Node{value=9}
Node{value=10}
Node{value=12}
树高度:3
左树高度:2
右数高度:2
当前Root节点为: Node{value=8}
# 单旋转的 <strong style="color:red"> 注意事项 </strong>
有些情况下,<strong style="color:red"> 单旋转不能完成平衡二叉树的转换如比数列 </strong> {10,11,7,6,8,9} 或者 {2,1,6,5,7,3}; 运行原来的代码可以看到,并没有转成 AVL 树。
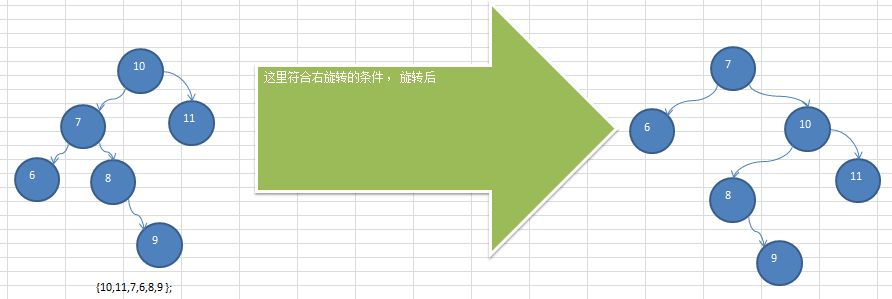
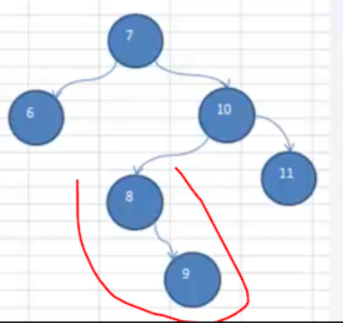
问题分析:
左侧这个树满足 leftHeight - rightHeight > 1 ,也就是满足右旋转,旋转之后,树结构变化了。但是还是一个非平衡二叉树
它的主要原因是:root 左子树的 左子树高度 小于 右子树的高度。即:节点 7 的左子树高度小于右子树的高度。
# 解决办法 —— 双旋转
- 先将 7 这个节点为 root 节点,进行左旋转
- 再将原始的 root 节点进行右旋转
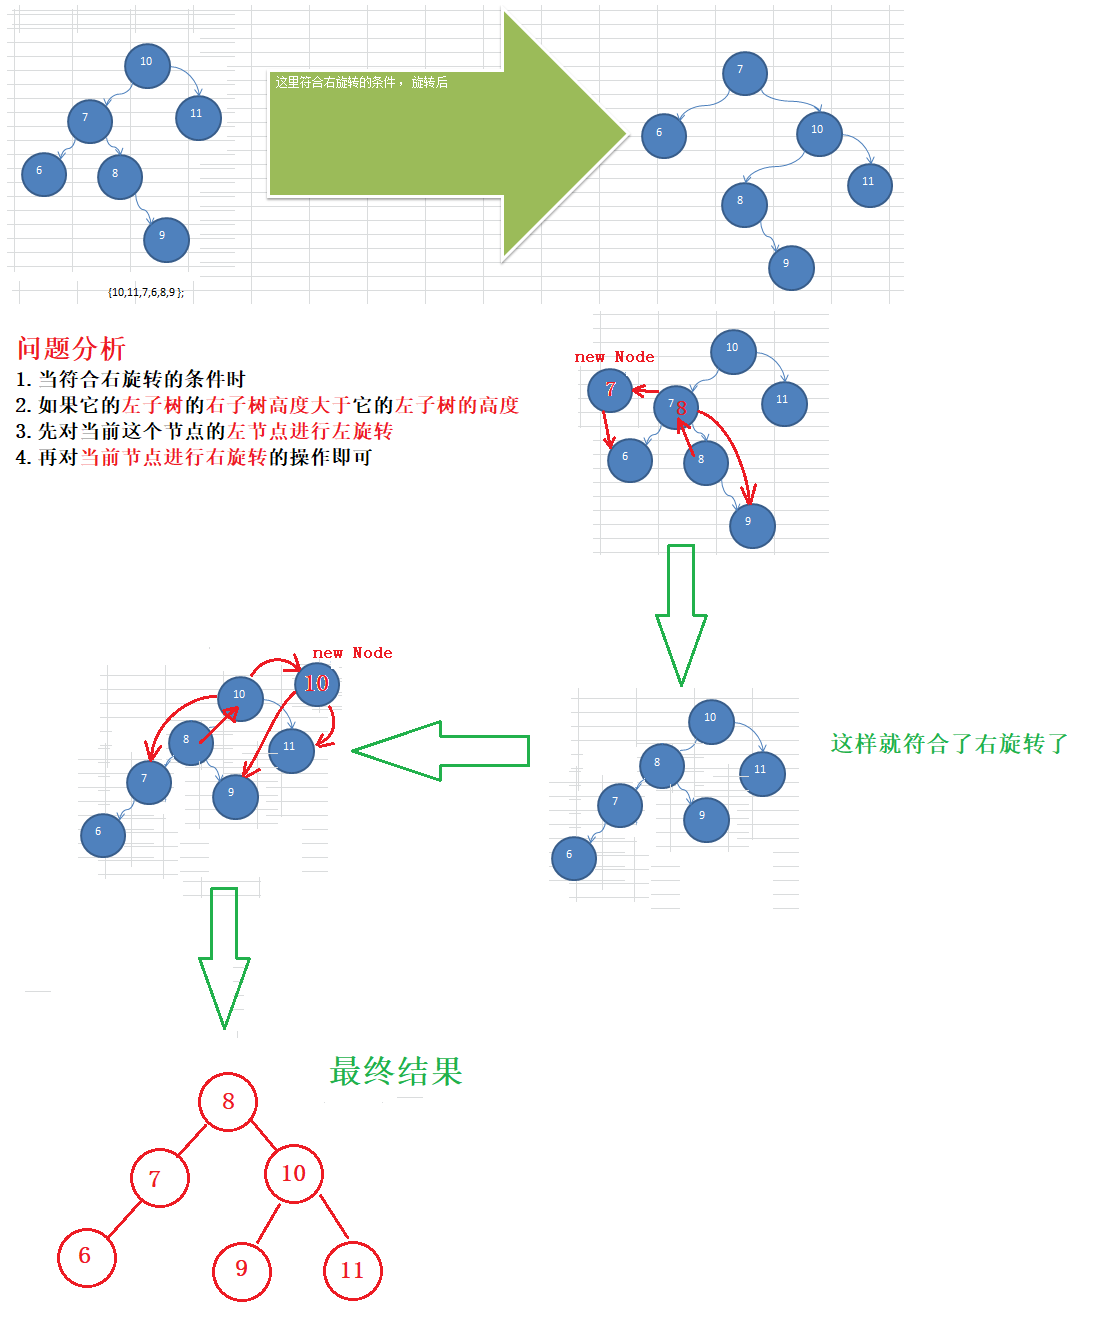
其实可以参考下面两个单旋转的例子,它有这样一个特点:
- 右旋转:
- root 的 left 左子树高度 大于 右子树高度
- 右旋转的时候,会将 left.right 旋转到 right.left 节点上个
- 左旋转:
- root 的 right 右子树高度 大于 左子树高度
- 左旋转的时候,会将 right.left 旋转到 left.right 上
如果不满足这个要求,在第二个操作的时候,就会导致 2 层的高度被旋转到 1 层的节点下面,导致不平衡了。
解决代码如下:
代码实现:
/** | |
* @author 窦凯欣 | |
* @version 1.0 | |
* @2023/7/1015:49 | |
* @comment | |
*/ | |
@SuppressWarnings("all") | |
public class AVLTreeDemo { | |
public static void main(String[] args) { | |
AVLTree tree = new AVLTree(); | |
// int[] arr = {4, 3, 6, 5, 7, 8}; | |
// int[] arr = {10, 12, 8, 9, 7, 6}; | |
// 下面两个数组是导致单旋转失败的例子 | |
// int[] arr = {10, 11, 7, 6, 8, 9}; | |
int[] arr = {2, 1, 6, 5, 7, 3}; | |
for (int i = 0; i < arr.length; i++) | |
tree.add(new Node(arr[i])); | |
tree.infixOrder(); | |
System.out.printf("树高度:%d\n", tree.root.height());//3 | |
System.out.printf("左树高度:%d\n", tree.root.leftHeight());//2 | |
System.out.printf("右数高度:%d\n", tree.root.rightHeight());//2 | |
System.out.println("当前Root节点为: " + tree.getRoot());//5 | |
} | |
} | |
class AVLTree { | |
public Node root; | |
/** | |
* @return 获取 root 节点 | |
*/ | |
public Node getRoot() { | |
return root; | |
} | |
/** | |
* 添加节点 | |
* | |
* @param node 传入要添加的节点 | |
*/ | |
public void add(Node node) { | |
if (root == null) | |
root = node; | |
else | |
root.add(node); | |
} | |
/** | |
* 中序遍历排序二叉树 | |
*/ | |
public void infixOrder() { | |
if (root == null) | |
return; | |
else | |
root.infixOrder(); | |
} | |
} | |
@SuppressWarnings("all") | |
class Node { | |
// 节点的值 | |
public int value; | |
// 左子节点 | |
public Node left; | |
// 右子节点 | |
public Node right; | |
// 构造器初始化节点的值 | |
public Node(int value) { | |
this.value = value; | |
} | |
// 返回左子树的高度 | |
public int leftHeight() { | |
if (left == null) | |
return 0; | |
else | |
return left.height(); | |
} | |
// 返回右子树的高度 | |
public int rightHeight() { | |
if (right == null) | |
return 0; | |
else | |
return right.height(); | |
} | |
// 返回当前节点的高度,以当前节点为跟节点的树的高度 | |
public int height() { | |
/** | |
* 这里使用了递归:返回了左右子树,最高的那一个数值。 | |
* 递归原理: 第一个开始统计的时候,一定是一个叶子节点。 | |
* 根据这个逻辑:叶子节点的 Math.max (0,0) = 0 | |
* 因为当前节点算一层,所以 +1; | |
* 返回到上一层的时候,至少是这样:Math.max (1,0) = 1 | |
* 然后把自己本身的层 + 1. 以此类推,返回到根节点的时候,就拿到了从包含根节点的树的高度 | |
*/ | |
//+1;因为本身节点也要算上 | |
return Math.max(left == null ? 0 : left.height(), | |
right == null ? 0 : right.height()) + 1; | |
} | |
/** | |
* 创建有旋转方法 | |
*/ | |
public void rightRotate() { | |
//1. 创建一个新的节点 newNode (以 10 这个值创建) | |
Node newNode = new Node(value); | |
//2. 把新节点的右子树设置为当前节点的右子树 | |
newNode.right = this.right; | |
//3. 把新节点的左子树设置为当前节点的左子树的右子树 | |
newNode.left = this.left.right; | |
//4. 把当前节点的值换为左子树的值 | |
this.value = this.left.value; | |
//5. 把当前节点的左子树设置为左子树的左子树 | |
this.left = this.left.left; | |
//6. 把当前节点的右子树设置为新节点 | |
this.right = newNode; | |
} | |
/** | |
* 创建左旋转方法 | |
*/ | |
public void leftRotate() { | |
//1. 创建一个新的节点 newNode (以 4 这个值创建), 创建一个新的节点,值等于当前根节点的值 | |
Node newNode = new Node(value); | |
//2. 把新节点的左子树设置为当前节点的左子树 | |
newNode.left = this.left; | |
//3. 把新节点的右子树设置为当前节点的右子树的左子树 | |
newNode.right = this.right.left; | |
//4. 把当前节点的值换为右子节点的值 | |
this.value = this.right.value; | |
//5. 把当前节点的右子树设置为右子树的右子树 | |
this.right = this.right.right; | |
//6. 把当前节点的左子树设置为新节点 | |
this.left = newNode; | |
} | |
/** | |
* 添加节点 | |
* | |
* @param node 传入要添加的节点进行添加 | |
*/ | |
public void add(Node node) { | |
if (node == null) | |
return; | |
if (node.value < this.value) | |
if (this.left == null) | |
this.left = node; | |
else | |
this.left.add(node); | |
else if (this.right == null) | |
this.right = node; | |
else | |
this.right.add(node); | |
/** | |
* 旋转的时候有以下规则 | |
* 没添加一个节点后:检查树的高度是否平衡 | |
* 如果右子树高度 - 左子树高度 > 1 ,则左旋转 | |
* 也就是说:每次旋转的层只涉及到 4 层 (对照笔记上的图示理解) | |
*/ | |
if (rightHeight() - leftHeight() > 1) { | |
// 如果它的右子树的左子树的高度大于它的右子树的右子树的高度 | |
if (right != null && right.leftHeight() > right.rightHeight()) { | |
// 先对右子节点进行右旋转 | |
right.rightRotate(); | |
// 然后再对当前节点进行左旋转 | |
leftRotate(); | |
} else | |
// 直接进行左旋转 | |
leftRotate(); | |
// 旋转好后阻止程序的向后执行否则就会产生错误的操作 | |
return; | |
} | |
if (leftHeight() - rightHeight() > 1) | |
// 如果它的左子树的右子树高度大于它的左子树的高度 | |
if (left != null && left.rightHeight() > left.leftHeight()) { | |
// 先对当前节点的左节点 (左子树) -> 左旋转 | |
left.leftRotate(); | |
// 再对当前节点进行右旋转 | |
rightRotate(); | |
} else | |
// 直接进行右旋转 | |
rightRotate(); | |
} | |
/** | |
* 中序遍历排序二叉树 | |
*/ | |
public void infixOrder() { | |
if (this.left != null) | |
this.left.infixOrder(); | |
System.out.println(this); | |
if (this.right != null) | |
this.right.infixOrder(); | |
} | |
@Override | |
public String toString() { | |
return "Node{" + | |
"value=" + value + | |
'}'; | |
} | |
} |
结果:
Node{value=1}
Node{value=2}
Node{value=3}
Node{value=5}
Node{value=6}
Node{value=7}
树高度:3
左树高度:2
右数高度:2
当前Root节点为: Node{value=5}