# 什么是 Thymeleaf

Thymeleaf 官网解释:
Thymeleaf is a modern server-side Java template engine for both web and standalone environments.
翻译:
Thymeleaf 是适用于 web 和独立环境的现代服务器端 <font style="color:red">Java 模板引擎 </font>
# 模板引擎介绍:
模板引擎? 你可能第一次听说模板引擎,估计你会禁不住想问:什么是模板引擎?
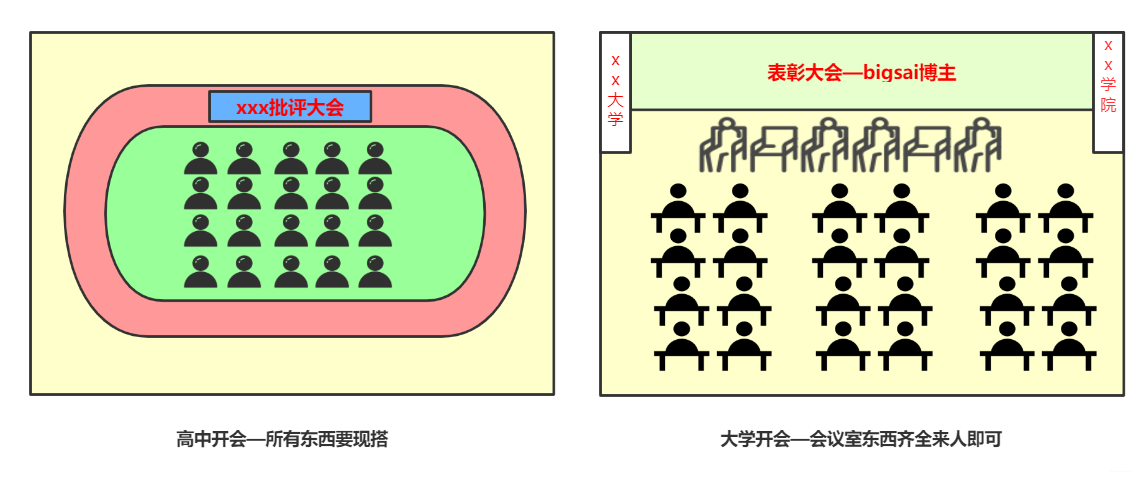
- 模板引擎(这里特指用于 Web 开发的模板引擎)为了使用户界面与业务数据(内容)分离而产生的,它可以生成特定格式的文档,用于网站的模板引擎就会生成一个标准的 html 文档,从字面上理解 <font style="color:red"> 模板引擎 </font>, 最重要的就是模板二字,这个意思就是做好的一个模板后套入对应位置的数据,最终以 html 的格式展示出来,这就是模板引擎的作用
- 对于模板引擎的理解,可以这样形象的做一个类比:开会!相信你在上学初高中时候每次开会都要提前布置场地,拿小板凳,收拾场地,而你上了大学之后每次开会再也不去大操场了,每次开会都去学校的会议室,桌子板凳音箱主席台 齐全,来个人即可,还可复用。。模板引擎的功能就类似我们的会议室开会一样开箱即用,将模板设计好之后直接填充数据即可而不需要重新设计整个页面,提高页面,代码的复用性
不仅如此,在 Java 中模板引擎还有很多,模板引擎是动态网页发展进步的产物,在最初并且流传度最广的 jsp 它就是一个模板引擎。jsp 是官方标准的模板,但是由于 jsp 的缺点比较多也挺严重的,所以很多人弃用 jsp 选用第三方的模板引擎,市面上开源的第三方的模板引擎也比较多,有 Thymeleaf、FreeMaker、Velocity 等模板引擎受众较广。
听完了模板引擎的介绍,相信你也很容易明白了模板引擎在 web 领域的主要作用:让网站实现界面和数据分离,这样大大提高了开发效率,让代码重用更加容易。
# Thymeleaf 介绍
上面知晓了模板引擎的概念和功能,你也知道 Thymeleaf 是众多模板引擎的一种,你一定会好奇想深入学习 Thymeleaf 的方方面面。从官方的介绍来看,Thymeleaf 的目标很明确:
Thymeleaf 的主要目标是为您的开发工作流程带来优雅自然的模板 - HTML 可以在浏览器中正确显示,也可以作为静态原型工作,从而可以在开发团队中加强协作。
Thymeleaf 拥有适用于 Spring Framework 的模块,与您喜欢的工具的大量集成以及插入您自己的功能的能力,对于现代 HTML5 JVM Web 开发而言,Thymeleaf 是理想的选择 —— 尽管它还有很多工作要做。
并且随着市场使用的验证 Thymeleaf 也达到的它的目标和大家对他的期望,在实际开发有着广泛的应用。Thymeleaf 作为被 Springboot 官方推荐的模板引擎,一定有很多过人和不寻同之处:
- 动静分离: Thymeleaf 选用 html 作为模板页,这是任何一款其他模板引擎做不到的!Thymeleaf 使用 html 通过一些特定标签语法代表其含义,但并未破坏 html 结构,即使无网络、不通过后端渲染也能在浏览器成功打开,大大方便界面的测试和修改。
- 开箱即用: Thymeleaf 提供标准和 Spring 标准两种方言,可以直接套用模板实现 JSTL、 OGNL 表达式效果,避免每天套模板、改 JSTL、改标签的困扰。同时开发人员也可以扩展和创建自定义的方言。
# 学习 Thymeleaf 必知的知识点
Thymeleaf 模板的运行离不开 web 的环境,所以你需要对相关知识学习理解才能更好的有助于你对 Thymeleaf 的学习和认知。
# SpringBoot
相信你对 Springboot 都很熟悉,我们使用 Thymeleaf 大多情况都是基于 Springboot 平台的,并且 Thymeleaf 的发展推广也离不开 Springboot 官方得支持,且本文的实战部分也是基于 Springboot 平台。
而 Spring Boot 是由 Pivotal 团队提供的全新框架,其设计目的是用来简化新 Spring 应用的初始搭建以及开发过程。该框架使用了特定的方式来进行配置,从而使开发人员不再需要定义样板化的配置。通过这种方式,Spring Boot 致力于在蓬勃发展的快速应用开发领域 (rapid application development) 成为领导者。
简而言之,Springboot 是当前 web 开发主流,且其简化了 Spring 的配置让开发者能够更容易上手 Web 项目的开发。且 Thymeleaf 能够快速整合入 Springboot,使用方便快捷。
# MVC 介绍
我们使用的 Thymeleaf 模板引擎在整个 web 项目中起到的作用为视图展示 (view),谈到视图就不得不提起模型 (model) 以及控制器 (view), 其三者在 web 项目中分工和职责不同,但又相互有联系。三者组成当今 web 项目较为流行的 MVC 架构。
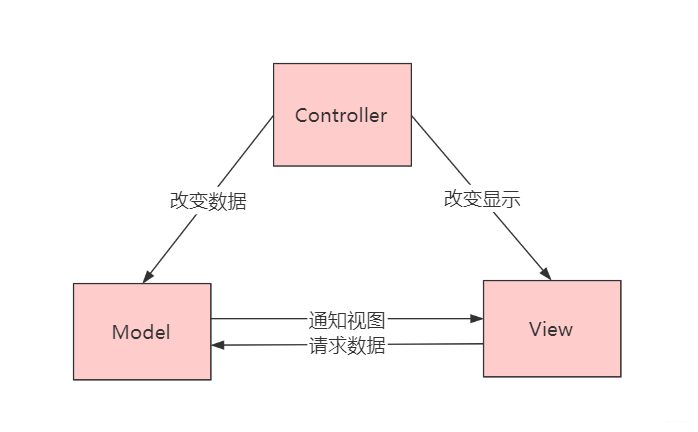
MVC 全名是 Model View Controller,是模型 (model)-视图 (view)-控制器 (controller) 的缩写,其中:
- Model(模型)表示应用程序核心(用来存储数据供视图层渲染)。
- View(视图)显示数据,而本篇使用的就是 Thymeleaf 作为视图。
- Controller(控制器)处理输入请求,将模型和视图分离。
使用 MVC 设计模式程序有很多优点,比如降低程序耦合、增加代码的复用性、降低开发程序和接口的成本,并且通过这样分层结构在部署维护能够提供更大的便捷性。
在 Java web 体系最流行的 MVC 框架无疑就是 Springmvc 框架了,在项目中经常配合模板引擎使用或者提供 Restful 接口。在下面案例 Thymeleaf 同样使用 Springmvc 作为 MVC 框架进行控制。
# 动静分离
你可能还是不明白什么才是真正的动静分离,其实这个主要是由于 Thymeleaf 模板基于 html,后缀也是.html,所以这样就会产生一些有趣的灵魂。
对于传统 jsp 或者其他模板来说,没有一个模板引擎的后缀为.html,就拿 jsp 来说 jsp 的后缀为.jsp, 它的本质就是将一个 html 文件修改后缀为.jsp,然后在这个文件中增加自己的语法、标签然后执行时候通过后台处理这个文件最终返回一个 html 页面。
浏览器无法直接识别.jsp 文件,需要借助网络 (服务端) 才能进行访问;而 Thymeleaf 用 html 做模板可以直接在浏览器中打开。开发者充分考虑 html 页面特性,将 Thymeleaf 的语法通过 html 的标签属性来定义完成,这些标签属性不会影响 html 页面的完整性和显示。如果通过后台服务端访问页面服务端会寻找这些标签将服务端对应的数据替换到相应位置实现动态页面!大体区别可以参照下图: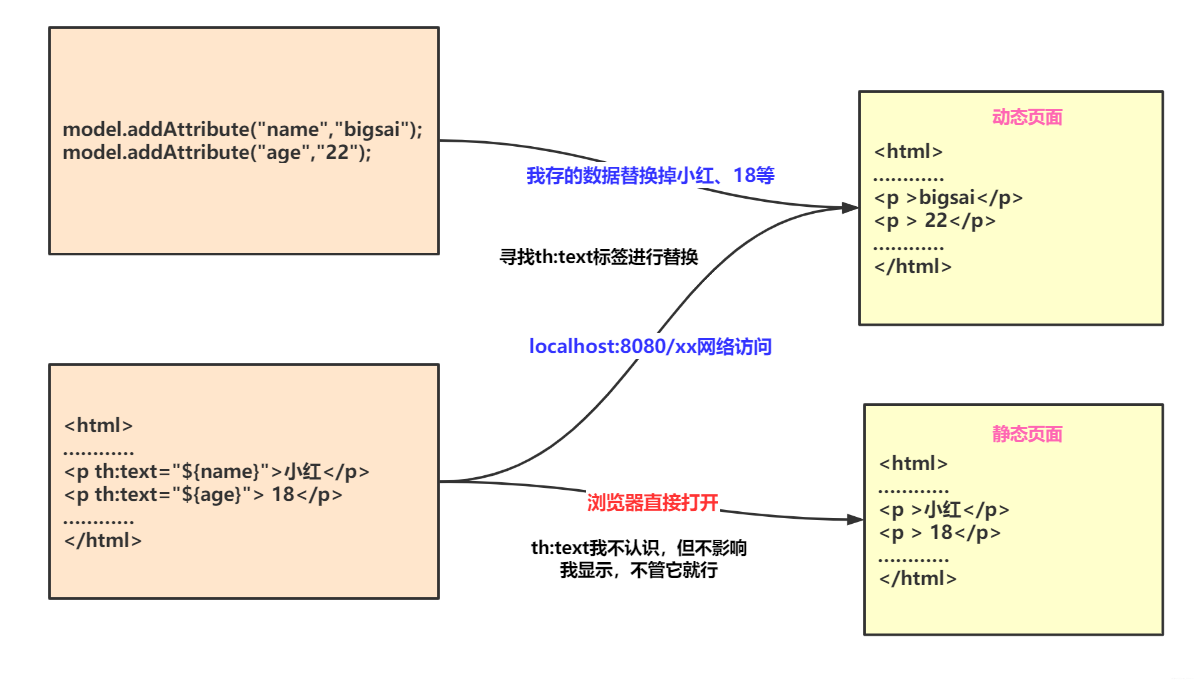
上图的意思就是如果直接打开这个 html 那么浏览器会对 th 等标签忽视而显示原始的内容。如果通过服务端访问那么服务端将先寻找 th 标签将服务端储存的数据替换到对应位置。具体效果可以参照下图,下图即为一个动静结合的实例。
- 右上角为动态页面通过服务端访问,数据显示为服务端提供的数据,样式依然为 html 的样式
- 右下角为静态页面可通过浏览器直接打开,数据为初始的数据
![在这里插入图片描述]()
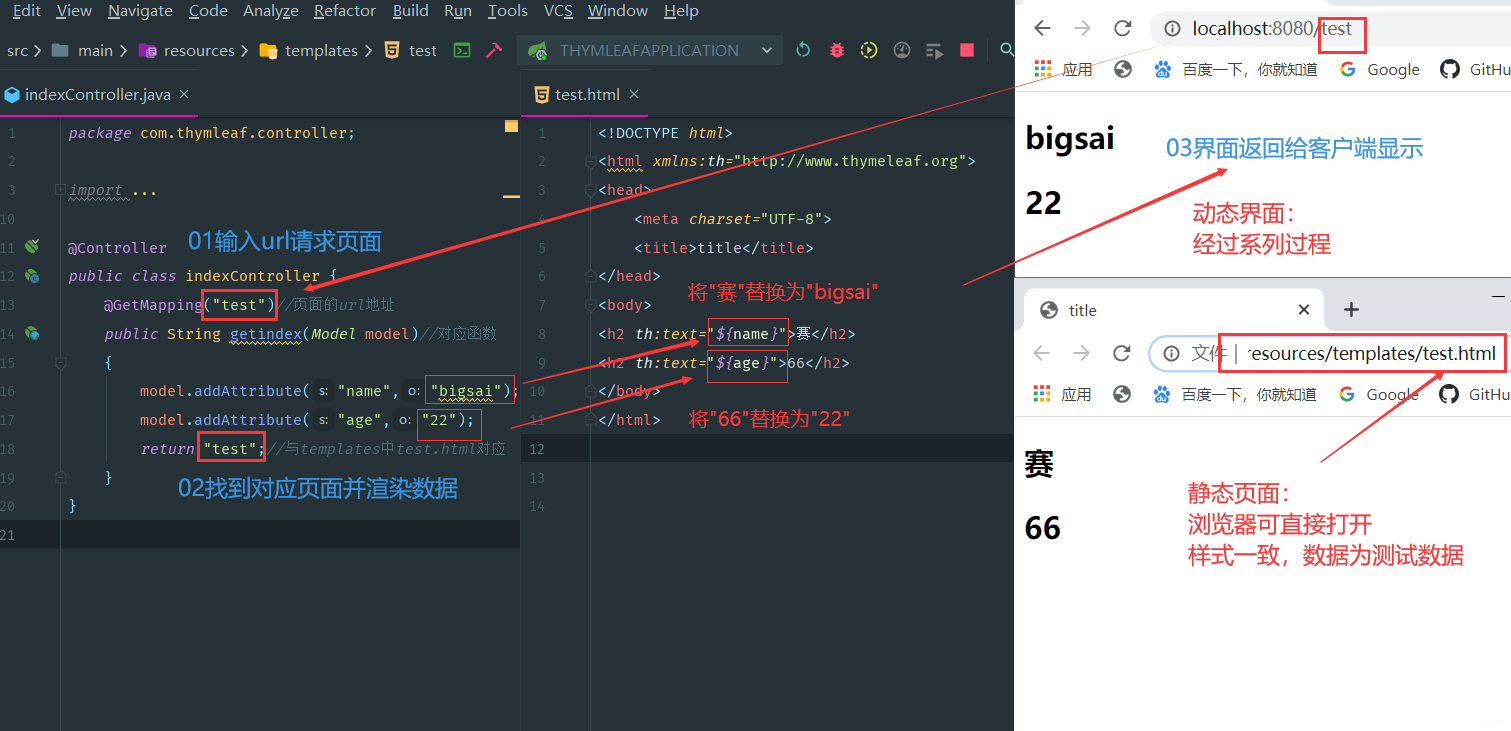
动态页面每次修改打开都需要重新启动程序、输入链接,这个过程其实是相对漫长的。如果界面设计人员用这种方式进行页面设计时间成本高并且很麻烦,可通过静态页面设计样式,设计完成通过服务端访问即可达成目标 UI 的界面和应用,达到动静分离的效果。这个特点和优势是所有模板引擎中 Thymeleaf 所独有的!
# 使用 Thymeleaf
Idea 创建步骤查看点击
使用步骤:
导入 Thymeleaf 的坐标
<dependency> | |
<groupId>org.springframework.boot</groupId> | |
<artifactId>spring-boot-starter-thymeleaf</artifactId> | |
<version>3.0.4</version> | |
</dependency> |
# 编写 Controller
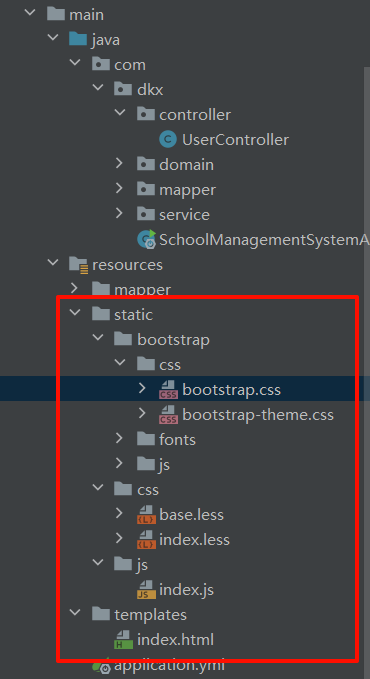
在编写 Controller 和 Thymeleaf 之前,先看下最终项目的目录结构,有个初略的印象和概念:
<span alt="wavy" style="color:red"> 特别注意:图中画红框框的必须创建出来否则就会出错 </span>

在其中:
- pom.xml:是项目中的 Maven 依赖,因为 Springboot 使用 Maven 来管理外部 jar 包依赖,我们只需填写依赖名称配置即可引入该依赖,在本系统中引入 Spring web 模块 (Springmvc) 和 Thymeleaf 的依赖。我们不需要自己去招相关 jar 包。
- application.properties: 编写 Springboot 与各框架整合的一些配置内容。
- controller:用来编写控制器,主要负责处理请求以及和视图 (Thymeleaf) 绑定。
- static:用于存放静态资源,例如 html、JavaScript、css 以及图片等。
- templates:用来存放模板引擎 Thymeleaf (本质依然是.html 文件)
项目基于 Springboot 框架,且选了 Spring web (Springmvc) 作为 mvc 框架,其中 Thymeleaf 就是 v (view) 视图层,我们需要在 controller 中指定 Thymeleaf 页面的 url,然后再 Model 中绑定数据。
Controller
<font style="color:red"> 注意事项:千万不要使用 @RestController 注解来配置类,因为它包含了 @ResponseBody 会让方法返回的数据为 Json 就会发生页面展示的是一串字符串 index</font>
@Controller | |
public class IndexController { | |
@GetMapping("/user")// 访问 controller 改方法的路径 | |
public String getIndex(Model model){//Model 给页面追加数据的 | |
model.addAttribute("name","刘桑"); | |
return "index";// 与 templates 中 index.html 对应 | |
} | |
} |
上述代码就是一个完整的 controller。部分含义如下:
- @controller 注解的意思就是声明这个 java 文件为一个 controller 控制器。
- @GetMapping (“index”) 其中 @GetMapping 的意思是请求的方式为 get 方式 (即可通过浏览器直接请求),而里面的 index 表示这个页面 (接口) 的 url 地址 (路径)。即在浏览器对项目网页访问的地址。
- getindex () 是 @GetMapping (“index”) 注解对应的函数,其类型为 String 类型返回一个字符串,参数 Model 类型即用来储存数据供我们 Thymeleaf 页面使用。
- model.addAttribute (“name”,“bigsai”) 就是 Model 存入数据的书写方式,Model 是一个特殊的类,相当于维护一个 Map 一样,而 Model 中的数据通过 controller 层的关联绑定在 view 层 (即 Thymeleaf 中) 可以直接使用。
- return “hello”:这个 index 就是在 templates 目录下对应模板 (本次为 Thymeleaf 模板) 的名称,即应该对应 hello.html 这个 Thymeleaf 文件 (与页面关联默认规则为:templates 目录下返回字符串.html)。
# 编写 Thymeleaf 页面
在 templates 文件夹中创建一个与上面 controller 方法中返回名称对应的文件名 index.html 然后在这个文件中的 html 标签中引入 thymeleaf 比如这样: <html xmlns:th="www.thymeleaf.org"></html> 这样在 thymeleaf 中就可以使用 thymeleaf 的语法规范了
对于一个 Thymeleaf 程序,只需将 index.html 文件改成这样即可
<!DOCTYPE html> | |
<html xmlns:th="http://www.thymeleaf.org"> | |
<head> | |
<meta charset="UTF-8"> | |
<title>title</title> | |
</head> | |
<body> | |
hello 第一个Thymeleaf程序 | |
<div th:text="${name}">name是bigsai(我是离线数据)</div> | |
</body> | |
</html> |
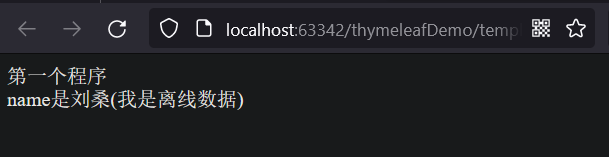
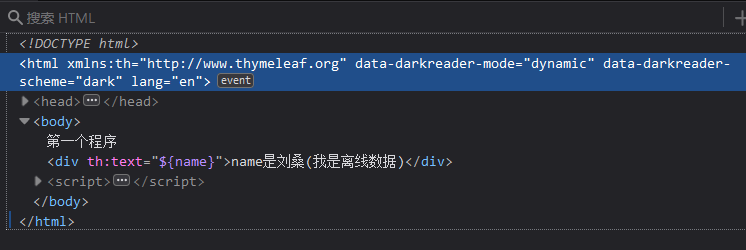
你可能会对 < div th:text="{name}" 就是 Thymeleaf 取值的一个语法,这个值从后台渲染而来 (前面 controller 中在 Model 中存地值),如果没网络 (直接打开 html 文件) 的时候静态数据为:name 是 bigsai (我是离线数据)。而如果通过网络访问那么内容将是前面在 controller 的 Model 中储存的 bigsai。
# 启动程序访问 controller 路径
如果访问不了查看基本配置 <a href="# 基本配置"> 点击查看 </a>
当前这个项目通过浏览器访问路径: http://localhost/user
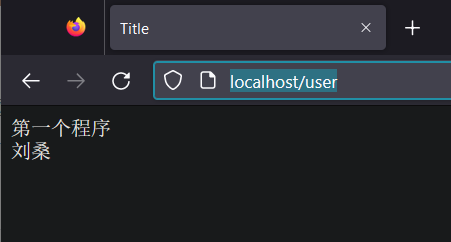
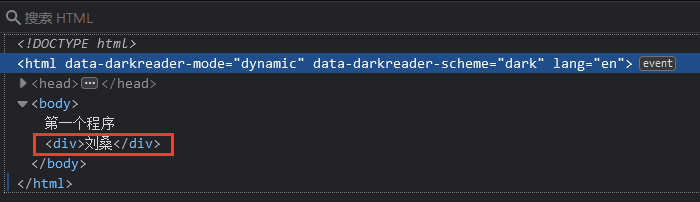
打开浏览器的控制台查看 index.html 页面中的 th:text="${name}" 解析的结果
直接访问 index.html 页面的展示效果,动静分离方便开发,完全可以独立开发不需要依赖于我们需不需要给它传数据
在标签中还可以进行拼接
<!DOCTYPE html> | |
<html lang="en" xmlns:th="http://www.thymeleaf.org"> | |
<head> | |
<meta charset="UTF-8"> | |
<title th:text="|dkx-${title}|">title是张三(我是离线数据)</title> | |
</head> | |
<body> | |
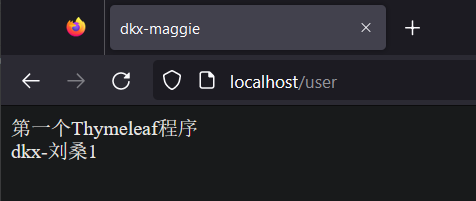
第一个Thymeleaf程序 | |
<div th:text="|dkx-${name}|">name是刘桑(我是离线数据)</div> | |
</body> | |
</html> |
@GetMapping("/user") | |
public String getIndex(Model model){//Model 给页面追加数据的 | |
model.addAttribute("title","maggie"); | |
model.addAttribute("name","刘桑1"); | |
return "index"; | |
} |
访问页面
# Thymeleaf 语法详解
上面虽然完成了第一个 Thymeleaf 程序,但是那样远远满足不了我们在项目中使用 Thymeleaf,所以我们要对 Thymeleaf 的语法规则进行更详细的学习
# 配置
虽然 SpringBoot 官方对 Thymeleaf 做了很多默认配置,但引入 Thymeleaf 的 jar 包依赖后很可能根据自己特定的需求进行更细化的配置,例如页面缓存,字体格式设置等等
SpringBoot 官方提供的配置内容如下:
# THYMELEAF (ThymeleafAutoConfiguration) | |
spring.thymeleaf.cache=true # Whether to enable template caching. | |
spring.thymeleaf.check-template=true # Whether to check that the template exists before rendering it. | |
spring.thymeleaf.check-template-location=true # Whether to check that the templates location exists. | |
spring.thymeleaf.enabled=true # Whether to enable Thymeleaf view resolution for Web frameworks. | |
spring.thymeleaf.enable-spring-el-compiler=false # Enable the SpringEL compiler in SpringEL expressions. | |
spring.thymeleaf.encoding=UTF-8 # Template files encoding. | |
spring.thymeleaf.excluded-view-names= # Comma-separated list of view names (patterns allowed) that should be excluded from resolution. | |
spring.thymeleaf.mode=HTML # Template mode to be applied to templates. See also Thymeleaf's TemplateMode enum. | |
spring.thymeleaf.prefix=classpath:/templates/ # Prefix that gets prepended to view names when building a URL. | |
spring.thymeleaf.reactive.chunked-mode-view-names= # Comma-separated list of view names (patterns allowed) that should be the only ones executed in CHUNKED mode when a max chunk size is set. | |
spring.thymeleaf.reactive.full-mode-view-names= # Comma-separated list of view names (patterns allowed) that should be executed in FULL mode even if a max chunk size is set. | |
spring.thymeleaf.reactive.max-chunk-size=0 # Maximum size of data buffers used for writing to the response, in bytes. | |
spring.thymeleaf.reactive.media-types= # Media types supported by the view technology. | |
spring.thymeleaf.servlet.content-type=text/html # Content-Type value written to HTTP responses. | |
spring.thymeleaf.suffix=.html # Suffix that gets appended to view names when building a URL. | |
spring.thymeleaf.template-resolver-order= # Order of the template resolver in the chain. | |
spring.thymeleaf.view-names= # Comma-separated list of view names (patterns allowed) that can be resolved. |
上面的配置有些我们可能不常使用,因为 Springboot 官方做了默认配置大部分能够满足我们的使用需求,但如果你的项目有特殊需求也需要妥善使用这些配置。
比如 spring.thymeleaf.cache=false 是否允许页面缓存的配置,我们在开发时候要确保页面是最新的所以需要禁用缓存;而在上线运营时可能页面不常改动为了减少服务端压力以及提升客户端响应速度会允许页面缓存的使用。
再比如在开发虽然我们大部分使用 UTF-8 多一些,我们可以使用 spring.thymeleaf.encoding=UTF-8 来确定页面的编码,但如果你的项目是 GBK 编码就需要将它改成 GBK。
另外 Springboot 默认模板引擎文件是放在 templates 目录下:spring.thymeleaf.prefix=classpath:/templates/, 如果你有需求将模板引擎也可修改配置,将 templates 改为自己需要的目录。同理其他的配置如果需要自定义化也可参照上面配置进行修改。
# 基本配置
spring: | |
thymeleaf: | |
cache: false | |
encoding: UTF-8 | |
mode: HTML5 | |
prefix: classpath:/templates/ | |
suffix: .html | |
mvc: | |
static-path-pattern: /static/** |
cache: 缓存
encoding: 编码
mode: 页面模式
prefix: 资源位置
suffix: 后缀名
mvc:
static-path-pattern: 可访问的静态资源
# 常用标签
Thymeleaf 通过特殊的标签来寻找属于 Thymeleaf 的部分,并渲染该部分内容,而除了上面展示过的 th:text 之外还有很多常用标签,并且 Thymeleaf 也主要通过标签来识别替换对应位置内容,Thymeleaf 标签有很多很多,功能也很丰富,这里列举一些比较常用的标签如下:
| 标签 | 作用 | 示例 |
|---|---|---|
| th:id | 替换 id | <input th:id="${user.id}"/> |
| th:text | 文本替换 | <p text:="${user.name}">bigsai</p> |
| th:utext | 支持 html 的文本替换 | <p utext:="${htmlcontent}">content</p> |
| th:object | 替换对象 | <div th:object="${user}"></div> |
| th:value | 替换值 | <input th:value="${user.name}" > |
| th:each | 迭代 | <tr th:each="student:${user}" > |
| th:href | 替换超链接 | <a th:href="@{index.html}"> 超链接 </a> |
| th:src | 替换资源 | <script type="text/javascript" th:src="@{index.js}"></script> |
# 链接表达式:@
上面我们已经学习到 Thymeleaf 是一个基于 html 的模板引擎,但是我们还是需要加入特定标签来声明和使用 Thymeleaf 的语法。我们需要在 Thymeleaf 的头部加 Thymeleaf 标识:
<html xmlns:th="http://www.thymeleaf.org"> |
在 Thymeleaf 中,如果想引入链接比如 link,href,src,需要使用 @{资源地址} 引入资源。其中资源地址可以 static 目录下的静态资源,也可以是互联网中的绝对资源。
引入 css
<link rel="stylesheet" th:href="@{index.css}"> |
如果使用 SpringBoot 配合 Thymeleaf 使用要找如下的路径的话需要这么配置,如下:
<link rel="stylesheet" th:href="@{/bootstrap/css/bootstrap.css}"/> | |
<link rel="stylesheet" th:href="@{/css/index.css}"/> |
引入 JavaScript:
<script type="text/javascript" th:src="@{index.js}"></script> |
超链接:
<a th:href="@{index.html}">超链接</a> |
# 变量表达式: $
在 Thymeleaf 中可以通过 ${…} 进行取值
创建实体类
@Getter | |
@Setter | |
@ToString | |
public class Test { | |
private String username; | |
private Integer age; | |
private Integer sex; | |
private Boolean isVip; | |
private Date createTime; | |
private List<String> tags; | |
private Map<String,String> maps; | |
} |
在 controller 中实例化对象并进行初始化赋值
@GetMapping("/test") | |
public String getTest(Model model){ | |
Test t = new Test(); | |
Map<String,String> map = new HashMap<>(); | |
map.put("name","张三"); | |
map.put("age","23"); | |
map.put("sex","女"); | |
t.setUsername("刘桑"); | |
t.setAge(18); | |
t.setIsVip(true); | |
t.setCreateTime(new Date()); | |
t.setSex(1); | |
t.setTags(Arrays.asList("php","Java","c","c++","c#")); | |
t.setMaps(map); | |
model.addAttribute("test",t); | |
return "usertest"; | |
} |
# 取普通字符串
如果在 controller 中的 Model 直接存储某字符串,我们可以直接 ${对象名} 进行取值
<!DOCTYPE html> | |
<html lang="en" xmlns:th="www.thymeleaf.org"> | |
<head> | |
<meta charset="UTF-8"> | |
<title>Title</title> | |
</head> | |
<body> | |
<!--${test.username 等同于 test.getUsername ()}--> | |
<!-- 这样我们需要一个一个的去点对应的变量有点麻烦 --> | |
<h2 th:text="${test.username}"></h2> | |
<p th:text="${test.age}"></p> | |
</body> | |
</html> |
# 取 JavaBean 对象:
取 JavaBean 对象也很容易,因为 JavaBean 自身有一些其他属性,所以咱们就可以使用 $ <font style="color:red">{对象名。对象属性}</font > 或者 $ <font style="color:red">{对象名 [' 对象属性 ']}</font > 来取值,这和 JavaScript 语法是不是很相似呢!除此之外,如果该 JavaBean 如果写了 get 方法,咱们也可以通过 get 方法取值例如 $ <font style="color:red">{对象.get 方法名}</font>
<!DOCTYPE html> | |
<html lang="en" xmlns:th="www.thymeleaf.org"> | |
<head> | |
<meta charset="UTF-8"> | |
<title>Title</title> | |
</head> | |
<body> | |
<h2 th:text="${test.username}"></h2> | |
<p th:text="${test.getUsername}"></p> | |
<p th:text="${test['username']}"></p> | |
</body> | |
</html> |
# 取 List 集合 (each):
因为 List 集合是个有序列表,里面内容可能不止一个,你需要遍历 List 对其中对象取值,而遍历需要用到标签:th:each, 具体使用为 <tr th:each="item:${userlist}">, 其中 item 就相当于遍历每一次的对象名,在下面的作用域可以直接使用,而 userlist 就是你在 Model 中储存的 List 的名称
<!DOCTYPE html> | |
<html lang="en" xmlns:th="www.thymeleaf.org"> | |
<head> | |
<meta charset="UTF-8"> | |
<title>Title</title> | |
</head> | |
<body> | |
<ul> <!--each 会遍历多个 li 标签来展示数组内的数据出来,所以不能放在 ul 中 --> | |
<li th:each="tag:${test.tags}" th:text="${tag}"></li> | |
</ul> | |
</body> | |
</html> |
遍历 List 集合元素将最后一个变为红色其余变为蓝色
1. 在 static 目录中创建一个 app.css 文件
.active{ | |
color:red; | |
} | |
.Idle{ | |
color:blue; | |
} |
2.html 文件中引入 app.css 文件
<!DOCTYPE html> | |
<html lang="en" xmlns:th="www.thymeleaf.org"> | |
<head> | |
<meta charset="UTF-8"> | |
<title>Title</title> | |
<!-- 引入外部的 css 样式文件如果在 static 目录的根则不需要加上目录路径 --> | |
<link rel="stylesheet" th:href="@{app.css}"> | |
</head> | |
<body> | |
<ul> | |
<!--each 会遍历多个 li 标签来展示数组内的数据出来,所以不能放在 ul 中 --> | |
<!--stat 随意起名相当于迭代的一个索引 --> | |
<li th:each="tag,stat:${test.tags}" | |
th:text="${tag}" | |
th:classappend="${stat.last}?active:Idle" | |
><!-- 通过索引为最后一个使用三目运算符判断是否为红色的 active 是 css 样式属性其余为 Idle 属性 --></li> | |
</ul> | |
</body> | |
</html> |
访问效果

# 直接取 Map:
很多时候我们不存 JavaBean 而是将一些值放入 Map 中,再将 Map 存在 Model 中,我们就需要对 Map 取值,对于 Map 取值你可以 ${对象名.Map名['key']} 来进行取值。也可以通过 ${对象名.Map名.key} 取值,当然你也可以使用 ${对象名.Map.get('key')} (java 语法) 来取值
<!DOCTYPE html> | |
<html lang="en" xmlns:th="www.thymeleaf.org"> | |
<head> | |
<meta charset="UTF-8"> | |
<title>Title</title> | |
</head> | |
<body> | |
<table bgcolor="#8fbc8f" border="1"} th:object="${test}"> | |
<tr> | |
<td>name:</td> | |
<td th:text="*{maps.name}"></td> | |
</tr> | |
<tr> | |
<td>age:</td> | |
<td th:text="*{maps['age']}"></td> | |
</tr> | |
<tr> | |
<td>sex:</td> | |
<td th:text="*{maps.get('sex')}"></td> | |
</tr> | |
</table> | |
</body> | |
</html> |
# 遍历 Map:
想遍历 Map 获取它的 key 和 value 那也是可以的使用 th:each="item:${对象名.Map名}" 进行遍历,在下面只需使用 item.key 和 item.value 即可获得值
<!DOCTYPE html> | |
<html lang="en" xmlns:th="www.thymeleaf.org"> | |
<head> | |
<meta charset="UTF-8"> | |
<title>Title</title> | |
</head> | |
<body> | |
<table bgcolor="red" border="1"> | |
<tr th:each="map:${test.maps}"> | |
<td th:text="${map.key}"></td> | |
<td th:text="${map.value}"></td> | |
</tr> | |
</table> | |
</body> | |
</html> |
# 选择变量表达式: *
变量表达式不仅可以写成 ${…},而且还可以写成 *{…}。
但是,有一个重要的区别:星号语法对选定对象而不是整个上下文评估表达式。也就是说,只要没有选定的对象,美元 (${…}) 和星号 (*{...}) 的语法就完全一样。
什么是选定对象?使用 th:object 属性的表达式的结果。就可以选定对象
<!DOCTYPE html> | |
<html lang="en" xmlns:th="www.thymeleaf.org"> | |
<head> | |
<meta charset="UTF-8"> | |
<title>Title</title> | |
</head> | |
<body> | |
<div th:object="${test}"> | |
<h2 th:text="*{username}"></h2> | |
<p th:text="*{age}"></p> | |
<!--if 判断元素是否渲染 --> | |
<p th:if="*{isVip}">会员</p> | |
</div> | |
<table bgcolor="#8fbc8f" border="1"} th:object="${test}"> | |
<tr> | |
<td>name:</td> | |
<td th:text="*{maps.name}"></td> | |
</tr> | |
<tr> | |
<td>age:</td> | |
<td th:text="*{maps['age']}"></td> | |
</tr> | |
<tr> | |
<td>sex:</td> | |
<td th:text="*{maps.get('sex')}"></td> | |
</tr> | |
</table> | |
</body> | |
</html> |
# 消息表达: #
文本外部化是从模板文件中提取模板代码的片段,以便可以将它们保存在单独的文件 (通常是.properties 文件) 中,文本的外部化片段通常称为 “消息”。通俗易懂的来说 #{…} 语法就是用来读取配置文件中数据的。在 Thymeleaf 你可以使用 #{...} 语法获取消息
首先在 templates 目录下建立 home.properties 中写入以下内容:
dkx.nane=DouKx | |
dkx.age=22 | |
province=Hei Bei Sheng Sha He Shi |
在 application.properties 中加入以下内容:
#配置读取配置文件的位置 | |
spring.messages.basename=templates/home |
这样我们就可以在 Thymeleaf 中读取配置的文件了
<!DOCTYPE html> | |
<html lang="en" xmlns:th="www.thymeleaf.org"> | |
<head> | |
<meta charset="UTF-8"> | |
<title>Title</title> | |
</head> | |
<body> | |
<table bgcolor="aqua" border="1"> | |
<tr> | |
<td th:text="#{dkx.name}"></td> | |
</tr> | |
<tr> | |
<td th:text="#{dkx.age}"></td> | |
</tr> | |
<tr> | |
<td th:text="#{province}"></td> | |
</tr> | |
</table> | |
</body> | |
</html> |
# Thymeleaf 碎片 / 组件 fragment
fragment 片段的意思,是 thymleaf 为了消除前端代码的重复性而设计出来的。
三种引入公共片段的 th 属性:
th:insert:将公共片段整个插入到声明引入的元素中
th:replace:将声明引入的元素替换为公共片段
th:include:将被引入的片段的内容包含进这个标签中
三者区别:
- th:insert 是最简单的:它将简单地插⼊指定宿主标签的标签体中。
- th:replace 实际上⽤指定的⽚段替换其宿主标签。
- th:include 类似于 th:insert,⽽不是插⼊⽚段,它只插⼊此⽚段的内容。
在 templates 目录中创建一个组件 component.html 文件
使用 th:fragment 定义片段
一个页面可以定义多个片段
<!DOCTYPE html> | |
<html lang="en" xmlns:th="www.thymeleaf.org"> | |
<head> | |
<meta charset="UTF-8"> | |
<title>Title</title> | |
</head> | |
<body> | |
<!--fragment 将其定义为片段 / 组件 --> | |
<div th:fragment="com1"> | |
<h2>com1</h2> | |
</div> | |
<!-- 一个页面可以定义多个片段 --> | |
<div th:fragment="com2"> | |
<h2>com2</h2> | |
</div> | |
</body> | |
</html> |
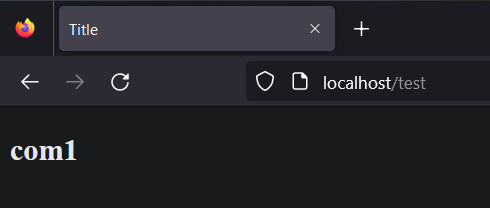
将 component.html 页面中的片段定义到 usertest.html 页面中
- 使用 replace 将片段替换到当前 div 中
<!DOCTYPE html> | |
<html lang="en" xmlns:th="www.thymeleaf.org"> | |
<head> | |
<meta charset="UTF-8"> | |
<title>Title</title> | |
</head> | |
<body> | |
<!--replace 将片段替换到这个 div 中 --> | |
<div th:replace="~{component::com1}"></div> | |
</body> | |
</html> |
访问 usertest.html 页面效果
- 如果想要保留原来的标签可以使用 insert
<!DOCTYPE html> | |
<html lang="en" xmlns:th="www.thymeleaf.org"> | |
<head> | |
<meta charset="UTF-8"> | |
<title>Title</title> | |
</head> | |
<body> | |
<!--replace 将片段替换到这个 div 中 --> | |
<div th:replace="~{component::com1}"></div> | |
<!-- 如果想要保留原来的标签可以使用 insert--> | |
<div th:insert="~{component::com1}"></div> | |
</body> | |
</html> |
- 在 component.html 页面中可以使用 id 来定义片段
<!DOCTYPE html> | |
<html lang="en" xmlns:th="www.thymeleaf.org"> | |
<head> | |
<meta charset="UTF-8"> | |
<title>Title</title> | |
</head> | |
<body> | |
<!--fragment 将其定义为片段 / 组件 --> | |
<div th:fragment="com1"> | |
<h2>com1</h2> | |
</div> | |
<!-- 一个页面可以定义多个片段,还可以使用 id 来定义片段 --> | |
<div id="com2"> | |
<h2>com2</h2> | |
</div> | |
</body> | |
</html> |
- usertest.html 页面中替换 id 来命名的片段
<!DOCTYPE html> | |
<html lang="en" xmlns:th="www.thymeleaf.org"> | |
<head> | |
<meta charset="UTF-8"> | |
<title>Title</title> | |
</head> | |
<body> | |
<!--replace 将片段替换到这个 div 中 --> | |
<div th:replace="~{component::com1}"></div> | |
<!--replace 替换片段使用 #来指定替换 id 为 com2 的片段 --> | |
<div th:replace="~{component::#com2}"></div> | |
</body> | |
</html> |
# 组件传值
component.html 页面
<!DOCTYPE html> | |
<html lang="en" xmlns:th="www.thymeleaf.org"> | |
<head> | |
<meta charset="UTF-8"> | |
<title>Title</title> | |
</head> | |
<body> | |
<!-- 括号中的名称是接收数据的变量名 --> | |
<div th:fragment="com3(message)"> | |
<!-- 渲染出变量的数据 --> | |
<p th:text="${message}"></p> | |
</div> | |
<div th:fragment="com4(message)"> | |
<div th:replace="${message}"></div> | |
</div> | |
</body> | |
</html> |
usertest.html 页面
<!DOCTYPE html> | |
<html lang="en" xmlns:th="www.thymeleaf.org"> | |
<head> | |
<meta charset="UTF-8"> | |
<title>Title</title> | |
</head> | |
<body> | |
<!-- 替换片段并给片段传递数据,然后渲染出来 --> | |
<div th:replace="~{component::com3('小日子-刘桑')}"></div> | |
<div th:replace="~{component::com4(~{::#message})}"> | |
<p id="message">替换的模块</p> | |
</div> | |
<!-- 格式化获取到对象的时间 --> | |
<div th:text="${#dates.format(test.createTime,'yyyy-MM-ddEHH:mm:ss')}"></div> | |
</body> | |
</html> |