# 一、Redis 分片集群🎄
- 搭建分片集群
- 散列插槽
- 集群伸缩
- 故障转移
- RedisTemplate 访问分片集群
# 1.1、分片集群结构
主从和哨兵可以解决高可用,高并发读的问题。但是依然有两个问题没有解决:
1、海量数据存储问题
2、高并发写的问题
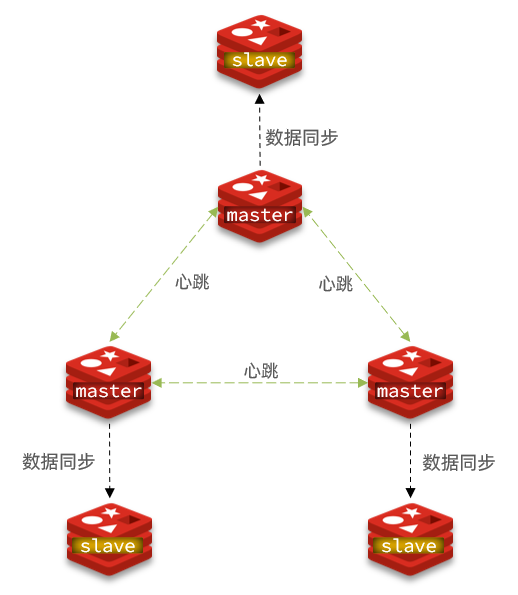
使用分片集群可以解决上述问题,分片集群特征:
1、集群中有多个 master,每个 master 保存不同数据
2、每个 master 都可以有多个 slave 节点
3、master 之间通过 ping 监测彼此健康状态
4、客户端请求可以访问集群任意节点,最终都会被转发到正确节点

# 二、搭建分片集群🎄
# 4.1. 集群结构
分片集群需要的节点数量较多,这里我们搭建一个最小的分片集群,包含 3 个 master 节点,每个 master 包含一个 slave 节点,结构如下:
这里我们会在同一台虚拟机中开启 6 个 redis 实例,模拟分片集群,信息如下:
| IP | PORT | 角色 |
|---|---|---|
| 192.168.150.101 | 7001 | master |
| 192.168.150.101 | 7002 | master |
| 192.168.150.101 | 7003 | master |
| 192.168.150.101 | 8001 | slave |
| 192.168.150.101 | 8002 | slave |
| 192.168.150.101 | 8003 | slave |
# 4.2. 准备实例和配置
删除之前的 7001、7002、7003 这几个目录,重新创建出 7001、7002、7003、8001、8002、8003 目录:
# 进入 /tmp 目录 | |
cd /tmp | |
# 删除旧的,避免配置干扰 | |
rm -rf 7001 7002 7003 | |
# 创建目录 | |
mkdir 7001 7002 7003 8001 8002 8003 |
在 /tmp 下准备一个新的 redis.conf 文件,内容如下:
port 6379 | |
# 开启集群功能 | |
cluster-enabled yes | |
# 集群的配置文件名称,不需要我们创建,由 redis 自己维护 | |
cluster-config-file /tmp/6379/nodes.conf | |
# 节点心跳失败的超时时间 | |
cluster-node-timeout 5000 | |
# 持久化文件存放目录 | |
dir /tmp/6379 | |
# 绑定地址 | |
bind 0.0.0.0 | |
# 让 redis 后台运行 | |
daemonize yes | |
# 注册的实例 ip | |
replica-announce-ip 192.168.150.101 | |
# 保护模式 | |
protected-mode no | |
# 数据库数量 | |
databases 1 | |
# 日志 | |
logfile /tmp/6379/run.log |
将这个文件拷贝到每个目录下:
# 进入 /tmp 目录 | |
cd /tmp | |
# 执行拷贝 | |
echo 7001 7002 7003 8001 8002 8003 | xargs -t -n 1 cp redis.conf |
修改每个目录下的 redis.conf,将其中的 6379 修改为与所在目录一致:
# 进入 /tmp 目录 | |
cd /tmp | |
# 修改配置文件 | |
printf '%s\n' 7001 7002 7003 8001 8002 8003 | xargs -I{} -t sed -i 's/6379/{}/g' {}/redis.conf |
# 4.3. 启动
因为已经配置了后台启动模式,所以可以直接启动服务:
# 进入 /tmp 目录 | |
cd /tmp | |
# 一键启动所有服务 | |
printf '%s\n' 7001 7002 7003 8001 8002 8003 | xargs -I{} -t redis-server {}/redis.conf |
通过 ps 查看状态:
ps -ef | grep redis |
发现服务都已经正常启动:

如果要关闭所有进程,可以执行命令:
ps -ef | grep redis | awk '{print $2}' | xargs kill |
或者(推荐这种方式):
printf '%s\n' 7001 7002 7003 8001 8002 8003 | xargs -I{} -t redis-cli -p {} shutdown |
# 4.4. 创建集群
虽然服务启动了,但是目前每个服务之间都是独立的,没有任何关联。
我们需要执行命令来创建集群,在 Redis5.0 之前创建集群比较麻烦,5.0 之后集群管理命令都集成到了 redis-cli 中。
1)Redis5.0 之前
Redis5.0 之前集群命令都是用 redis 安装包下的 src/redis-trib.rb 来实现的。因为 redis-trib.rb 是有 ruby 语言编写的所以需要安装 ruby 环境。
# 安装依赖 | |
yum -y install zlib ruby rubygems | |
gem install redis |
然后通过命令来管理集群:
# 进入 redis 的 src 目录 | |
cd /tmp/redis-6.2.4/src | |
# 创建集群 | |
./redis-trib.rb create --replicas 1 192.168.150.101:7001 192.168.150.101:7002 192.168.150.101:7003 192.168.150.101:8001 192.168.150.101:8002 192.168.150.101:8003 |
2)Redis5.0 以后
我们使用的是 Redis6.2.4 版本,集群管理以及集成到了 redis-cli 中,格式如下:
redis-cli --cluster create --cluster-replicas 1 192.168.249.128:6379 192.168.249.128:6380 192.168.249.128:6381 192.168.249.128:6382 192.168.249.128:6383 192.168.249.128:6384 |
命令说明:
redis-cli --cluster或者./redis-trib.rb:代表集群操作命令create:代表是创建集群--replicas 1或者--cluster-replicas 1:指定集群中每个 master 的副本个数为 1,此时节点总数 ÷ (replicas + 1)得到的就是 master 的数量。因此节点列表中的前 n 个就是 master,其它节点都是 slave 节点,随机分配到不同 master
运行后的样子:
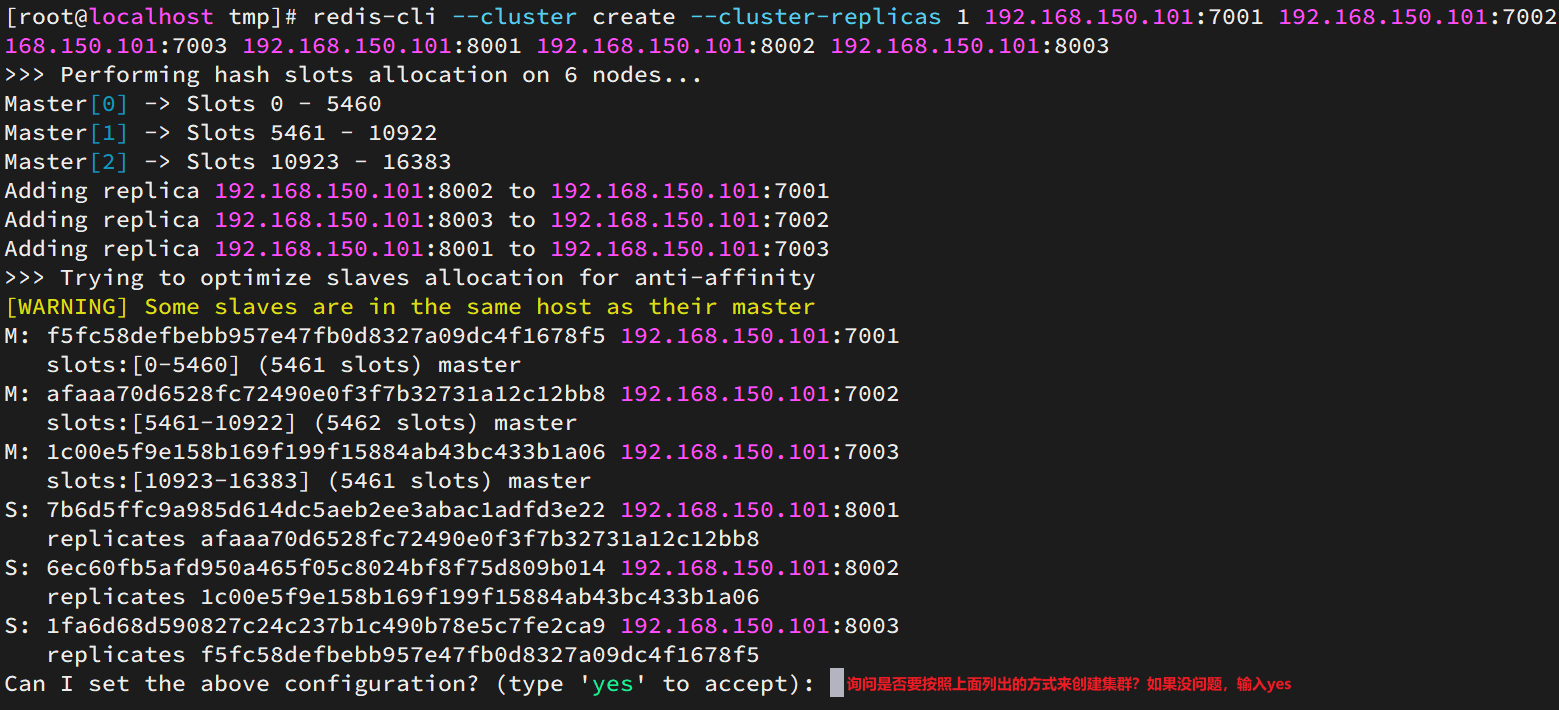
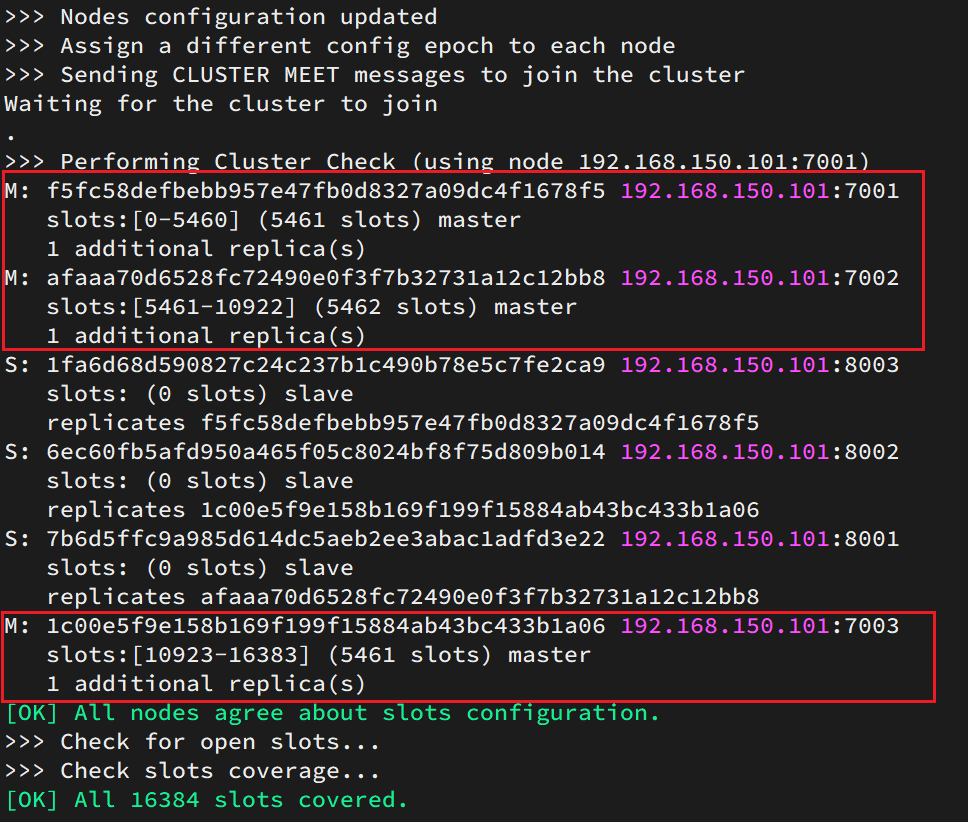
这里输入 yes,则集群开始创建:
[ERR] Not all 16384 slots are covered by nodes.
如果出现上述错误则使用如下命令进行修复:
redis-cli --cluster fix 192.168.249.128:6379 |
通过命令可以查看集群状态:
redis-cli -p 7001 cluster nodes |

# 4.5. 测试
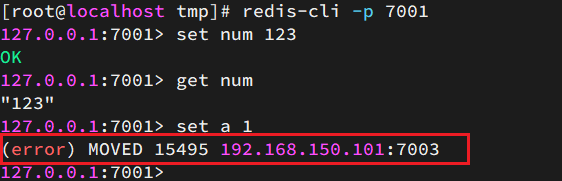
尝试连接 7001 节点,存储一个数据:
# 连接 | |
redis-cli -p 7001 | |
# 存储数据 | |
set num 123 | |
# 读取数据 | |
get num | |
# 再次存储 | |
set a 1 |
结果悲剧了:
集群操作时,需要给 redis-cli 加上 -c 参数才可以:
redis-cli -c -p 7001 |
这次可以了:
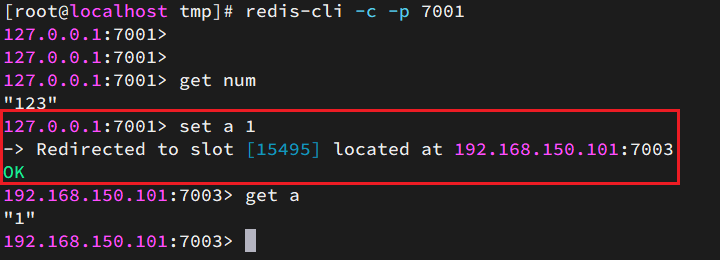
其中的 一段多余的信息是,重定向数据到 15495 插槽中了。这个插槽是根据 a 这个变量来计算的
# 三、散列插槽🎄
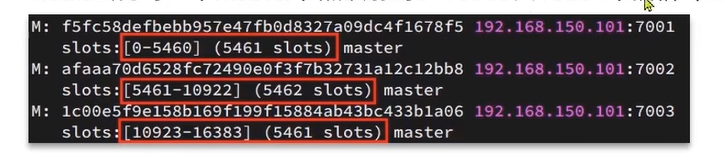
Redis 会把每一个 master 节点映射到 0 ~ 16383 共 16384 个插槽 (hash slot) 上,查看集群信息时就能看到:
数据 key 不是与节点绑定,而是与插槽绑定。Redis 会根据 key 的有效部分计算插槽值,分两种情况:
1、key 中包含 “{}” 且 “{}” 中至少包含 1 个字符,“{}” 中的部分是有效部分
2、key 中不包含 “{}” ,整个 key 都是有效部分
例如:key 是 num,那么就根据 num 计算,如果是 {itcast} num,则根据 itcast 计算。计算方式是利用 CRC16 算法得到一个 hash 值,然后对 16384 取余,得到的结果就是 slot 值。
为什么 key 要去跟插槽绑定,而不是跟节点绑定?
因为 redis 主节点可能出现宕机的情况或者是集群扩容增加了节点再或者是删除节点。
如果一个节点删除或者宕机了那么它上面的数据跟着丢了,而如果数据是跟插槽绑定的,当节点宕机时,我们可以将这个节点对应的插槽转移到活着的节点上。集群扩容时我们也可以将插槽进行转移。
这样数据跟着插槽走,永远都能够找到数据所在位置,这就是数据跟插槽绑定的原因了。
总结:
Redis 如何判断某个 kkey 应该在哪个实例?
- 将 16384 个插槽分配到不同的实例
- 根据 key 的有效部分计算哈希值,对 16384 取余
- 余数作为插槽,寻找插槽所在实例即可
问题:
如何将同一类数据固定的保存在同一个 Redis 实例?
这一类数据使用相同的有效部分,例如 key 都以 {typeId} 为前缀
# 四,集群伸缩🎄
# 4.1、添加一个节点到集群🌳
redis-cli --cluster 提供了很多操作集群的命令,可以通过下面方式查看:
[root@localhost bin]# redis-cli --cluster help | |
Cluster Manager Commands: | |
create host1:port1 ... hostN:portN | |
--cluster-replicas <arg> | |
check host:port | |
--cluster-search-multiple-owners | |
info host:port | |
fix host:port | |
--cluster-search-multiple-owners | |
--cluster-fix-with-unreachable-masters |
比如,添加节点命令:
[root@localhost bin]# redis-cli --cluster help | |
add-node new_host:new_port existing_host:existing_port | |
--cluster-slave | |
--cluster-master-id <arg> |
# 4.1.1、案例,向集群中添加一个小新的 master 节点,并向其中存储 num = 10
需求:
1、启动一个新的 redis 实例,端口为 7004
2、添加 7004 到之前的集群,并作为一个 master 节点
3、给 7004 节点分配插槽,使得 num 这个 key 可以存储到 7004 实例
步骤:
1、创建新 redis 实例的配置文件
[root@localhost bin]# cp configs/6379.conf configs/7004.conf | |
[root@localhost bin]# ls configs/ | |
6379.conf 6380.conf 6381.conf 6382.conf 6383.conf 6384.conf 7004.conf | |
[root@localhost bin]# |
2、将 7004.conf 配置文件中的所有端口号改为 7004
[root@localhost bin]# sed -i s/6379/7004/g configs/7004.conf
2.1、查看修改情况
# Accept connections on the specified port, default is 7004 (IANA #815344).
# If port 0 is specified Redis will not listen on a TCP socket.
port 7004
3、运行这个 redis 实例
[root@localhost bin]# vim configs/7004.conf | |
[root@localhost bin]# redis-server configs/7004.conf | |
[root@localhost bin]# ps -ef | grep redis | grep -v grep | |
root 51922 1 0 Oct18 ? 00:00:19 redis-server *:6379 [cluster] | |
root 51964 1 0 Oct18 ? 00:00:18 redis-server *:6380 [cluster] | |
root 51983 1 0 Oct18 ? 00:00:23 redis-server *:6381 [cluster] | |
root 52001 1 0 Oct18 ? 00:00:17 redis-server *:6382 [cluster] | |
root 52025 1 0 Oct18 ? 00:00:23 redis-server *:6383 [cluster] | |
root 52043 1 0 Oct18 ? 00:00:17 redis-server *:6384 [cluster] | |
root 116920 1 0 01:41 ? 00:00:00 redis-server *:7004 [cluster] | |
[root@localhost bin]# |
4、将 7004 这个新 redis 实例添加成为集群中的一个节点
[root@localhost bin]# redis-cli --cluster add-node 192.168.249.128:7004 192.168.249.128:6379 | |
>>> Adding node 192.168.249.128:7004 to cluster 192.168.249.128:6379 | |
>>> Performing Cluster Check (using node 192.168.249.128:6379) | |
S: 74ea48fd9c233b0e4c46f52d00535f040917be36 192.168.249.128:6379 | |
slots: (0 slots) slave | |
replicates 022d61ad3fb65399d711408bcec5b54068a601b0 | |
S: 25b42825643381d41525c1951f112766b912baa7 192.168.249.128:6380 | |
slots: (0 slots) slave | |
replicates 8cae694bd787bad63ab9dab15f397c34131f2a12 | |
S: c4d2d8841cb4c801f755e2d95559221229ba7649 192.168.249.128:6382 | |
slots: (0 slots) slave | |
replicates 74ea48fd9c233b0e4c46f52d00535f040917be36 | |
M: 8cae694bd787bad63ab9dab15f397c34131f2a12 192.168.249.128:6383 | |
1 additional replica(s) | |
M: 022d61ad3fb65399d711408bcec5b54068a601b0 192.168.249.128:6381 | |
2 additional replica(s) | |
S: 34d086276e2a3790b72503c5d877a2d2b26020ff 192.168.249.128:6384 | |
slots: (0 slots) slave | |
replicates 022d61ad3fb65399d711408bcec5b54068a601b0 | |
[OK] All nodes agree about slots configuration. | |
>>> Check for open slots... | |
>>> Check slots coverage... | |
[OK] All 16384 slots covered. | |
>>> Send CLUSTER MEET to node 192.168.249.128:7004 to make it join the cluster. | |
[OK] New node added correctly. |
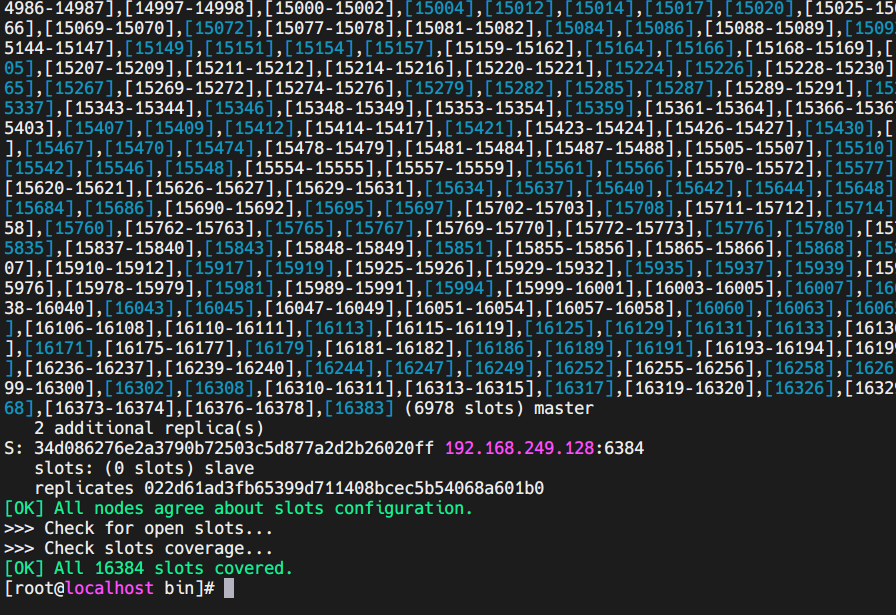
7004 成功的加入到了集群当中了
5、将插槽重新分片
[root@localhost bin]# redis-cli --cluster reshard 192.168.249.128:6379 | |
>>> Performing Cluster Check (using node 192.168.249.128:6379) | |
S: 74ea48fd9c233b0e4c46f52d00535f040917be36 192.168.249.128:6379 | |
slots: (0 slots) slave | |
replicates 022d61ad3fb65399d711408bcec5b54068a601b0 | |
S: 25b42825643381d41525c1951f112766b912baa7 192.168.249.128:6380 | |
slots: (0 slots) slave | |
replicates 8cae694bd787bad63ab9dab15f397c34131f2a12 | |
S: c4d2d8841cb4c801f755e2d95559221229ba7649 192.168.249.128:6382 | |
slots: (0 slots) slave | |
replicates 74ea48fd9c233b0e4c46f52d00535f040917be36 | |
M: 34b1a846b72cbb3bdae35fb30567ddba8bf2d5d3 192.168.249.128:7004 | |
slots: (0 slots) master | |
M: 8cae694bd787bad63ab9dab15f397c34131f2a12 192.168.249.128:6383 | |
1 additional replica(s) | |
M: 022d61ad3fb65399d711408bcec5b54068a601b0 192.168.249.128:6381 | |
2 additional replica(s) | |
S: 34d086276e2a3790b72503c5d877a2d2b26020ff 192.168.249.128:6384 | |
slots: (0 slots) slave | |
replicates 022d61ad3fb65399d711408bcec5b54068a601b0 | |
[OK] All nodes agree about slots configuration. | |
>>> Check for open slots... | |
>>> Check slots coverage... | |
[OK] All 16384 slots covered. | |
# 移动插槽的数量 | |
How many slots do you want to move (from 1 to 16384)? 3000 | |
# 接收插槽数据的 id | |
What is the receiving node ID? 34b1a846b72cbb3bdae35fb30567ddba8bf2d5d3 | |
Please enter all the source node IDs. | |
Type 'all' to use all the nodes as source nodes for the hash slots. | |
Type 'done' once you entered all the source nodes IDs. | |
# 发送插槽数据的 id | |
Source node #1: 8cae694bd787bad63ab9dab15f397c34131f2a12 | |
# 完成! | |
Source node #2: done | |
Ready to move 3000 slots. | |
Source nodes: | |
M: 8cae694bd787bad63ab9dab15f397c34131f2a12 192.168.249.128:6383 | |
1 additional replica(s) | |
Destination node: | |
M: 34b1a846b72cbb3bdae35fb30567ddba8bf2d5d3 192.168.249.128:7004 | |
slots: (0 slots) master | |
Resharding plan: | |
Moving slot 0 from 8cae694bd787bad63ab9dab15f397c34131f2a12 | |
Moving slot 1 from 8cae694bd787bad63ab9dab15f397c34131f2a12 | |
... | |
Moving slot 5217 from 8cae694bd787bad63ab9dab15f397c34131f2a12 | |
Moving slot 5218 from 8cae694bd787bad63ab9dab15f397c34131f2a12 | |
Do you want to proceed with the proposed reshard plan (yes/no)? yes | |
Moving slot 0 from 192.168.249.128:6383 to 192.168.249.128:7004: | |
Moving slot 1 from 192.168.249.128:6383 to 192.168.249.128:7004: | |
Moving slot 2 from 192.168.249.128:6383 to 192.168.249.128:7004: | |
... |
通过 get num 看出 它自动切换到了 6381 集群节点去了,set num 这时 num 就已经存在 7004 这个集群节点上了
[root@localhost bin]# redis-cli -c -p 7004 | |
127.0.0.1:7004> ping | |
PONG | |
127.0.0.1:7004> get num | |
-> Redirected to slot [2765] located at 192.168.249.128:6381 | |
"123" | |
192.168.249.128:6381> set num 10 | |
OK | |
192.168.249.128:6381> |
这就是说数据是跟着插槽走的
# 五,故障转移🎄
当集群中有一个 master 宕机会发生什么呢?
[root@localhost bin]# redis-cli -p 6380 shutdown
[root@localhost bin]#
可以看到 6380 节点被停止后 7004 变成了主节点
74ea48fd9c233b0e4c46f52d00535f040917be36 192.168.249.128:6379@16379 myself,slave 022d61ad3fb65399d711408bcec5b54068a601b0 0 1697697326000 10 connected | |
25b42825643381d41525c1951f112766b912baa7 192.168.249.128:6380@16380 slave,fail 8cae694bd787bad63ab9dab15f397c34131f2a12 1697697296140 1697697292000 9 disconnected | |
c4d2d8841cb4c801f755e2d95559221229ba7649 192.168.249.128:6382@16382 slave 74ea48fd9c233b0e4c46f52d00535f040917be36 0 1697697327000 1 connected | |
34b1a846b72cbb3bdae35fb30567ddba8bf2d5d3 192.168.249.128:7004@17004 master - 0 1697697326309 11 connected |
当它回来的时候就是 slave 了

由此可以看出我们不需要哨兵,Redis 自动具备主从的故障切换
这是自动的故障转移,有一个机器意外宕机了需要选出一个主。
但是有的时候我们需要手动故障转移。比如说:机器升级
# 5.1、手动故障转移🌳
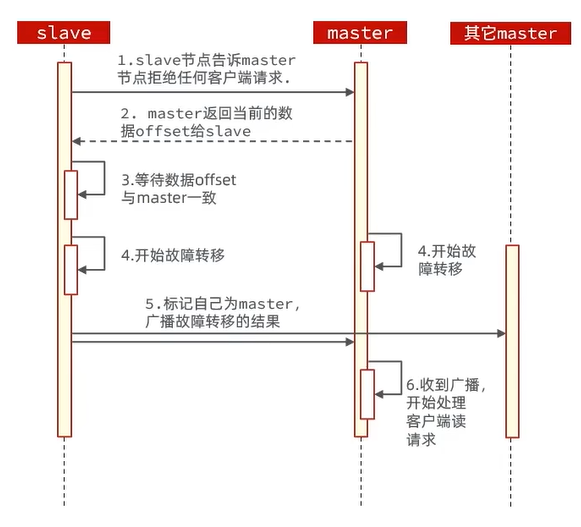
利用 cluster failover 命令可以手动让集群中的某个 master 宕机,切换到 cluster failover 命令的这个 slave 节点,实现无感知的数据迁移。其流程如下:
手动的 Failover 支持三种不同模式:
1、缺省:默认的流程,如图 1 ~ 6 步
2、force:省略了对 offset 的一致性校验
3、takeover:直接执行第 5 步,忽略数据一致性,忽略 master 状态和其它 master 的意见
# 5.2、案例,在 6380 这个 slave 节点执行手动故障转移,重新夺回 master 地位🌳
步骤如下:
1、利用 redis-cli 连接 6380 这个节点
[root@localhost bin]# redis-cli -p 6380 |
2、执行命令
127.0.0.1:6380> cluster failover | |
OK | |
127.0.0.1:6380> |
完成
25b42825643381d41525c1951f112766b912baa7 192.168.249.128:6380@16380 master - 0 1697698095838 12 connected |
# 六,RedisTemplate 访问分配集群🎄
RedisTempalte 底层同样基于 lettuce 实现了分片集群的支持,而使用的步骤与哨兵模式基本一致:
1、引入 redis 的 starter 依赖
<dependency> | |
<groupId>org.springframework.boot</groupId> | |
<artifactId>spring-boot-starter-data-redis</artifactId> | |
</dependency> |
2、配置分片集群地址
spring: | |
redis: | |
cluster: | |
nodes: # 指定分配集群的每一个节点信息 | |
- 192.168.249.128:6379 | |
- 192.168.249.128:6380 | |
- 192.168.249.128:6381 | |
- 192.168.249.128:6382 | |
- 192.168.249.128:6383 | |
- 192.168.249.128:6384 | |
- 192.168.249.128:7004 |
3、配置读写分离
@Bean | |
public LettuceClientConfigurationBuilderCustomizer configurationBuilderCustomizer() | |
{ | |
return clientConfigurationBuilder -> clientConfigurationBuilder.readFrom(ReadFrom.REPLICA_PREFERRED); | |
} |
与哨兵模式相比,其中只有分片集群的配置方式略有差异,如下:
测试获取数据
[channel=0x1291f995, /192.168.249.1:6999 -> /192.168.249.128:6379, chid=0x9] Stack contains: 1 commands |
测试设置数据
[channel=0xff704bc2, /192.168.249.1:7000 -> /192.168.249.128:6381, chid=0xa] Stack contains: 1 commands |